Posted: Sun Apr 04, 2010 5:41 pm
Size: 1600x1200 Views: 480
Rating: Not rated
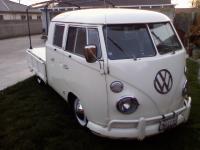
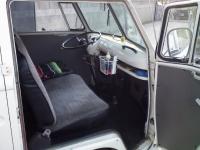
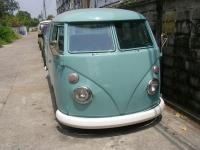
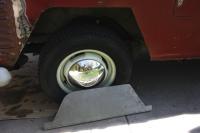
Installing DC Truck roof/ceiling panels in Joe's 66 light grey DC Clara
Ceiling installed. :)
Did mark the paint a little by the outer edge.
Probably should have slipped some cloth in between the panel and the metal.
Other than that, I though it turned out great.
This took threee hours, including installing the insulation. View other images: From Clara Search Forums for photo
Posted: Sun Apr 04, 2010 5:41 pm
Size: 1600x1200 Views: 339
Rating: Not rated
Installing DC Truck roof/ceiling panels in Joe's 66 light grey DC Clara
Installing the four trim strips.
The rear two are longer and are shaped to fit around the dome light.
The pencil marks show where the hole in the metal above the panels is.
Start with the screw nearest the middle of the bus, then work out to the edge .
I poked a hole in the trim strip, then installed a screw. Repeat till done.
The pencil marks wipe off easily. View other images: From Clara Search Forums for photo
Posted: Sun Apr 04, 2010 5:41 pm
Size: 1600x1200 Views: 699
Rating: Not rated
Installing DC Truck roof/ceiling panels in Joe's 66 light grey DC Clara
To install the rear roof panel, start by fitting one side (driver side is easiest) into the inner gutter channel.
Then, bend it into an M with the middle sagging down. You must hold it in the channel while bending the panel.
With an M, both sides point down, and the middle flexes down.
We found it tricky to get the middle flexing down, and ended up putting some pieces of wood in there to help bend the mmmmmiddle of the M down.
***(Do not try to install it as an S on its side. It needs to be an M.) ***
Then the other person gets the second leg of the M, on the passenger side, above the inner rain gutter, then drops it into the right channel.
At this point it ended up being a little too far forward on the right hand side, so we tapped the rear roof panel back, with a rubber mallet and a piece of wood as a drift. Pulled the panel a little down at the side right by the inner rain gutter to get space to set the wooden drift. We left the wood above the panel in there to relieve the stress of the bend on the panel, which made it easier to shift it back.
After it was in the right forward/back location, we removed the wood and the center of the M popped up to make an upside down U.
This is most definitely a two person job. One person in the back seat, one in the front.
This is the same idea for the SC rear roof panel, or the DC middle roof panel. It is easier with the smaller panel, as the middle flexes down more easily. It's still a two person job, though. View other images: From Clara Search Forums for photo
Posted: Sun Apr 04, 2010 5:32 pm
Size: 1200x1600 Views: 360
Rating: Not rated
Installing DC Truck roof/ceiling panels in Joe's 66 light grey DC Clara
Front and middle panel installed.
You can see the screw holes on the metal ridge wher ethe center and back panels will meet. Make pencil marks (parallel to direction of travel) to make it easy to find those screw holes later. View other images: From Clara Search Forums for photo
Posted: Sun Apr 04, 2010 5:32 pm
Size: 1600x1200 Views: 238
Rating: Not rated
Installing DC Truck roof/ceiling panels in Joe's 66 light grey DC Clara
First panels you install are the little ones in front.
Before installing the middle roof panel, remove the dome light.
You might want to just completely take it out, rather than leave it hanging.
To install the middle roof panel, just one side (driver side is easiest) in the channel, bend it into an M with the middle sagging down, while the other person gets the leg of the M on the passenger side above the inner rain gutter, then drops it into the right channel. Then the center of the M can be popped up to make an upside down U.
Next you can tap it forward to set it right up against the forward ceiling panels.
This is really a two person job. View other images: From Clara Search Forums for photo
Posted: Sun Apr 04, 2010 5:32 pm
Size: 1600x1200 Views: 266
Rating: Not rated
Installing DC Truck roof/ceiling panels in Joe's 66 light grey DC Clara
First panels you install are the little ones in front.
Make sure the channels in front, and on both sides wont pinch the panel.
Get the panel in the channel on the door side, then bend teh panel and slip it in the channel on the air vents side. Push it forward. At some point you need to get out the rubber mallet and tap it forward. tap on the left back edge, then the right, to keep it from tilting to one side.
When you get close to the front you may need a hook to pull the front sge down so it fits into the front channel.
YOU WILL NEED TO GET THE FRONT PANELS SEATED ALL THE WAY FORWARD. View other images: From Clara Search Forums for photo
Posted: Sun Apr 04, 2010 5:21 pm
Size: 1600x1200 Views: 319
Rating: Not rated
Installing DC Truck roof/ceiling panels in Joe's 66 light grey DC Clara
See that ridge in the inner rain gutter, that is inboard of the Reflectix foil insulation?
The roof panel fits in the channel between the ridge and the inner lip, NOT between the ridge and the outer skin of the roof. View other images: From Clara Search Forums for photo
Posted: Sun Apr 04, 2010 5:21 pm
Size: 1200x1600 Views: 325
Rating: Not rated
Installing DC Truck roof/ceiling panels in Joe's 66 light grey DC Clara
Two layers of foil bubble wrap Reflectix insulation.
It is adhered with masking tape in loops sticky side out, and some strips at the edges between the front and middle sections View other images: From Clara Search Forums for photo
Posted: Sun Apr 04, 2010 5:21 pm
Size: 1600x1200 Views: 378
Rating: Not rated
Installing DC Truck roof/ceiling panels in Joe's 66 light grey DC Clara
Joe cutting out the foil covered bubble wrap Reflectix insulation. View other images: From Clara Search Forums for photo
All times are Mountain Standard Time/Pacific Daylight Savings Time Page 366 of 531
You cannot upload new pics in this category You cannot rate pics in this category You cannot edit your pics and comments in this category You cannot delete your pics and comments in this category