| Author |
Message |
Joey
Samba Member

Joined: August 12, 2005
Posts: 5366
Location: Nova Scotia - Canada

|
 Posted: Tue Sep 19, 2006 2:19 am Post subject: Bay Window Front Nose Replacment Posted: Tue Sep 19, 2006 2:19 am Post subject: Bay Window Front Nose Replacment |
 |
|
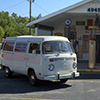
I'm replacing the hole front of the van..
because there is some rust   with this one. with this one.
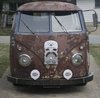
There's no turning back now!
The new nose on.
Here's how I welded the inner structure of the 'A' pillars:
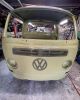
And here are the finish pillars:
The glass will go in Wednesday. Hope it fits  . .
_________________
Joey
60 Kombi - '74 Bus - '79 Panel - '65 Beetle |
|
| Back to top |
|
 |
onion456
Samba Member

Joined: September 09, 2006
Posts: 674
Location: Houston, TX
|
| Posted: Tue Sep 19, 2006 4:10 am Post subject: |
|
|
looks great!
omg, i just *know* thats what mine looks like under the windshield seal.. *gulp*
cant wait to learn to weld... again looks great, thanks for sharin the pics! |
|
| Back to top |
|
|
dickcharlton
Samba Member

Joined: February 09, 2004
Posts: 257
Location: Victoria, B.C., Cold Canada
|
| Posted: Tue Sep 19, 2006 12:44 pm Post subject: |
|
|
I need to do that too. I'm dreading it.  |
|
| Back to top |
|
|
MarkWard
Samba Member

Joined: February 09, 2005
Posts: 17153
Location: Retired South Florida
|
| Posted: Tue Sep 19, 2006 1:22 pm Post subject: |
|
|
| I cut the nose off of a 71 destined for the crusher for my 68. When I actually got to looking at the windshield area along with the dents from the bumper guards, I am now leaning towards a replacement panel. Hope the windshield fits up nice for you. |
|
| Back to top |
|
|
Joey
Samba Member
Joined: August 12, 2005
Posts: 5366
Location: Nova Scotia - Canada
|
| Posted: Thu Sep 21, 2006 6:43 pm Post subject: |
|
|
The windshield is in ...sort of, it's a bit off center, toward the drivers side too much. I'll have to see if I can push it over somehow or maybe it'll settle in over time ..if not ..oh well. Top to bottom fits good though!
The doors are back on as well and line up perfectly.
The hardest part of the whole job was getting the wire for the dome light down the "A" pillar ..go figure!
_________________
Joey
60 Kombi - '74 Bus - '79 Panel - '65 Beetle |
|
| Back to top |
|
|
Joey
Samba Member
Joined: August 12, 2005
Posts: 5366
Location: Nova Scotia - Canada
|
| Posted: Tue Oct 17, 2006 12:47 pm Post subject: |
|
|
Here the finished product ..well, sort of.
Here's the pillars - no filler, just grounded down metal.
As you can see I'm not concerned about matching colors .
I still have a few spots to cover-up with some paint to protect from rust. I'm gonna give it a paint job next year ...flat black  hides everthing. hides everthing.
This van is only driven in the winter, so looks is not too important.
_________________
Joey
60 Kombi - '74 Bus - '79 Panel - '65 Beetle |
|
| Back to top |
|
|
Adventurewagen
Samba Member

Joined: April 14, 2003
Posts: 1583
Location: Seattle
|
| Posted: Tue Oct 17, 2006 1:28 pm Post subject: |
|
|
Wow. Very nice. I'm in the process of filling my horribly dented front end with pounds of bondo for now and covering up the rust spots more or less. I took off the front wheel and decided i'd fix it up just a bit between now and when i cut off the front like you.
Any trouble detaching the dash and internal front pieces from the nose? Anything you would have done differently with cuts, welds or just plain anything?
Did you use an oxyacetylene torch for the welds? Great post.
_________________
63 Gulf Blue Notch
71 Sierra Yellow Adventurewagen |
|
| Back to top |
|
|
Joey
Samba Member
Joined: August 12, 2005
Posts: 5366
Location: Nova Scotia - Canada
|
| Posted: Tue Oct 17, 2006 2:38 pm Post subject: |
|
|
| Adventurewagen wrote: |
| Any trouble detaching the dash and internal front pieces from the nose? Anything you would have done differently with cuts, welds or just plain anything? |
The dash, vents, fusebox etc. just unscrews from the front of the van. Just keep track of what screw goes where. There was only one wire that I had to cut and splice back together - the rest just unplugged.
Everything went well ..wasn't really that difficult at all.
Take a lot of measurements from lots of different places for reference. examples: between the two door hinges on each pillar (14 1/16" if I remember correctly), top door hinge to the 'B' pillar. For the windshield opening, I found the middle of both the top and bottom of the opening and measured there vertically. Also from the middle I measured 22" over (left & right, both top and bottom) then measured vertically there.
The more reference points the better. When preparing the new nose, cut it oversized to fit at first then use a grinder take a bit off at a time until it fits just right ..measure 10 times - cut once! (my windshield opening ended up being 1/32" bigger ..not too bad!).
I cut the 'new' front nose from my old 79 westy over five years ago ..it took me this long to build up the courage to do this!
I used a MIG welder.
_________________
Joey
60 Kombi - '74 Bus - '79 Panel - '65 Beetle
Last edited by Joey on Tue Oct 17, 2006 2:41 pm; edited 1 time in total |
|
| Back to top |
|
|
barefootwestie
Samba Member
Joined: September 19, 2005
Posts: 1551
Location: Johns Island, SC
|
| Posted: Tue Oct 17, 2006 2:40 pm Post subject: |
|
|
Boy, in that 4th picture, you should have some great airflow. Only thing missing would be a flashlight in your lap to warn the oncoming drivers.
_________________
My Bus Restoration Blog
https://myvolkswagenbus.com/
1973 Westfalia
"Getting better....one repair at a time."
Other VW's owned through the years, in no particular order:
'67 Beetle,
'67 Ghia Hardtop,
'72 Ghia Convertible,
'72 Westfalia |
|
| Back to top |
|
|
dwill49965
Samba Member

Joined: August 08, 2005
Posts: 1396
Location: Dartmouth, Nova Scotia
|
| Posted: Tue Oct 17, 2006 2:48 pm Post subject: |
|
|
Looks great, Joey. Nice job.
_________________
Darryl
--------------
'78 Westy, Boston Bob built 2.0 L, FI, MSD 6A
| Meyer wrote: |
| Lastly, you just referred to US citizens as 'Americans'. Exactly what kind of Canadian are you? From what continent? |
|
|
| Back to top |
|
|
gmag69
Type2 Nutcase

Joined: January 13, 2006
Posts: 1941
Location: northwest PA
|
| Posted: Tue Oct 17, 2006 11:24 pm Post subject: |
|
|
[quote="56ovalbug"]Here the finished product ..well, sort of.
ol: .
Man that is sweet.  I'm going to be putting a new nose skin on my 78 hopefully next spring. I'm going with a repo one from BD. The only bad thing is it's going to cost me almost as much to ship it as it is for the nose itself. It will be worth it though. I'm probably going to get new rear quarters too and the middle rocker with the lower sliding door track already attached. I'd like to open my slider without it falling off all the time. It will be worth it in the end though. I still have to get the gallon of bondo off the drivers side floor that someone put on there and see how bad it is. Looks like that Mario guy they've been talking about in the Rants worked on it. Can't wait to get it solid again. It is a labor of love and another bus saved from the crusher. I'm going to be putting a new nose skin on my 78 hopefully next spring. I'm going with a repo one from BD. The only bad thing is it's going to cost me almost as much to ship it as it is for the nose itself. It will be worth it though. I'm probably going to get new rear quarters too and the middle rocker with the lower sliding door track already attached. I'd like to open my slider without it falling off all the time. It will be worth it in the end though. I still have to get the gallon of bondo off the drivers side floor that someone put on there and see how bad it is. Looks like that Mario guy they've been talking about in the Rants worked on it. Can't wait to get it solid again. It is a labor of love and another bus saved from the crusher.
Geno 
_________________
Check out my Westy resto. thread.
http://www.thesamba.com/vw/forum/viewtopic.php?t=230285 |
|
| Back to top |
|
|
i_am_cool_fred
Samba Member
Joined: June 26, 2004
Posts: 1743
Location: Benton, AR
|
| Posted: Tue May 22, 2007 11:35 am Post subject: |
|
|
the before pictures would fall into the "when is a bay to far gone" thread. but man that finished product makes anything look like it has potential. good work
_________________
proud owner of a defunct 1979 sunroof kombi
Brian Denning, as seen on Gearz TV |
|
| Back to top |
|
|
jeston
Samba Member
Joined: July 22, 2004
Posts: 14
Location: seattle, WA
|
| Posted: Sun Sep 23, 2007 10:34 am Post subject: Rust protection iside frames? |
|
|
| How do you protect against rust inside the frames and between metal pieces you weld together. I am doing a lot of work repairing some frames and floor sections on my bus and now that I have it all cut out and am ready to put it back together I want to do it right. For example I am replacing a U-chanel that connects to the rear outrigger to make a completely closed section and I am wandering how to protect the inside of the section. I bought it from Wolfsburg West and it comes with a primer on it but I am worried that when I weld it the Heat affected Zone will destroy the paint and welds rust so quickly. Do you use any corrosion protection between flanges and inside channels? |
|
| Back to top |
|
|
VWsArent4Hippies
Samba Member
Joined: April 13, 2005
Posts: 3079
Location: The Bull City
|
| Posted: Sun Sep 23, 2007 10:43 am Post subject: Re: Rust protection iside frames? |
|
|
| jeston wrote: |
| How do you protect against rust inside the frames and between metal pieces you weld together. I am doing a lot of work repairing some frames and floor sections on my bus and now that I have it all cut out and am ready to put it back together I want to do it right. For example I am replacing a U-chanel that connects to the rear outrigger to make a completely closed section and I am wandering how to protect the inside of the section. I bought it from Wolfsburg West and it comes with a primer on it but I am worried that when I weld it the Heat affected Zone will destroy the paint and welds rust so quickly. Do you use any corrosion protection between flanges and inside channels? |
Weld through primer.
_________________
| aeromech wrote: |
| in my opinion you don't know shit |
|
|
| Back to top |
|
|
waterboy
Samba Member
Joined: January 19, 2006
Posts: 233
Location: Lake county, california
|
| Posted: Sun Sep 23, 2007 11:08 am Post subject: |
|
|
| I have to do the same with mine, it's only the small panel piece directly under the windshield and not the entire skin. Question, what is the best way to cut the old metal out? Sawzall with metal blade? Or some other tool? |
|
| Back to top |
|
|
Joey
Samba Member
Joined: August 12, 2005
Posts: 5366
Location: Nova Scotia - Canada
|
| Posted: Sun Sep 23, 2007 3:34 pm Post subject: |
|
|
All I used was a drill to drill out the spotwelds and a hacksaw to cut the 'A' Pillars, the rest was rusted free  . .
An angle grinder with a cut-off wheel or a sawzall will work too.
_________________
Joey
60 Kombi - '74 Bus - '79 Panel - '65 Beetle |
|
| Back to top |
|
|
VOLKSWAGNUT
Fastest VW Belt Changer

Joined: October 14, 2007
Posts: 11056
Location: Flippin' a Belt........ .... Off-n-On ... NC USA
|
| Posted: Tue Mar 31, 2009 9:08 am Post subject: |
|
|
Do you know if it can be transfered including the lower inner nose support? Or is it better to repair the lower inner support then transfer the outter skin or nose?
_________________
aka Ken {o\!/o}
Its your vehicle- stop askin' for approval-do what YOU like for cryin' out loud
Better to roll em' how you want and wear em' out-than lettin' em' rot out
Its about the going not the showing
Rebuilt to drive not decorate
WANTED: Local Eatin' Joints, Triple D for TheSamba contributions here http://www.thesamba.com/vw/forum/viewtopic.php?t=570510
Search "VOLKSWAGNUT" on YouTube since you cant watch a "certain" BELT change video round here
Usually and often edited |
|
| Back to top |
|
|
Joey
Samba Member
Joined: August 12, 2005
Posts: 5366
Location: Nova Scotia - Canada
|
| Posted: Tue Sep 13, 2011 2:54 pm Post subject: |
|
|
Well, it's been five years sine I replaced the nose on my '79 panel and it looks like it needs to be repaired already. I removed the windshield and found some rust. Not as much as I thought there would be but enough. I have the Gerson panel for the bottom but I'll have to make the pieces for the other rust holes. The perils of road salt....
Pics of the repair coming soon...
_________________
Joey
60 Kombi - '74 Bus - '79 Panel - '65 Beetle |
|
| Back to top |
|
|
babysnakes
Samba Member
Joined: August 19, 2008
Posts: 7106
|
| Posted: Tue Sep 13, 2011 3:26 pm Post subject: |
|
|
| Joey, you are a true bus pilot. |
|
| Back to top |
|
|
EZ Gruv
King of Plaid

Joined: December 10, 2002
Posts: 8544
Location: Las Vegas
|
| Posted: Tue Sep 13, 2011 3:53 pm Post subject: |
|
|
Damn, time to move.
_________________
Eric
1977 Deluxe Westfalia - 2.0L FI Type IV, Completely Original
Photographer for HotVWs, VolksWorld, AirMighty, VW Camper & Commercial, Hayburner, and more.
My Photography Page. |
|
| Back to top |
|
|
|


