| Author |
Message |
txoval
Samba Member
Joined: January 23, 2004
Posts: 3552
Location: The Woodlands, TX

|
 Posted: Sat Apr 27, 2013 6:37 am Post subject: Engine Build - 54 Posted: Sat Apr 27, 2013 6:37 am Post subject: Engine Build - 54 |
 |
|
Beginning of my 36HP Engine Build
DPR Counterweighted Crank
Case getting ready for reassembly
|
|
| Back to top |
|
 |
txoval
Samba Member
Joined: January 23, 2004
Posts: 3552
Location: The Woodlands, TX
|
| Posted: Sat Apr 27, 2013 6:45 am Post subject: |
|
|
Engine Specs:
Standard Bore and Stroke
DPR CW Crank with 14lb flywheel
Aircooled Research Stage 2 Cam with straight cut gears
Ported/Polished stock heads (33mm Intake and 30mm exhaust)
Full Flow, with 1.5 qt sump
Speedwell Blower w/ 31 pict 1 carb
header with baffled stinger
More pictures to follow |
|
| Back to top |
|
|
henry roberts
Samba Member

Joined: February 24, 2003
Posts: 1275
Location: australia

|
| Posted: Sat Apr 27, 2013 7:35 am Post subject: |
|
|
sounds nice, i'll be watching this one eagerly.
spotto bronze bushed lifters and case savers. any other case mods?
did you bush the lifter bores to reclaim the case? to reduce case wear with a more agressive cam? or for another reason? |
|
| Back to top |
|
|
txoval
Samba Member
Joined: January 23, 2004
Posts: 3552
Location: The Woodlands, TX
|
| Posted: Sat Apr 27, 2013 8:07 am Post subject: |
|
|
Thanks for the comments
Lifter bores were close to spec limit, decided to use bronze inserts for "safety" and ultimately strength
Case savers were installed due to the addition of the blower and 8lbs of boost, extra insurance
I had the case machined for an oil (sand) seal at the pulley.
Besides that, normal align bore, thrust cut (just due to bearing availability, case was in good shape at STD) resurfaced the cylinder surface as well
I had DPR balance the crank, flywheel, and pressure plate (pinned) together as well |
|
| Back to top |
|
|
txoval
Samba Member
Joined: January 23, 2004
Posts: 3552
Location: The Woodlands, TX
|
| Posted: Sat Apr 27, 2013 9:54 am Post subject: |
|
|
Update Pics:
Crank gears assembled, waiting on rods bearings (Monday)
The car (B&W)
Color
up close (to do the paint justice) |
|
| Back to top |
|
|
pig-pen
Samba Member

Joined: December 04, 2012
Posts: 570
Location: United Kingdom
|
| Posted: Sat Apr 27, 2013 2:06 pm Post subject: |
|
|
I like very much.
Real nice. |
|
| Back to top |
|
|
RichardinNZ
Samba Member

Joined: September 16, 2011
Posts: 280
Location: Auckland, New Zealand
|
|
| Back to top |
|
|
txoval
Samba Member
Joined: January 23, 2004
Posts: 3552
Location: The Woodlands, TX
|
| Posted: Sat Apr 27, 2013 7:45 pm Post subject: |
|
|
Rims are smoothies widened to 6" and powder coated gloss black
All suspension, brake parts (including drums), pan are powder coated gloss black
Tires are 205/65 R15's - Falken Tires
Lug bolts are coated silver, my hubcaps are gloss black with white VW vinyl inserts |
|
| Back to top |
|
|
Roadcow
Samba Member
Joined: November 14, 2003
Posts: 1012
Location: Stockton, Ca. area
|
| Posted: Sat Apr 27, 2013 11:14 pm Post subject: |
|
|
Be careful with the powder coated wheels, the lug holes need to have the powder sanded out or the lugs when tightened will break out the powder and become loose. Looking forward to pictures.
_________________
71 Westy Roadcow
67 Panel
63 Bug
66 Ghia Bonneville 2014
74 Ghia Vert
69 Bonneville Ghia 150 in Chico
69 Bonneville Ghia in Ireland
80 Cabby 2.1 16v
98 Passat |
|
| Back to top |
|
|
Rome
Samba Member
Joined: June 02, 2004
Posts: 9651
Location: Pearl River, NY
|
| Posted: Sun Apr 28, 2013 7:35 am Post subject: |
|
|
The insides of your engine case look amazingly and uniformly clean. Did you use a baking soda blasting method?
Appealing combination of wheel treatment, and body color. |
|
| Back to top |
|
|
txoval
Samba Member
Joined: January 23, 2004
Posts: 3552
Location: The Woodlands, TX
|
| Posted: Sun Apr 28, 2013 5:56 pm Post subject: |
|
|
Just an update:
My rod bearings came in Saturday which was a pleasant surprise. Being my first time building a 36HP engine, I was unaware of the difficulty you can run into getting the rods to line-up properly to set the bearing on the crank. After several tries with the cylinder #2 rod, I've decided to get a replacement.
Side note thank you to Mr. Aircooled Research for the tips installing the rods. I understand now why VW made the change in rods.
I'm waiting on the Loctite "Klean and Prime" and of course a rod now to connect the case halves. Besides the rod, it has gone together well.
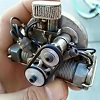
rods installed (tangs down) #2 came off later
crank set and waiting for its last rod. pulley and 009 distributor are place holders, distributor drive set and ready
Another car pic...love a clean trunk! |
|
| Back to top |
|
|
txoval
Samba Member
Joined: January 23, 2004
Posts: 3552
Location: The Woodlands, TX
|
| Posted: Sun Apr 28, 2013 5:58 pm Post subject: |
|
|
| Rome wrote: |
The insides of your engine case look amazingly and uniformly clean. Did you use a baking soda blasting method?
Appealing combination of wheel treatment, and body color. |
Engine case was baking soda blasted, steam bathed 3 times, oil passages cleaned countless times
thanks for the comment on the wheels...I'll post a pic with the hubcaps on soon. Can't decide if I want to run them or not |
|
| Back to top |
|
|
Rome
Samba Member
Joined: June 02, 2004
Posts: 9651
Location: Pearl River, NY
|
| Posted: Sun Apr 28, 2013 6:22 pm Post subject: |
|
|
Hubcaps- You can always install them on one side of the car, and leave them off the other. Drive the car like that for a week and finalize your preference...
Or take a photo of each side with and without the caps, post them here, and get votes from samba readers...
I'd think that the black hubcaps make the car look ever so slightly more stock (despite the all-black look); leaving them off is more like a "rally" look, and giving away some of the car's performance potential. You're going through the effort to modify the hubcaps, and I don;'t see many Beetles like that; so I suggest snap them on.
On your engine- when you mentioned "a blower"- did you mean a Judson supercharger, or a more modern turbocharger setup- if you even want to tell us in advance? You are strengthening your bottom end quite a bit to handle either power option. |
|
| Back to top |
|
|
3foldfolly
Samba Member
Joined: March 08, 2009
Posts: 894
Location: Edwardsville, Il
|
| Posted: Sun Apr 28, 2013 6:24 pm Post subject: |
|
|
| Are there cam follower bore bushings installed on your case? |
|
| Back to top |
|
|
txoval
Samba Member
Joined: January 23, 2004
Posts: 3552
Location: The Woodlands, TX
|
| Posted: Sun Apr 28, 2013 6:31 pm Post subject: |
|
|
Blower= Speedwell Supercharger (newer pulleys to create additional boost)
I had RIMCO install bronze lifter bushings (sleeves) to ensure proper fit and strength...$255 as an FYI |
|
| Back to top |
|
|
3foldfolly
Samba Member
Joined: March 08, 2009
Posts: 894
Location: Edwardsville, Il
|
| Posted: Sun Apr 28, 2013 6:45 pm Post subject: |
|
|
| txoval wrote: |
Blower= Speedwell Supercharger (newer pulleys to create additional boost)
I had RIMCO install bronze lifter bushings (sleeves) to ensure proper fit and strength...$255 as an FYI |
I didn't know that modification was available. Thanks for answering my next question before I even asked.  |
|
| Back to top |
|
|
txoval
Samba Member
Joined: January 23, 2004
Posts: 3552
Location: The Woodlands, TX
|
| Posted: Sun Apr 28, 2013 6:58 pm Post subject: |
|
|
Ask any question you have (or tell me if you see something wrong)
I'm posting to share my experience and do not believe in keeping "build secrets"
I'm using Redline Synthetic assembly lube, which so far has been great, very easy to apply.
Case sealant will be loctite 518
I used blue loctite on the rod bolts... |
|
| Back to top |
|
|
RichardinNZ
Samba Member
Joined: September 16, 2011
Posts: 280
Location: Auckland, New Zealand
|
| Posted: Mon Apr 29, 2013 3:17 am Post subject: |
|
|
The car does look super clean.....with the wheels at least you have the choise of caps, no caps or a complete change later on!
Richard
_________________
Richard
'58 Beetle; NZ Assembled
Dual Carb 36hp
My Car https://www.thesamba.com/vw/forum/album_page.php?pic_id=1750253 |
|
| Back to top |
|
|
txoval
Samba Member
Joined: January 23, 2004
Posts: 3552
Location: The Woodlands, TX
|
| Posted: Mon Apr 29, 2013 4:22 am Post subject: |
|
|
I was lucky enough to find an all original rust free oval to begin with...I bought the car in April 2011, (original black car from Hollywood, CA) drove it for a year and then began the tear down (April 2012). The bodywork/paint took 6 months, then I slowly rebuilt the pan (brakes, suspension, etc).
The engine was a deviation from the plan...I was going to simply clean it up and put it back in. The rest is history.
Interior is all that is left, and I have the pieces...so once the motor is done I'm hoping to finish in a few months. I really can't wait to drive it again |
|
| Back to top |
|
|
RichardinNZ
Samba Member
Joined: September 16, 2011
Posts: 280
Location: Auckland, New Zealand
|
|
| Back to top |
|
|
|


