| Author |
Message |
jasonpap2002
Samba Member
Joined: December 18, 2012
Posts: 129
Location: Austin, Texas

|
 Posted: Tue Feb 04, 2014 9:09 pm Post subject: For those of you considering bedliner paint.. (photos) Posted: Tue Feb 04, 2014 9:09 pm Post subject: For those of you considering bedliner paint.. (photos) |
 |
|
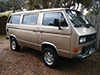
For those of you thinking of bedlining the outside of your rig, all I can say is Go For It!
Our 1984 Vanagon:
Photo in less bright light:
This all came together over the past holiday break, after months of work finally finished prepping the 84 van for Monstaliner, and am still completely amazed how well the Coppa Feel tint matches the original Assuan Brown. Its near identical.
If you read this far, you may read more, so here is a bit of history
Bought in December 2012, we live in Austin, Texas and the van was for sale in Ohio. Not afraid, a buddy and I jumped on a plane and flew up - ready to pull the ripcord if it turned out to be a dog, but was in surprisingly solid shape as well as accurately described. Not perfect by any means, but lots of new parts, strong motor and transmission (low mileage Suby ej25, rebuilt trans), new wheels+tires, canvas top, tire carrier, A/C adapter, truck fridge, bumpers and the interior was respectable and original (other than the floor). It was obvious the PO had put a lot of sweat and soul into this van but it still needed a solid cleaning, some body work and truthfully a lot of TLC.
I think this van has the best cup holders Ive seen yet. Can be used as a jack stand when not holding a drink:
Was picked up at the airport and was dismayed at a strongly pulsating pedal, but Im an old BMW guy and dont worry about brake repair too much. Rip cord not pulled.
First break down on the way home (actually the only one) was a broken alternator bolt, but luckily my buddy found a spare in the parts in the back.
Made it home in one piece after a marathon drive. Camped once in a rest stop for a few hours. Im in there somewhere:
Although we camped in it once again with my family, the real goal was complete dependability (as far as that goes) and also to dig into the cosmetic issues on the door and side. So, first took a long time (too long!) sorting the brakes out (and replacing the already new MC, rear drums and shoes, etc.):
Ugly but works:
New south african heavy duty drums:
Didnt take a photo of the new rear wheel studs, but you get the drift:
Go Westy big brake kit already installed, but had disk resurfaced while trying to chase down the pedal pulse:
New shocks all around:
Also tackled a few low-hanging fruit items. For example, strengthened the fold down seat:
Wrong washers on the arms up front, easily remedied and now much more stable.
Nothing better than relabeled and routed wiring. Great having the tach work now. This isn't how it looks now, I need to take more photos:
Dashboard warning light rewiring:
I wound up taking this WHOLE snarl out, and completely relocating and rewiring. While decent job done all around, the wiring harness gave me a headache looking at it. Plus I found some questionable wires - so EVERY wire I looked at was recut, soldered and shrink-wrapped for durability throughout the van:
Replaced the front heater valve cable (really nice not having heat on 24/7):
Next to one of the old BMWs, truly a water buffalo standing next to a kids pony:
THEN, alternator voltage regulator gave the ghost, bought new but stupid alt light STILL permanently on. Need to figure that one out. Photo during installation:
And on to the body. Had seam rust in various standard locations (especially the kitchen) so wound up replacing the bottom panel and rebuilding the drivers corner a bit. Clean, clean, pick, sand, pick, wire wheel, clean, <fill in lots more here>, ospho, clean, paint and finally fluid-filmd ever living thing I could find. Its tight as a drum now.
Dismantling:
Weve all been here, not sure what compelled me to take a photo:
Body work:
All seams cleaned and then joined with 3M 8115 adhesive seam sealer! Expensive, lets see how it holds out. Interior seams were cleaned and POR-15'd then after dry and dynamat installed, sprayed with fluid film.
Looks a lot worse than it was, scraped up but no rust other than the seam:
Again, looks a lot worse than it was:
Putting the paint on (holy crap, its now December 2013!):
One micro second in film time, but hours later (insert swearing as needed):
POOF! Like magic! Look carefully to see the very small dimple I missed (grrrr) and of course the falling emblem (fixed now):
A couple of weeks after this and our first camp trip 2014!
Even the dog was happy.
My welding skills took on a good learning curve - love rebuilding metal, wish I had more time to do it. I have spent many hours prepping my two old cars for paint and feel comfortable doing so. Its really just time investment at the end of it all. That being said, always find you miss something
Happy van again
A month and a half later, the paint has hardened to an eggshell finish (still a bit shiny, looks sharp) and is hard as a rock. I feel I prepped the body very well and started from a solid van. Time will tell the durability. Yes, I also thought about being able to see any metal issues but I feel that its no real difference than plain paint at the end of the day. Id do it again!
Still to do:
* Finish wiring - need a couple more dash warning indicators to work (coolant level, check engine, alternator)
* Replace steering rack boots
* Stainless bolts on top
* 2nd battery wiring - going to use one of these:
* Prob a dozen other things
Here is the blog
havent updated this content yet
http://awestynamedrowlf.blogspot.com/
Easy to say, but I mean it: Couldnt have done it without the samba.com, my wife, kids (to cheer me on), and my buddy AJ! Glenn (from tosimplify.net), look what a brief encounter in Durango CO turned out to be, your van was the inspiration for this madness.
Beep when you drive by in Austin
Hope you enjoyed the read (and the road)!
Cheers -
~Jason
Last edited by jasonpap2002 on Wed Feb 05, 2014 6:56 pm; edited 1 time in total |
|
| Back to top |
|
 |
bosruten
Samba Member
Joined: February 11, 2011
Posts: 551
|
| Posted: Tue Feb 04, 2014 9:20 pm Post subject: |
|
|
Great work! Hope you and your family have many happy trails making good memories!
_________________
'87 Syncro Weekender |
|
| Back to top |
|
|
DAV!D
Samba Member
Joined: September 10, 2013
Posts: 979
Location: EL CAMINO
|
| Posted: Tue Feb 04, 2014 9:45 pm Post subject: |
|
|
Looks good. I'm still up in the air if I will do it on my syncro or not.
_________________
86 Syncro Build - Ecotec Motor Swap - Pop Top Conversion - Camper Build & Syncro Conversion |
|
| Back to top |
|
|
rubbachicken
Samba Member

Joined: October 05, 2004
Posts: 3058
Location: socal
|
|
| Back to top |
|
|
ThankYouJerry
Samba Member

Joined: September 01, 2012
Posts: 2271
Location: Shakedown Street
|
| Posted: Tue Feb 04, 2014 10:14 pm Post subject: |
|
|
Looks like a beautiful '72 round tail light 2002! Tii???
Curious
did you weigh your Westy before and after the bed liner application? That stuff is H-E-A-V-Y.
_________________
1990 Multivan - "Ohana"
1.8T, Auto w/3.27 R&P + Peloquin TBD |
|
| Back to top |
|
|
Dampcamper
Samba Member
Joined: October 07, 2013
Posts: 788
Location: Rainy Portland, Oregon
|
| Posted: Tue Feb 04, 2014 10:38 pm Post subject: |
|
|
| Beautiful! Thanks for sharing! |
|
| Back to top |
|
|
whafalia
Samba Member
Joined: January 28, 2009
Posts: 685
Location: San Francisco
|
| Posted: Tue Feb 04, 2014 10:56 pm Post subject: |
|
|
How many gallons did it take, and is it true that the curing process has an effect such that each 8# gallon applied ends up weighing magnitudes more? 
I think I'm sold, durabak had what looked like a good match for my ivory 84 think I'll send for a sample.
_________________
84 westie 2.2 w/ digijet, AT |
|
| Back to top |
|
|
NxNWesty
Samba Member
Joined: September 21, 2012
Posts: 34
Location: Seattle
|
| Posted: Tue Feb 04, 2014 11:59 pm Post subject: |
|
|
Great post!
_________________
1985 Westfalia '92 EJ22 KEP Adapter |
|
| Back to top |
|
|
bugeye72
Samba Member
Joined: April 24, 2011
Posts: 144
Location: Warren, ME
|
| Posted: Wed Feb 05, 2014 4:30 am Post subject: |
|
|
| God help anyone who want to un-do that! |
|
| Back to top |
|
|
Gunldesnapper
Samba Member
Joined: July 16, 2013
Posts: 147
Location: Murika
|
| Posted: Wed Feb 05, 2014 6:38 am Post subject: |
|
|
Looks nice dude!
_________________
1990 Vanagon Carat "Pig"
USN RET |
|
| Back to top |
|
|
landkholdings
Samba Member

Joined: March 11, 2008
Posts: 250
Location: N. GA
|
| Posted: Wed Feb 05, 2014 6:40 am Post subject: |
|
|
| bugeye72 wrote: |
| God help anyone who want to un-do that! |
No kidding! Good thing you're your own body man.
Looks great though, and I bet you don't have to worry about twigs or brush scratching the paint when entering certain camp sites. Very cool!
_________________
Kevin |
|
| Back to top |
|
|
Zeitgeist 13
Samba Member

Joined: March 05, 2009
Posts: 12115
Location: Port Manteau
|
| Posted: Wed Feb 05, 2014 8:03 am Post subject: |
|
|
Do these types of bed liner products off-gas over time, especially when subjected to heat? I ask because I'm considering one of these products to seal up a floor pan replacement project, and don't want nasty smells to be an issue
_________________
Casey--
'89 Bluestar ALH w/12mm Waldo pump, PP764 and GT2052
'01 Weekender --> full camper
y u rune klassik? |
|
| Back to top |
|
|
furrylittleotter
Samba Member

Joined: May 19, 2008
Posts: 1506
Location: West Seattle
|
| Posted: Wed Feb 05, 2014 8:23 am Post subject: |
|
|
Awesome van! Nice post. The color really is fantastic!!! You were fortunate to find the best year ever! (same as mine) and with the best engine ever! (pretty much same as mine).
Loved seeing the before, during and after photos, that is a true family heirloom, perfect for trips to Rudy's for brisket!!!
Missed dimples keep us humble
.
Neil2 |
|
| Back to top |
|
|
Terry Kay
Banned

Joined: June 22, 2003
Posts: 13331
|
| Posted: Wed Feb 05, 2014 8:25 am Post subject: |
|
|
Usually Bedliner is impervious to almost all solvents--gas & oil for sure.
I am positive about this using Raptor urethane bedliner products anyway--
Not sure about the bedliner you applied.
What a bitch to keep clean, but you'll find all of this out on your own, over time.
_________________
T.K. |
|
| Back to top |
|
|
srmpf
Samba Member
Joined: February 25, 2011
Posts: 296
|
| Posted: Wed Feb 05, 2014 8:36 am Post subject: |
|
|
| very nice - I might want to take a look how the paint looks and feels in reality. a paint job is still on my to do list. |
|
| Back to top |
|
|
Bman
Samba Member

Joined: April 28, 2005
Posts: 895
Location: South Coast, Oregon
|
|
| Back to top |
|
|
jimeg
Samba Member

Joined: May 14, 2007
Posts: 510
Location: PNW
|
|
| Back to top |
|
|
jasonpap2002
Samba Member
Joined: December 18, 2012
Posts: 129
Location: Austin, Texas
|
| Posted: Wed Feb 05, 2014 7:31 pm Post subject: Follow up - |
|
|
Thank you for the nice words. Let me see if I can address any questions/comments:
BMW 2002 -
Good catch! It's a '73 Tii but hard to tell the difference. We've owned it for 14 years now, 2nd owners.
Gallons of paint -
2 gallons, we used the "kit" they sell on their website. It's heavy alright (2 gallons of water is ~15lbs in itself) but it weighs more than that I bet! The paint is really sticky, which makes it feel like it weighs a ton when laying it down. Had to toss my clothes when done.
Un-Doing
Agreed, this was really the primary dilemma when making the decision. Here is my thought process though.
1. Color matches near perfect, can't ask for better (I'm an original color car type of guy, no matter what it was).
2. I could do it myself (am confident in my body repair skills) and chose to spend the money for a body shop rather on a welder (Millermatic 135) and other fun toys.
3. I love the texture. It's very smooth bumps (like a golf ball) so very easy to wipe and doesn't show the dirt (heck it's brown!).
Removing it, well I tried to think of a situation when I would need to do that. Ok, if we get in an accident, I would have to clean the area, perhaps weld in metal, but with my DA and decent grit should take it off at some point. Color match is supposed to be excellent so I would buy another quart/gallon and then reapply. Seams are clean and dry and I will monitor from the inside if something appears - if so, then I will do the same and dig in then retouch.
I really don't see a world where I would need to "restore" this van to original showroom finish. Bought to use and be ok with going outside with it. Everyone has different needs, and I get that.
Agreed, that dimple I missed does keep it all pretty real...
Overgas
Yes, the first few days (lets say a week) I could smell it when walking up to it. Now, a month later I can smell it only when putting my nose right up to it. This is an outside van, I can't fit it in my garage with the freakin' 2" lift! A downside if any and so if you store inside you would likely smell it more at least early on.
Rudys
'Nuff said! We love Rudys!
Keeping clean
I don't think it will be a problem for us - for one, it's brown!  . I haven't washed it in a month and it looks pretty good all around. . I haven't washed it in a month and it looks pretty good all around.
srmpf -
Come on by and check it out! Love to see another westy and you are welcome to see up close.
Here are some more photos (this may turn into a build-thread):
Color match - wanted to show one of the lines, pretty much identical.
Dynamat installation - added quite a bit up front and in the doors, also all along the side panels. Not every inch, just squares to reduce resonance. Seems to be much better inside.
New fuel tank - current one has rust in pick up internally, and wanted to move to 11mm output due to fuel pump noise when running. Using Loctite 518 around the seals.
|
|
| Back to top |
|
|
bowtiebug
Samba Member
Joined: March 17, 2013
Posts: 902
Location: North Texas
|
|
| Back to top |
|
|
flyindutchman
Samba Member

Joined: December 09, 2012
Posts: 112
Location: Vancouver,WA.
|
| Posted: Thu Feb 06, 2014 11:01 am Post subject: |
|
|
| Good work and thanks for sharing your experience. I intend on doing the same thing with the monsta liner and have been researching as much as possible. Your post is what I wanted to hear before diving in. |
|
| Back to top |
|
|
|


