| Author |
Message |
wcfvw69 
Samba Purist

Joined: June 10, 2004
Posts: 13389
Location: Arizona

|
 Posted: Tue Aug 26, 2014 9:21 am Post subject: Posted: Tue Aug 26, 2014 9:21 am Post subject: |
 |
|
| CWAVE wrote: |
What you suggest is my exact plan. I'm going to only use the bits of metal off the replacement parts that I need, preserving as much of the OG metal as possible.
| wcfvw69 wrote: |
Unless the top hats they are selling have improved, don't replace the whole thing. Cut off your rusted portion on both sides and weld them in leaving the majority of the top hat over the pan in place.
When I did my vert, I quickly cut off the entire top hat and then found the new one didn't fit at all. I had to do major modifications to it. I wish I'd only cut off the ends where the two bolts go thru. |
|
I wish I'd done that as well. I cut so many complete parts off and then had to weld in new panels when I should of just patched many of them. You're right on point with less is more better! 
_________________
Contact me at [email protected]
Follow me on instagram @sparxwerksllc
Decades of VW and VW parts restoration experience.
The Samba member since 2004.
**Now rebuilding throttle bodies for VW's and Porsche's**
**Restored German Bosch distributors for sale or I can restore yours**
**Restored German Pierburg fuel pumps for sale or I can restore yours**
**Restored Porsche fuel pumps or I can restore yours**
**Restored Porsche distributors or I can restore yours** |
|
| Back to top |
|
 |
owdlvr
Samba Member
Joined: June 23, 2008
Posts: 684
Location: Squampton BC
|
| Posted: Tue Aug 26, 2014 12:30 pm Post subject: |
|
|
| CWAVE wrote: |
Wondering if anyone has some recent product experience with undercoating products for the pan.
Obviously I have a rust free chassis. The new pans will be welded on, plan on priming with a metal etch primer from Eastwood. But then where to go. There are so many products out there.
Was wondering if anyone had any recent experience of something that would protect from rust and road rash (ie: stone chips etc). Would like to keep this nice and rust free going forward.
All front and rear suspension components are going to be powdercoated. So it's the pan and backbone that's going to need protection.
Inside (floors and tunnel) will be covered with some sort of Dynamat product.
Any thoughts would be appreciated.
Thanks |
The rally beetle build took three or four cars to create one good one as well, but then...I wanted only German Sheet metal. (save for a heater channel, try finding good examples attached to a Canadian car!)
On the floorpan, there is honestly only one good answer: Powdercoat it. I've done it for plenty of other projects, but didn't do it on the Rallybug. Big mistake. For mine I used 6 coats of POR-15, but even with the metal prep and all the other stuff they say to use, it bonded only to the "old" metal. Anywhere there was new metal on my floorpan, I could just peel the POR15 off after about 6 months. There are three good powder coating places in Edmonton, and I'm pretty sure at least two, possibly all of them, can fit a floor pan into their ovens.
You won't regret powder coating, I can guarantee that.
-Dave
_________________
---
Instagram: @DaveHord
1971 1302s - Salzburg Tribute the #RallyBug
1958 Beetle
1975 Beetle
1973 Super Beetle
1993 C3500 with Cummins swap
1967 MGB
1963 MG Midget |
|
| Back to top |
|
|
wcfvw69
Samba Purist
Joined: June 10, 2004
Posts: 13389
Location: Arizona
|
| Posted: Tue Aug 26, 2014 1:09 pm Post subject: |
|
|
I had the same experiences with POR15. It peeled off in sheets even though I followed the directions perfectly.
I couldn't agree more w/powder coating the pan after you weld in the new floor pans and any other suspension parts as well.
_________________
Contact me at [email protected]
Follow me on instagram @sparxwerksllc
Decades of VW and VW parts restoration experience.
The Samba member since 2004.
**Now rebuilding throttle bodies for VW's and Porsche's**
**Restored German Bosch distributors for sale or I can restore yours**
**Restored German Pierburg fuel pumps for sale or I can restore yours**
**Restored Porsche fuel pumps or I can restore yours**
**Restored Porsche distributors or I can restore yours** |
|
| Back to top |
|
|
hopkin
Samba Member

Joined: June 25, 2012
Posts: 2480
Location: Ottawa, Ontario
|
| Posted: Tue Aug 26, 2014 7:45 pm Post subject: |
|
|
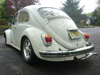
I was at a show in Joilette, Quebec on Sunday and saw a nice example of a Sports Bug:
|
|
| Back to top |
|
|
CWAVE
Samba Member
Joined: September 18, 2008
Posts: 510
|
| Posted: Tue Aug 26, 2014 8:39 pm Post subject: |
|
|
That's a really nice lookin Sports Bug! Thanks for sharing the photos!
| hopkin wrote: |
I was at a show in Joilette, Quebec on Sunday and saw a nice example of a Sports Bug:
|
_________________
___
My 1973 Sports Bug Body off Restoration:
https://www.thesamba.com/vw/forum/viewtopic.php?t=666556 |
|
| Back to top |
|
|
CWAVE
Samba Member
Joined: September 18, 2008
Posts: 510
|
| Posted: Tue Aug 26, 2014 9:10 pm Post subject: |
|
|
Thanks for your suggestions. Think I'm going to take you up on your suggestion, and go with powdercoating the pan.
First though, I'm going to have to get through installing the pans, and pulling the rest of the rear suspension out (ie: torsion bars etc).
| wcfvw69 wrote: |
I had the same experiences with POR15. It peeled off in sheets even though I followed the directions perfectly.
I couldn't agree more w/powder coating the pan after you weld in the new floor pans and any other suspension parts as well. |
| owdlvr wrote: |
The rally beetle build took three or four cars to create one good one as well, but then...I wanted only German Sheet metal. (save for a heater channel, try finding good examples attached to a Canadian car!)
On the floorpan, there is honestly only one good answer: Powdercoat it. I've done it for plenty of other projects, but didn't do it on the Rallybug. Big mistake. For mine I used 6 coats of POR-15, but even with the metal prep and all the other stuff they say to use, it bonded only to the "old" metal. Anywhere there was new metal on my floorpan, I could just peel the POR15 off after about 6 months. There are three good powder coating places in Edmonton, and I'm pretty sure at least two, possibly all of them, can fit a floor pan into their ovens.
You won't regret powder coating, I can guarantee that.
-Dave |
_________________
___
My 1973 Sports Bug Body off Restoration:
https://www.thesamba.com/vw/forum/viewtopic.php?t=666556 |
|
| Back to top |
|
|
CWAVE
Samba Member
Joined: September 18, 2008
Posts: 510
|
| Posted: Tue Aug 26, 2014 9:29 pm Post subject: |
|
|
Continuing with the momentum I built from the weekend getting the pan sandblasted, I was thinking this morning that putting the pan on a couple of 10 dollar collapsible saw horses, granted a good temporary solution, isn't going to work going forward, given the postage stamp amount of floor space I have left in my garage with the donor shell, tools and everything else in there. Getting the pan on the rotisserie was the goal for today.
I spent the day doing the moving-crap-from-one-side-of-the-garage-to-the-other dance. In the end, I managed to get the pan mounted on the rotisserie.
Still have to drill the holes in the support structure to ensure nothing moves (right now it's all held together just with the plethora of set screws on this beast). Also haven't tried the air over hydraulics that the system came with. That work will be for tomorrow if I can make the time.
Here are some pictures of what it looks like so far...
Now that I've decided on powdercoating the entire completed pan, I'm thinking that I may take the new floorpans to my powdercoating guy this coming weekend (if the weather's nice), and see if he can gingerly remove the paint from the CIP1 pans I have. I'm sure it wouldn't take much to convince the paint to come off those pans. Would be nice to have them stripped bare for when I powdercoat. Would save me a pile of time stripping them down by hand. I am a bit dubious about having them sandblasted though, given my last experiment with getting him to sandblast the hood. Perhaps if he keeps the nozzle far away, I really don't think the paint on the CIP1 floorpans would offer much resistance to sandblasting even if he keeps the nozzle FAR away from it.
_________________
___
My 1973 Sports Bug Body off Restoration:
https://www.thesamba.com/vw/forum/viewtopic.php?t=666556 |
|
| Back to top |
|
|
cj2a
Samba Member
Joined: March 26, 2013
Posts: 119
Location: Baltimore, Maryland
|
| Posted: Wed Aug 27, 2014 4:31 pm Post subject: |
|
|
Nice work so far. I am going to be curious on how you tackle the front sheet metal. Are you just going to patch the rust on that red body? Or replace the entire side panel? I have a similar problem to your original body in that I need to replace both front side panels and the trunk floor. I have a donor front clip and was wondering if it might be better to replace the whole front clip at once or individual panels. I am wondering if anyone has ever replaced the whole thing at once and if there were any pros/cons.
_________________
1965 Beetle
1971 Super Beetle |
|
| Back to top |
|
|
VWCOOL
Samba Member
Joined: June 02, 2006
Posts: 1821
Location: Down under
|
| Posted: Wed Aug 27, 2014 5:27 pm Post subject: |
|
|
| CWAVE wrote: |
Wondering if anyone has some recent product experience with undercoating products for the pan.
Obviously I have a rust free chassis. The new pans will be welded on, plan on priming with a metal etch primer from Eastwood. But then where to go. There are so many products out there.
Was wondering if anyone had any recent experience of something that would protect from rust and road rash (ie: stone chips etc). Would like to keep this nice and rust free going forward.
All front and rear suspension components are going to be powdercoated. So it's the pan and backbone that's going to need protection.
Inside (floors and tunnel) will be covered with some sort of Dynamat product.
Any thoughts would be appreciated.
Thanks |
For my restos, I blast/prime/paint and apply 'steinschlag' - the textured spray-on stone guard material that is applied to the lower sills of many new cars - on the underside of the floor. It can be over-painted or left black, which is what I do. Off the gun, t has a satin finish that is easily hosed/wiped clean.
Don't stick dynamat etc to the floor inside. Like the original VW foam sound proofing, it can hide moisture and cause rust. Instead, use lift-out high-density sound proof mats under the carpet and leave the floors painted but bare
Paint is a better choice than powdercoat on suspension etc - it can be touched up when it chips  |
|
| Back to top |
|
|
CWAVE
Samba Member
Joined: September 18, 2008
Posts: 510
|
| Posted: Thu Aug 28, 2014 9:39 am Post subject: |
|
|
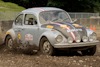
Well, the red car shell is gone. The deeper I got into it, the more rot I found to the point where (if you were standing beside the car), everything from your knee down was rotted away. All of the mounting points to the pan were gone (literally GONE... Rotted away). There wasn't anything holding the car together other than rust loosely adhered to itself. So, I pulled the parts off it that could be used, and scrapped the rest.
The front quarters of that red car were obviously history, but the spare tire well was in great shape. So I cut off the front nose and will remove the spare tire well for re-use in the next shell that I bought. I haven't gotten to the point in determining IF the spare tire well is toast or not, but at first blush I think it is.
Got this one with a bit of front end damage. I plan on replacing the complete driver side front quarter and more than likely the spare tire well.
There is a REALLY great thread that's well documented with photos over at Superbeetlesonly. Don't know if I'm allowed to share a thread link to another forum, but I will... If the moderators don't like it, they can let me know. Couldn't find anything on the site that says I can't so here it goes...
http://www.superbeetlesonly.com/forum/index.php?showtopic=11276
This guy's thread really inspired me, and is by far the best front quarter thread I've come across in my searching so far.
| cj2a wrote: |
| Nice work so far. I am going to be curious on how you tackle the front sheet metal. Are you just going to patch the rust on that red body? Or replace the entire side panel? I have a similar problem to your original body in that I need to replace both front side panels and the trunk floor. I have a donor front clip and was wondering if it might be better to replace the whole front clip at once or individual panels. I am wondering if anyone has ever replaced the whole thing at once and if there were any pros/cons. |
_________________
___
My 1973 Sports Bug Body off Restoration:
https://www.thesamba.com/vw/forum/viewtopic.php?t=666556 |
|
| Back to top |
|
|
OzzyTR
Samba Member
Joined: August 04, 2014
Posts: 9
Location: TURKEY
|
| Posted: Fri Sep 05, 2014 7:29 am Post subject: |
|
|
| any updates on the car? |
|
| Back to top |
|
|
CWAVE
Samba Member
Joined: September 18, 2008
Posts: 510
|
| Posted: Sat Sep 06, 2014 6:48 am Post subject: |
|
|
Well, since my last post, I've been busy getting the last of the metal to the sandblaster. My final load of metal was done by the sandblaster last night.
Next step for me now is to start getting some powdercoating done. All of the parts have been coated with Eastwoods metal wash, so flash rusting won't be an issue. The pan that I had done a couple weeks ago is still fine. I am however in a part of the country with low humidity (especially this time of year).
After that it's going to be on to installing the floors in the chassis and at the same time repairing some of the rust on the hat and the rear cross members. Once that's all done, and I get the rear suspension stripped off, the pan should be ready for powdercoating.
| OzzyTR wrote: |
| any updates on the car? |
_________________
___
My 1973 Sports Bug Body off Restoration:
https://www.thesamba.com/vw/forum/viewtopic.php?t=666556 |
|
| Back to top |
|
|
CWAVE
Samba Member
Joined: September 18, 2008
Posts: 510
|
| Posted: Fri Sep 26, 2014 3:40 pm Post subject: |
|
|
Been busy doing some powdercoating in the garage. Ran a 30amp 220 outlet to the front of the garage, so I could push the oven (now on wheels) onto the driveway when "baking" parts. Keeps the stink out of the garage.
Started with the bumper brackets and they turned out nice. Did them in a Semi gloss black.
A couple shots of two of them.
Then I decided to try the Sports bug rims that I had sandblasted a while back. Had bought this "Rally Wheel Silver" for them. What a mistake that turned out to be. What a horrible color they turned into once baked. I was just about to run them back to the sandblaster and have this s%$t blown off, when a buddy of mine suggested that the powder coat that I had done would be great rust prevention. And that I should prep the surface and paint/clear the color I want.
Figured, all it's going to cost me is about 20 bucks in paint, it's worth a shot.
Here is a rim with the powder on.
Here is the hideous Rally Wheel Silver baked on.
Here is the first coat of Aluminum paint on the powdercoated rim. (Just showing one in the pictures, but I've done four like this).
Once I get them all cleared I'll post again. See if it looks any better then.
This weekend I'm planning on getting some more powdercoating done. Winter approaches and need to get more of these parts coated.
_________________
___
My 1973 Sports Bug Body off Restoration:
https://www.thesamba.com/vw/forum/viewtopic.php?t=666556 |
|
| Back to top |
|
|
CWAVE
Samba Member
Joined: September 18, 2008
Posts: 510
|
| Posted: Tue Sep 30, 2014 8:08 pm Post subject: |
|
|
Things have been moving along a bit on my car. After spending a bit more time on my rims, I've decided that I hate what I've done with them. Plan on taking them to be professionally powdercoated. I have a couple of Sports Bug rims with their original Pirelli tires on them (spares from a couple of my Sports Bugs that I've bought over this past year), so I'm going to use them as examples of the color of the powdercoat I want. Hopefully I can get something really close. A factory look finish on the rims is what I'm shooting for.
I'll post pictures of the finished wheels once they're done.
Been doing some smaller stuff powder coating of my own and they're coming out nice. Did the struts a couple days ago. The pictures kinda dark, but they came out really nice.
And, got my VW 1303S badge in the mail finally (bought it off a guy in the UK). Will be powdercoating that a semi-gloss black shortly.
I've also pulled together all of the smaller pieces that will fit in my oven, and plan on powder coating them over the coming week. Just got some new powder from Eastwood, a charcoal silver. Going to give that a try on a test piece first. Had bought that powder for the doghouse and all the engine tin. Want to make sure I like it before I do all those pieces.
Also have a vacation day coming up when I plan on starting to cut away the crushed front quarter on the body. Hopefully I can get through most of that to see what I'm up against in replacing it with the new quarter I have sitting inside the car.
With luck I'll have some more progress to share in a week or so.
_________________
___
My 1973 Sports Bug Body off Restoration:
https://www.thesamba.com/vw/forum/viewtopic.php?t=666556 |
|
| Back to top |
|
|
19super73
Hardcore Stock Nazi

Joined: October 18, 2007
Posts: 4351
Location: Cité Soleil
|
| Posted: Thu Oct 02, 2014 8:48 am Post subject: |
|
|
| CWAVE wrote: |
Been busy doing some powdercoating in the garage. Ran a 30amp 220 outlet to the front of the garage, so I could push the oven (now on wheels) onto the driveway when "baking" parts. Keeps the stink out of the garage.
Started with the bumper brackets and they turned out nice. Did them in a Semi gloss black.
A couple shots of two of them.
Then I decided to try the Sports bug rims that I had sandblasted a while back. Had bought this "Rally Wheel Silver" for them. What a mistake that turned out to be. What a horrible color they turned into once baked. I was just about to run them back to the sandblaster and have this s%$t blown off, when a buddy of mine suggested that the powder coat that I had done would be great rust prevention. And that I should prep the surface and paint/clear the color I want.
Figured, all it's going to cost me is about 20 bucks in paint, it's worth a shot.
Here is a rim with the powder on.
Here is the hideous Rally Wheel Silver baked on.
Here is the first coat of Aluminum paint on the powdercoated rim. (Just showing one in the pictures, but I've done four like this).
Once I get them all cleared I'll post again. See if it looks any better then.
This weekend I'm planning on getting some more powdercoating done. Winter approaches and need to get more of these parts coated. |
Looks like the lip of that one is bent.
_________________
1970 Campmobile [url=https://www.vw-mplate.com/mplate-47260.png]Click to view image[/URL]
1970 Fastback 1600 TL
1971 Doka [url=https://www.vw-mplate.com/mplate-14845.png]Click to view image[/URL]
1973 Super Beetle
1973 Westfalia [url=https://www.vw-mplate.com/mplate-31892.png]Click to view image[/URL]
1974 412 Variant
1975 La Grande Bug
1984 Vanagon |
|
| Back to top |
|
|
CWAVE
Samba Member
Joined: September 18, 2008
Posts: 510
|
|
| Back to top |
|
|
jhicken
Samba Member
Joined: October 24, 2003
Posts: 9466
Location: Fallbrook, CA
|
| Posted: Thu Oct 02, 2014 9:19 am Post subject: |
|
|
You should have straightened it first. Also, the aluminum paint is to bright. If you put a clear over the rally wheel silver it would be closer to original.
-jeffrey
_________________
Der Kleiner Kampfwagens |
|
| Back to top |
|
|
CWAVE
Samba Member
Joined: September 18, 2008
Posts: 510
|
| Posted: Thu Oct 02, 2014 9:32 am Post subject: |
|
|
They're all going to the powder coater before long, but you're right, I'll have to take care of that before they go.
I agree, they're too bright. Going to take one of my wheels that were in the spare tire well, that still have good paint, and have the powdercoater give me a finish that will be as close as possible to the original paint.
_________________
___
My 1973 Sports Bug Body off Restoration:
https://www.thesamba.com/vw/forum/viewtopic.php?t=666556 |
|
| Back to top |
|
|
jhicken
Samba Member
Joined: October 24, 2003
Posts: 9466
Location: Fallbrook, CA
|
| Posted: Thu Oct 02, 2014 9:37 am Post subject: |
|
|
Nice! Good choice to powder coat the wheels, chassis and tin. The stuff will last forever. I have tin and wheels I had powder coated more than 20 years ago that still looks great.
-jeffrey
_________________
Der Kleiner Kampfwagens |
|
| Back to top |
|
|
CWAVE
Samba Member
Joined: September 18, 2008
Posts: 510
|
| Posted: Thu Oct 02, 2014 10:02 am Post subject: |
|
|
That's great to know. How I'd love to have my beetle not show any signs of rust in the coming years. That's really my goal... to finish the car such that I can drive it the rest of my life (hopefully that's a long time)... without it falling apart. 
Given that I only plan on driving it in the spring/summer/fall seasons when the weather is nice... that should be much easier on the car.
| jhicken wrote: |
Nice! Good choice to powder coat the wheels, chassis and tin. The stuff will last forever. I have tin and wheels I had powder coated more than 20 years ago that still looks great.
-jeffrey |
_________________
___
My 1973 Sports Bug Body off Restoration:
https://www.thesamba.com/vw/forum/viewtopic.php?t=666556 |
|
| Back to top |
|
|
|


