| Author |
Message |
AggieZig
Samba Member

Joined: March 10, 2013
Posts: 188
Location: Los Angeles, CA

|
 Posted: Sun Aug 24, 2014 10:44 pm Post subject: Starting Over... My Baja Build Posted: Sun Aug 24, 2014 10:44 pm Post subject: Starting Over... My Baja Build |
 |
|
Two times a charm, right? Or is it three...
Anyways you may have seen my sand rail build that I've been working on for the last year or so. Well that's all changing thanks to some fantastic Texas state legislature.
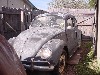
I figured a "new" project deserved a new thread so here we go. It's a 73 standard beetle in pretty decent condition with a clean title that I picked up for a pretty good deal.
Here she is in all her glory:
The rush isn't too terrible. Typical spots: under rear window seal, couple small body spots, bottom of doors where seal was, typical pan spots. Easy fixes.
I'm planning on keeping / using the 235/75/15 ATs off of my rail and I was hoping I'd get to use a set of 31/10.5 MTs I had around for the rear...
They look awesome...
But do not exactly clear spring plate caps:
So it looks like I'll stick with the 235/75/15s on the rear on 8" rims. Not sure what to do up front. Only matching rims I can get are 7" wide and that seems way too wide for the front end.
I'm planning on making an "all steel" baja so tinkered around with front fenders mounted in the rear:
Will need some trimming of course but I like the look so far. Speaking of looks... here's what I'm thinking for paint - yes this is an 80's Dick Cepek style throwback, and no, I was not alive when this was "cool". "YOLO".
As of now, this will get paired with a 1776 DP I have in pieces waiting to be built and a 68-72 IRS 4.125 tranny. I also have access to a 5-rib 002 but planning to do some street driving and not crazy about 4000+ rpm on the freeway.
Other stuffs to figure out: seats, dash, how the hell I'm going to shorten the hood, lots of other things I can't think of at the moment.
Good thing is a lot of parts will be directly bolted off the rail and bolted onto the baja. No sense in wasting those nice pretty new rebuilt parts.
_________________
Zig, Aircooled Enthusiast
Current: Porsche 914 Resto | 1969 VW Beetle
Past: 74 Thing | Sand Rail | Baja Project | Oval Beetle |
|
| Back to top |
|
 |
AggieZig
Samba Member
Joined: March 10, 2013
Posts: 188
Location: Los Angeles, CA
|
| Posted: Thu Aug 28, 2014 5:00 pm Post subject: |
|
|
Had a chance to go out and get some work done today with a couple of buddies.
We got one of the rear (front) fenders mounted and pre-lim cut / shape mocked up. Here's what that looks like:
We also cut off the rear apron in the process
I am thinking about "pulling up" the rear edge of the fender using some rod underneath to "flare" it out
Here's what that would look like:
What do y'all think looks better?
_________________
Zig, Aircooled Enthusiast
Current: Porsche 914 Resto | 1969 VW Beetle
Past: 74 Thing | Sand Rail | Baja Project | Oval Beetle |
|
| Back to top |
|
|
winchin73blazinbaja
Samba Member

Joined: June 26, 2014
Posts: 648
Location: Michigan
|
| Posted: Thu Aug 28, 2014 7:30 pm Post subject: |
|
|
CUT IT!!!!  less fender=more room for tire less fender=more room for tire |
|
| Back to top |
|
|
brooksinc1976
Samba Member
Joined: April 09, 2014
Posts: 140
Location: Pasadena
|
| Posted: Fri Aug 29, 2014 4:12 am Post subject: |
|
|
| Well looks like ill have to follow this one too. Ha. Looks good like the flare. Cool paint sceme. |
|
| Back to top |
|
|
HERC
Samba Member
Joined: July 30, 2007
Posts: 1003
Location: Menifee
|
| Posted: Fri Aug 29, 2014 5:57 am Post subject: |
|
|
Here's my all metal dual spring plate 69 with 235's. Gonna go with 30x9.5's next, and still miss the torsion bars.
_________________
Herc |
|
| Back to top |
|
|
winchin73blazinbaja
Samba Member
Joined: June 26, 2014
Posts: 648
Location: Michigan
|
| Posted: Fri Aug 29, 2014 7:29 am Post subject: |
|
|
| NICE! I am planning on slowly swapping out the fiberglass parts on mine with sheet metal. I hate dealing with fiberglass. |
|
| Back to top |
|
|
About the Ride
Samba Member

Joined: July 12, 2013
Posts: 17
Location: So Cal
|
| Posted: Fri Aug 29, 2014 9:28 am Post subject: |
|
|
| Digging the old school Dick Cepek paint scheme! keep posting! |
|
| Back to top |
|
|
modernbeat
Samba Member

Joined: December 21, 2006
Posts: 45
Location: Dallas, TX
|
| Posted: Fri Aug 29, 2014 9:44 am Post subject: Re: Starting Over... My Baja Build |
|
|
| AggieZig wrote: |
But do not exactly clear spring plate caps:
|
Why not swap to early short torsion bars and spring plates, or stretch the IRS arm 1-2" longer?
_________________
Jason McDaniel |
|
| Back to top |
|
|
AggieZig
Samba Member
Joined: March 10, 2013
Posts: 188
Location: Los Angeles, CA
|
| Posted: Mon Sep 01, 2014 10:11 pm Post subject: |
|
|
Thanks for the kind words, gents.
I'll keep posting updates as I get the chance to work on her.
Regarding torsion bars: the reason I don't want to go through the swap is two fold: 1) I'm on a budget and 2) I'm trying to use as many of the clean painted parts off of my rail as I can so that I don't have to double my work.
Next up... front fenders & hood chop.
_________________
Zig, Aircooled Enthusiast
Current: Porsche 914 Resto | 1969 VW Beetle
Past: 74 Thing | Sand Rail | Baja Project | Oval Beetle |
|
| Back to top |
|
|
AggieZig
Samba Member
Joined: March 10, 2013
Posts: 188
Location: Los Angeles, CA
|
| Posted: Sat Sep 27, 2014 6:26 pm Post subject: |
|
|
It's been a while since an update but I finally got a chance to do some work today.
Finished hacking off the back (for now) apron:
Finished (for now) the rear fender design. Will make a template and do the other
Planning on welding in a rod to support the underside and flare up the end just slightly:
Also played with the front fender design. Pretty happy with this, just need to take another sliver out to square it up:
Also cut the nose off. To be fair it was mostly rust and bondo anyways.
Now I need to figure out how to section the hood back up into place... Will be fun.
I think I'm going to focus next on more productive stuff, like separating body and pans to blast and prime. Hopefully I get a chance to do some work again soon!
_________________
Zig, Aircooled Enthusiast
Current: Porsche 914 Resto | 1969 VW Beetle
Past: 74 Thing | Sand Rail | Baja Project | Oval Beetle |
|
| Back to top |
|
|
Bret2094
Samba Member

Joined: March 22, 2012
Posts: 665
Location: Linden, Texas or College Station Texas
|
| Posted: Sat Sep 27, 2014 8:16 pm Post subject: |
|
|
Hey man, I'm going to school here in college station. If ya need a hand sometime, just send me a PM
Bret
_________________
1959 baja beetle ragtop( going back to Full body)
1959 beetle
1960 Beetle frame Custom buggy
1962 Karmann Ghia
1967 beetle( august 66, first car)
1967 beetle (parts car)
1977 Westfalia Camper
1972 Plymouth Duster
Just another 22 year old jackass who caught the bug, and lives by the motto " NO fatchicks allowed" , I've got too many cars as is (buses N/A) |
|
| Back to top |
|
|
AggieZig
Samba Member
Joined: March 10, 2013
Posts: 188
Location: Los Angeles, CA
|
| Posted: Sat Oct 18, 2014 8:11 pm Post subject: |
|
|
Found some time to head out today and get some work done. Basically stripped the body of every and anything.
Here is a full trash can of "beetle crap"
Also managed to split the body and pans
Trailered the pan back up with me to work on it this week. It will need new floor pan halves in the rear as well as some repairs to the shoddy welds done by the PO who installed the "new" pans.
(lots of holes but hard to see in these pics)
My plan this week is to get everything cleaned, scuffed, primed in rustoleum, and covered in bedliner. Also plan to swap the suspension over from my rail to this frame once its painted.
More to come!
_________________
Zig, Aircooled Enthusiast
Current: Porsche 914 Resto | 1969 VW Beetle
Past: 74 Thing | Sand Rail | Baja Project | Oval Beetle |
|
| Back to top |
|
|
AggieZig
Samba Member
Joined: March 10, 2013
Posts: 188
Location: Los Angeles, CA
|
| Posted: Fri Oct 24, 2014 2:22 pm Post subject: |
|
|
On to some floor pan repairs....
Warning Now: Purists and those faint of heart.... don't keep scrolling.
SO I ordered replacement panels, thinking they were full size half panels... of course they were typical empi crap:
First up was the battery tray repair:
All welded in:
^ This goes to prove that you can do welding on pans with a cheap $100 Northern Tool Flux Core welder
The other side is much messier... and truthfully the whole half panel needed to be repaired. Seeing as I don't have that whole panel, I'll be (cringe) piecing it together:
This is going to be so much fun...
_________________
Zig, Aircooled Enthusiast
Current: Porsche 914 Resto | 1969 VW Beetle
Past: 74 Thing | Sand Rail | Baja Project | Oval Beetle |
|
| Back to top |
|
|
AggieZig
Samba Member
Joined: March 10, 2013
Posts: 188
Location: Los Angeles, CA
|
| Posted: Sat Oct 25, 2014 5:59 pm Post subject: |
|
|
Got around to finishing the floor "repair" today. Also found enough time to blast the frame and get a coat of Rustoleum Rusty Metal Primer on the bottom. I thinned 7:1 with mineral spirits and shot out of my $15 HF HVLP gun. Was actually really nice to spray and came out great for the novice.
Also loving my $100 Northern Tool Flux core welder.
Hoping to get the top sprayed tomorrow and then get a coat of bedliner on the whole thing. Not too shabby for just a couple of bucks invested.
_________________
Zig, Aircooled Enthusiast
Current: Porsche 914 Resto | 1969 VW Beetle
Past: 74 Thing | Sand Rail | Baja Project | Oval Beetle |
|
| Back to top |
|
|
63ziggy
Samba Member
Joined: June 19, 2005
Posts: 1100
Location: The Woodlands, Texas
|
| Posted: Sat Oct 25, 2014 9:07 pm Post subject: |
|
|
well, I see some lessons from dear old Dad have paid off years later. start them early. here's few teasers of the one the got away when AggieZig was around 12-13 yrs old.
enjoy AggieZig!!!!!!
child labor, gotta love it
|
|
| Back to top |
|
|
AggieZig
Samba Member
Joined: March 10, 2013
Posts: 188
Location: Los Angeles, CA
|
| Posted: Sun Oct 26, 2014 6:57 pm Post subject: |
|
|
Thanks for the shout out and throwback. I guess you could say I caught the disease / addiction at a young age...
Got the rest of the pan blasted and sprayed today. Looks great in the pics and looks good in person too - there are some corners that have been cut but I have to keep reminding myself it's just a baja.
Sitting in the sun to bake
The thinned rustoleum definitely dries quick and appears to be hard. Definitely happy with the finish. Much better than out of a rattle can!
Now on to bedliner...
_________________
Zig, Aircooled Enthusiast
Current: Porsche 914 Resto | 1969 VW Beetle
Past: 74 Thing | Sand Rail | Baja Project | Oval Beetle |
|
| Back to top |
|
|
gargamel
Samba Member
Joined: December 20, 2011
Posts: 693
Location: Orange Grove, Texas
|
| Posted: Mon Oct 27, 2014 10:20 am Post subject: |
|
|
Interesting. I will follow your build. Thanks for posting about the Texas law. I was not aware of.
BTW, I heard about people putting front fenders in the rear. What is the advantage of doing that vs. cutting the rear ones that are already there? Best of luck! |
|
| Back to top |
|
|
AggieZig
Samba Member
Joined: March 10, 2013
Posts: 188
Location: Los Angeles, CA
|
| Posted: Mon Oct 27, 2014 11:33 am Post subject: |
|
|
| gargamel wrote: |
Interesting. I will follow your build. Thanks for posting about the Texas law. I was not aware of.
BTW, I heard about people putting front fenders in the rear. What is the advantage of doing that vs. cutting the rear ones that are already there? Best of luck! |
The idea with swapping front / rear fenders is that the front fenders have a little wider shape and a higher arch. It lets you get a little more coverage over the tire before it "turns down" on the edge. Plus, in my opinion, looks more appropriate for a baja.
Additionally my car came with 4 front fenders so it worked out perfect for me
_________________
Zig, Aircooled Enthusiast
Current: Porsche 914 Resto | 1969 VW Beetle
Past: 74 Thing | Sand Rail | Baja Project | Oval Beetle |
|
| Back to top |
|
|
winchin73blazinbaja
Samba Member
Joined: June 26, 2014
Posts: 648
Location: Michigan
|
| Posted: Mon Oct 27, 2014 11:47 am Post subject: |
|
|
| AggieZig wrote: |
| gargamel wrote: |
Interesting. I will follow your build. Thanks for posting about the Texas law. I was not aware of.
BTW, I heard about people putting front fenders in the rear. What is the advantage of doing that vs. cutting the rear ones that are already there? Best of luck! |
The idea with swapping front / rear fenders is that the front fenders have a little wider shape and a higher arch. It lets you get a little more coverage over the tire before it "turns down" on the edge. Plus, in my opinion, looks more appropriate for a baja.
Additionally my car came with 4 front fenders so it worked out perfect for me |
gotta love when the world works in your favor! |
|
| Back to top |
|
|
AggieZig
Samba Member
Joined: March 10, 2013
Posts: 188
Location: Los Angeles, CA
|
| Posted: Wed Oct 29, 2014 11:59 am Post subject: |
|
|
I just finished getting the first couple of coats of Rustoleum bed liner on after sealing the seams with 3M Asphalt Roof Repair caulk (nasty stuff but does the job and is paintable in 1 hr)
Looking pretty good!
_________________
Zig, Aircooled Enthusiast
Current: Porsche 914 Resto | 1969 VW Beetle
Past: 74 Thing | Sand Rail | Baja Project | Oval Beetle |
|
| Back to top |
|
|
|


