| Author |
Message |
campingbox 
Samba Member
Joined: November 14, 2000
Posts: 10196
Location: Petaluma, CA

|
 Posted: Tue Nov 22, 2011 8:42 am Post subject: Re: Middle Seat Kick Panel stapling questions... Posted: Tue Nov 22, 2011 8:42 am Post subject: Re: Middle Seat Kick Panel stapling questions... |
 |
|
| Jack Frisch wrote: |
Greg
Couple questions...
-Are you using a staple gun or a desk stapler to staple in the staples on the back of a middle seat kick panel?
-Are you using a specific type of staple? I ask because the thickness of a middle seat kick panel isn't that thick where a regular staple, as far as i can see, would work.
Obviously I'm trying to avoid the staples coming thru and puncturing the front of the panel
How are you stapling the staple sin where they go straight thru the panel, or are you putting them in where the ends spread outward as they go in? Obviously a home desktop stapler gives the option to staple the ends outward, but I don't think a staple gun does
Any help appreciated
Jack Frisch |
I use a pneumatic stapler, If I remember correctly the staples measure 5/32".
In the beginning I tried using cut down staples, but I found that process very time consuming and was not happy with the finished quality. You might consider running the panel down to your local upholstery trimmer, I would expect they could attach the piping for you while you wait and for very little cost. |
|
| Back to top |
|
 |
campingbox
Samba Member
Joined: November 14, 2000
Posts: 10196
Location: Petaluma, CA
|
| Posted: Sun Aug 17, 2014 12:36 pm Post subject: |
|
|
I started this thread in 2005 after I made my first middle seat kick panel for Brian O'Kellys 21-window and haven't updated it in a while.
I look back at the pictures of kick panels I was making back then and feel they have came along way - although to date I have never really gotten any valuable criticism, or many complaints - the changes I have made have always just been me pushing myself to put out a better product. That said, if anyone has any suggestions or thinks I should do something differently let me know.
I haven't been buying up many rear seat kick panels to sacrifice these days - instead I invested a bunch of time into making some tools which have allowed me to reproduce the trim. Here are some pictures of what the metal kick panel trim looks like now.
And some comparison shots of the new piece vs. a restored original. It's hard to get good pictures of these when the trim is super shiny - I really could use some seamless paper and a nice shooting cove to take some better pictures.
I think the reproduction trim we made is a really nice match - it's made entirely in house starting with a perfectly flat piece of aluminum. Sometimes when I am restoring original pieces I have a hard time telling the new vs. old apart - I pretty much just have to look for the deep scratches that are always found in the original trim. The new dies are also allowing me to do a better job restoring original pieces - and much faster too - they make perfect molds for straightening out the old stuff. |
|
| Back to top |
|
|
BeaterBarndoor
Samba Member
Joined: December 15, 2000
Posts: 824
Location: North Carolina
|
| Posted: Sun Aug 17, 2014 1:42 pm Post subject: |
|
|
Looks great Greggy, nice job.
_________________
www.thebustransfer.com
Whaaaaat? |
|
| Back to top |
|
|
Jack Frisch
Samba Member

Joined: August 12, 2003
Posts: 743
Location: NY
|
| Posted: Sun Aug 17, 2014 2:17 pm Post subject: |
|
|
I like big time!!!
_________________
1958 Beetle orig. 6 volt 36 hp engine, body & pan, Black w/red/off white inter., Orig. VW wood roof rack and orig. rear luggage rack.
1967 13 Window Walk-thru Deluxe Bus, stock 1500 engine, Titan Red/Grey, Platinum Mesh interior, orig. & stock
1966 GT350H Shelby Orig. low mileage car
2002 PT Cruiser Limited Edition, stock, auto, loaded |
|
| Back to top |
|
|
zuggbug
Samba Member

Joined: June 17, 2008
Posts: 3479
Location: Anderson SC
|
| Posted: Sun Aug 17, 2014 3:51 pm Post subject: |
|
|
Outstanding
_________________
SOUTHERN INTEGRITY AIRCOOLERS
58 15 window
56 westy |
|
| Back to top |
|
|
scvw
Samba Member

Joined: September 02, 2006
Posts: 3544
Location: South Carolina
|
|
| Back to top |
|
|
ezcamper
Samba Member

Joined: January 10, 2001
Posts: 897
Location: Atlantic Beach, FL
|
| Posted: Sun Aug 17, 2014 5:19 pm Post subject: |
|
|
looks great
_________________
I make HWE style roof racks, Jim-Dandy racks, SO-33 metal parts, Dormobile racks, HWE style ladders, engine crank start handles, Westy rack tags, Binz tags, Sundial badges, State of California tags, steering lock electrical covers and single / double cab gate latch friction blocks.
instagram is http://instagram.com/bullidriversteelworks |
|
| Back to top |
|
|
Braukuche
Samba Member
Joined: September 03, 2004
Posts: 10997
|
| Posted: Sun Aug 17, 2014 8:04 pm Post subject: |
|
|
Damn, Greg, those look super nice! Any chance you are doing the earlier style?
_________________
Go Reds! Smash state!
Retirement is here!
1956 Ghia
1959 SO-23 Westfalia
1960 double cab
1960 Baja Bug
1963 stretched double cab
1962 Golde sunroof Ghia
1963 356 B coupe
1963 Notchback
1967 21 window less rusty now |
|
| Back to top |
|
|
campingbox
Samba Member
Joined: November 14, 2000
Posts: 10196
Location: Petaluma, CA
|
| Posted: Mon Aug 18, 2014 10:54 am Post subject: |
|
|
| Braukuche wrote: |
| Damn, Greg, those look super nice! Any chance you are doing the earlier style? |
Thanks!
Ricardo in Argentina has already done an impressive job reproducing the snowflake trim - if you are in need I would suggest buying it from him.
Bulk material:
http://www.thesamba.com/vw/classifieds/detail.php?id=956609
If you need someone to add the upper pressing, shape it, and mount it onto upholstered kick panels I could do this using my dies. I would prefer to do both the middle and the rear at the same time because my upper bead probably will not match the middle kick panels he offers perfectly - and I think it would be better to have them both exactly the same.
If you just need a middle, you can buy it from him already trimmed out:
http://www.thesamba.com/vw/classifieds/detail.php?id=1008793
His trim is not perfect, but I like using it and think it's a fairly impressive reproduction. I certainly don't have the skills to do better. If someone down the road contacts me with the skills to take a better stab at reproducing it - I certainly would be willing to collaborate with them. I think a lot of the tools I already made would work the same - just need someone able to transfer the pattern into a computer file and then someone with contacts to get a pair of round roller dies laser engraved or etched - not sure which would work - might take a couple attempts to get perfect. |
|
| Back to top |
|
|
Wiggy
Samba Member
Joined: April 17, 2003
Posts: 6601
Location: Downingtown, PA
|
| Posted: Mon Aug 18, 2014 4:00 pm Post subject: |
|
|
| campingbox wrote: |
| Braukuche wrote: |
| Damn, Greg, those look super nice! Any chance you are doing the earlier style? |
Thanks!
Ricardo in Argentina has already done an impressive job reproducing the snowflake trim - if you are in need I would suggest buying it from him.
Bulk material:
http://www.thesamba.com/vw/classifieds/detail.php?id=956609
If you need someone to add the upper pressing, shape it, and mount it onto upholstered kick panels I could do this using my dies. I would prefer to do both the middle and the rear at the same time because my upper bead probably will not match the middle kick panels he offers perfectly - and I think it would be better to have them both exactly the same.
If you just need a middle, you can buy it from him already trimmed out:
http://www.thesamba.com/vw/classifieds/detail.php?id=1008793
His trim is not perfect, but I like using it and think it's a fairly impressive reproduction. I certainly don't have the skills to do better. If someone down the road contacts me with the skills to take a better stab at reproducing it - I certainly would be willing to collaborate with them. I think a lot of the tools I already made would work the same - just need someone able to transfer the pattern into a computer file and then someone with contacts to get a pair of round roller dies laser engraved or etched - not sure which would work - might take a couple attempts to get perfect. |
Agreed. Here is the repro in my 57. It came out great.
And by the way - Greg does a kick ass job restoring originals.
_________________
Kevin "Wiggy"
My 58 Ghia Vert
My 51 Split 11G
My 57 Deluxe
My 56 Oval |
|
| Back to top |
|
|
campingbox
Samba Member
Joined: November 14, 2000
Posts: 10196
Location: Petaluma, CA
|
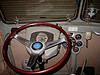
| Posted: Mon Sep 15, 2014 5:38 pm Post subject: |
|
|
| Wiggy wrote: |
And by the way - Greg does a kick ass job restoring originals.
|
Thanks Kevin - Ronnies bus is looking awesome.
I've had some requests for rear kick panels using Ricardo's trim so I figured I would add some photos and comparison shots.
This is how the trim arrives:
Here is a green middle seat kick panel I made using Ricardo's trim:
This is how our fabric, piping, and his trim compare to a original pieces:
Rear seat kick panel coming soon.....
|
|
| Back to top |
|
|
campingbox
Samba Member
Joined: November 14, 2000
Posts: 10196
Location: Petaluma, CA
|
| Posted: Wed Sep 24, 2014 4:55 pm Post subject: |
|
|
|
|
| Back to top |
|
|
andre b
Samba Member

Joined: August 10, 2004
Posts: 806
Location: San Jose C.A.
|
| Posted: Wed Sep 24, 2014 5:10 pm Post subject: |
|
|
| damn...nice work Greg..im going to have to get a set for FINKS!! |
|
| Back to top |
|
|
Stocknazi
Samba Member

Joined: June 18, 2004
Posts: 5150
|
| Posted: Wed Sep 24, 2014 5:55 pm Post subject: |
|
|
The repo trim, although nice, looks like it does not have the fine detail that the og has; it does not have that "metal turned" look.
Nice work on the mounting, looks spot on.
_________________
WANTED:
58 Westfalia cabinet knobs (3 needed), roof rack, and (7) privy tent poles (silver painted).
"When the people are afraid of the government, that's tyranny. But when the government is afraid of the people, that's liberty."
"Resistance to tyrants is obedience to God."
Thomas Jefferson |
|
| Back to top |
|
|
|


