| Author |
Message |
germanx
Samba Member
Joined: July 29, 2010
Posts: 326
Location: Germany

|
 Posted: Mon Nov 11, 2013 2:09 am Post subject: Hard Top Project Posted: Mon Nov 11, 2013 2:09 am Post subject: Hard Top Project |
 |
|
Hello from Europe,
I scored a used hardtop and plan to fit it to my buggy this winter.
The hardtop I found in the UK has the shape of the Manx hardtop, just that is completely encloses the car around the rear end.
I would like to get some other opinions / experiences / suggestions from you to decide on the final outer/inner color and design of the roof and what I hav to consider whilst I laminate it to fit.
In case some specific work steps should be covered while I am modelling the edges and the front lip of the roof (e.g. any type of brackets to mount the roof to the rollbar) I don't want to miss them and start all over again.
I plan to participate on some events, and in that case I prefer to mount the roof.
Also most of the questions are in fact 'no-brainers', I would like to get your opinions and experiences with hard tops and specifically with the long term effects of weather, and dust impact considering dark and light types of colors, outer and interior design (flowers or motive on the outside, padding or stitched liner on the inside....things like that).
Waht do I have to consider regarding performance of the roof:
- Easy / rigid mounting
- Noise / sound protection
- Risk of contact with gasoline also on the inside
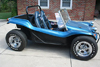
I want to find the color of the roof which fits perfectly to the classic appearance of our buggy:
Our buggy is a classical type buggy with a large Petri wood steering wheel, single rollbar and I plan to mount my CalParts once I have had them re-welded to perfect offset.
So after all, not the aggressive sportive look (also my wife likes sportive buggies even more...).
The body color is an original 1970ies Porsche Maroon Brown, and I plan to built a new stainless steel polished rollbar for it to fit the hard top.
The vinyl seats are and any other new seats will always stay black.
So here are some of my questions:
Should I put a motive on the outside across the whole roof, or just some stripes in body color across a beige unicolor roof?
Should I put a flower sky in the inside or soft padding?
Should i fit a rear window and should it open? (this will blow exhaust fumes into the car during driving...)
Should I further model the sides or leave the geometry as is?
The roof is a little too long, should I leave it at about 2 inches reaching over the front window frame (like a' built-in' sun visor), or should I shorten it to sit tight with the window frame?
What is the ideal inclination of the roof? I still can adjust that as i will have the roll bar custom made to fit into the hardtop.
I personally think a creamy-white or beige roof will compliment the car's body color and make it a 'light' appearance as the black roof make the car more dominant and heavy. So cream-white or beige color is one of my favorites.
I know, lots of different opinions out there, but just start firing, I appreciate any aspect and ideas you have to define the final package.
Our buggy:
My hardtop:
Cream White:
Modified side curtain geometry:
My idea about different side gemotery:
With flowers - The car looks like I want ours to finally look like:
_________________
'73 Beach Buggy
'66 T1 Deluxe |
|
| Back to top |
|
 |
parmaynu
Samba Member
Joined: March 29, 2004
Posts: 182
Location: Kent, England
|
| Posted: Mon Nov 11, 2013 2:51 am Post subject: |
|
|
Great looking buggy!
Personally I would cut and shape the roof to fit yours. A friend of mine here in the UK made the mould for that roof and most of them seem to need some tweaking to look just right but when done right they are a very good roof and give a lot more coverage than a traditional Manx roof.
There was a French Manx for sale last year that had a roof covered in a canvas material and it looked amazing IMHO.
The louvred rear window looks great too.
That brown Manx is stunning btw! |
|
| Back to top |
|
|
Wetstuff
Samba Member
Joined: September 23, 2010
Posts: 700
Location: Maryland
|
| Posted: Mon Nov 11, 2013 6:04 am Post subject: |
|
|
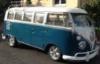
Not on my list of 'favorite persons' but Janis Joplin's painted Porsche from 1968 might provide a conversation starter.
Jim
_________________
Manx #2614 |
|
| Back to top |
|
|
Rathbone
Samba Member

Joined: February 25, 2006
Posts: 235
Location: Palm Coast, Florida
|
| Posted: Mon Nov 11, 2013 10:04 am Post subject: |
|
|
I like the current shape of the top. I wouldn't change it more than I had to.
I think the flowers are cute but are too bold for the outside. I'd use a solid color on the outside and put the flowered paper on the inside. 
_________________
(o\_i_/o) what you've just said ... is one of the most insanely idiotic things I have ever heard. At no point in your rambling, incoherent response were you even close to anything that could be considered a rational thought. Everyone in this room is now dumber for having listened to it. I award you no points, and may God have mercy on your soul - Mr. Oblaski, Principal |
|
| Back to top |
|
|
germanx
Samba Member
Joined: July 29, 2010
Posts: 326
Location: Germany
|
| Posted: Tue Nov 12, 2013 3:44 am Post subject: |
|
|
Thanks for the feedback so far.. Flowers inside I like....
_________________
'73 Beach Buggy
'66 T1 Deluxe |
|
| Back to top |
|
|
BL3Manx
Samba Member
Joined: August 29, 2006
Posts: 6767
Location: Northern California
|
| Posted: Tue Nov 12, 2013 3:50 am Post subject: |
|
|
I like the outline of the top in your drawing. You might want to consider adding some rear quarter window cut outs like the original convertible tops had.
Try to keep the "ear flaps"outside or at least on top of the back seat area. It requires something to protect the finish from being rubbed and scratched but having the top tucked inside the back seat looks very poorly assembled.
http://www.flickr.com/photos/lvsutton/4336928019/sizes/l/in/photostream/ |
|
| Back to top |
|
|
Rathbone
Samba Member
Joined: February 25, 2006
Posts: 235
Location: Palm Coast, Florida
|
| Posted: Fri Jan 17, 2014 9:32 am Post subject: |
|
|
How did this turn out?
I really like the original shape of that roof. Does anyone know where to get one in the US?
_________________
(o\_i_/o) what you've just said ... is one of the most insanely idiotic things I have ever heard. At no point in your rambling, incoherent response were you even close to anything that could be considered a rational thought. Everyone in this room is now dumber for having listened to it. I award you no points, and may God have mercy on your soul - Mr. Oblaski, Principal |
|
| Back to top |
|
|
manxdavid
Samba Member

Joined: November 24, 2003
Posts: 1841
Location: David Jones, Anglesey, North Wales, UK. Manxclub #678.
|
| Posted: Sat Jan 18, 2014 8:33 am Post subject: |
|
|
The original top that the mould was taken off came from Bruce Meyers, it was white in color and had black louvred rear window. He sent it over in around the year 2000.
I always had it mind that it was off the buggy that inspired this toy one...
[/img] |
|
| Back to top |
|
|
germanx
Samba Member
Joined: July 29, 2010
Posts: 326
Location: Germany
|
| Posted: Wed Sep 17, 2014 4:51 am Post subject: some updates |
|
|
I did some more work on my hardtop:
1. I slotted the side curtains diagonally with a disc grinder to bend the lower edges in order to match the slightly smaller body geometry. I glassed and filled the cuts afterwards from both sides.
2. I also added a front lip to the top (it came without as it had been used as a mold plug)
Here I noticed a mistake: I thought I have to mold the lip such way it fits into the small groove along the outside edge of the windshield frame. But thickness and shape are very difficult to achieve without a negative form. So I molded on the taped-off frame itself, not perfect but ok. I used a mat-like material which turns flexible and soft when soaked with resin.
Just today I noticed the hardtops do embracing the total frame with their front lip which basically "sits" close to or on the window's front face.
This has the advantage that the radius of the front lip can be bigger (helps for glassing), and thickness is not limited by the width of the slot. I have decided to just add more layers of resin and glass to form a wider radius and a slightly larger lip. Much easier actually than my first approach.
3. I cut, remolded and filled the lower edge where the roof sits on the body.
4. The roof sits on the horizontal areas of the body. I modeled a Z-like shape towards the inside. This way, I have a defined area where I will glue self adhesive thick rubber gasket (natural foam) to protect the body paint from scratches and to seal the car against water spray (should that ever happen - I hope not).
I don't work on it for now, as the roll-cage has to be done first before I can fine-adjust the roof on its fixtures, which will be integrated into the rear rollbar.
The feature to lift the roof at the rear end using two Smart Rear lid gas dampers I have dropped after I found I can still enter and exit the car with the roof mounted without being a contorsionist.
The rear window is already sitting here cut to my design. This will have to be fitted as well...
some pics:
_________________
'73 Beach Buggy
'66 T1 Deluxe |
|
| Back to top |
|
|
bugtub
Samba Member
Joined: January 05, 2006
Posts: 96
|
|
| Back to top |
|
|
germanx
Samba Member
Joined: July 29, 2010
Posts: 326
Location: Germany
|
| Posted: Wed Sep 17, 2014 10:30 am Post subject: |
|
|
Yes, i know they are being sold for 1300 USD.
I paid just 150 USD for the mold plug. The benefit of this one is that it is stiffer due to inserted wooden beams which were molded in to strenthen against torsion.
_________________
'73 Beach Buggy
'66 T1 Deluxe |
|
| Back to top |
|
|
bugtub
Samba Member
Joined: January 05, 2006
Posts: 96
|
| Posted: Thu Sep 18, 2014 12:52 am Post subject: |
|
|
| More like 300 USD and they fit strait on. And yes they are strengthened were needed |
|
| Back to top |
|
|
germanx
Samba Member
Joined: July 29, 2010
Posts: 326
Location: Germany
|
| Posted: Thu Sep 18, 2014 1:13 am Post subject: |
|
|
| bugtub wrote: |
| More like 300 USD and they fit strait on. And yes they are strengthened were needed |
Bugtup is correct - sorry, my mistake. I quoted a site which is not .co.uk, but .co.nz.:
http://www.beachbuggies.co.nz/parts_bodies.html
The site you refer to and I had in mind is the one above...
In any case, I like the enclosed version much better. Looking forward to drive it the fist time...
_________________
'73 Beach Buggy
'66 T1 Deluxe |
|
| Back to top |
|
|
germanx
Samba Member
Joined: July 29, 2010
Posts: 326
Location: Germany
|
| Posted: Fri Feb 17, 2017 2:08 am Post subject: Re: Hard Top Project |
|
|
Ok, the project continues....
The original rollbar was too high to fit the roof, so I had some year delay until I could fit it on top of the new rollbar.
The rollbar was bent from a pipe bending shop with a AD CNC Bender. More to this one in the rollbar threat.
Just wanted to update you on the roof progress. This is what it loked like when I got it, and so far I have:
- corrected the lower edge to fit the shape of the body
- pushed the curtains (C-beams) inward to adjust to body width
- shaped the missing front lip so the roof sits tight in the window frame slot
And I added a rear window which I had made from car glas more than 1 year ago. It was lying under my bed (I better don't show a picture....)
Ok, this is what the roof looked when i got it:
This is the mockup I did to figure the best looking window geometry:
This is the work I did the last two evenings:
1) Cut out the window + seal area
2) Fit the window:
And here a picture of the front lip of the top sitting tight in the window frame:
Next steps are the production of the front mount and the production of the two rear gas damper fixtures to lift the roof for easy access.
_________________
'73 Beach Buggy
'66 T1 Deluxe |
|
| Back to top |
|
|
andygere
Samba Member

Joined: January 31, 2014
Posts: 600
Location: Central Coast, CA
|
| Posted: Sat Feb 18, 2017 11:31 am Post subject: Re: Hard Top Project |
|
|
Very nice work on the hard top, looks great. On color, I really like solid black or white. This makes it look clean and matched when adding vinyl side-curtains. Other colors will be more difficult to match and never look quite as clean. If you are not bothering with side curtains, do whatever color lights your fire.
Here's a link to an article that talks about how a retro flower hard top was done.
http://www.flatlandsengineering.co.uk/fle/download/VolksWorldFeb13YellowSteveCollis.pdf |
|
| Back to top |
|
|
BerryMini-T4
Samba Member
Joined: June 29, 2016
Posts: 3
|
| Posted: Sat Feb 18, 2017 11:50 pm Post subject: Re: Hard Top Project |
|
|
Speaking of hard tops...
I have a Berry Mini-T 4 buggy and i am looking for a hard top for it. I have found a photo of one online that i really like but i cant seem to find one specifically for it.
Anyone have any insight if it would fit and/or where i can found one or tips on making my own?
Example:
|
|
| Back to top |
|
|
germanx
Samba Member
Joined: July 29, 2010
Posts: 326
Location: Germany
|
| Posted: Sun Feb 19, 2017 9:36 am Post subject: Re: Hard Top Project |
|
|
Thanks Andy,
Our Top will stay black from the outside. After all fitting work has been done, it will get a new paint job.
From the inside it will be covered with flowers. We found an nice piece of fabric in a local draper's store and decided to get it. I think the meter was about 6 USD. Pretty nice to get the full roof covered for 30 USD. I read here somebody had the full UV proof original Manx flower power fabric special made in Netherlands, and i recall this material was least 10 times more expensive.
And UV proof cotton is not really required in our use case: we only use the roof in case it could rain, and if it does not rain there are a lot of clouds anyhow. So, no worries about fading colors.
Flower power is kind of cool, but I wanted to stay decent on the street - and kind of flippy from the inside.
The cloth will get laminated with Epoxy as they do with surfboards... Hope to get to it this summer (when the temps go up to work with the nasty stuff in the open...)
The green flowers will work with the Porsche Maroon Brown, and the gun metal leaves will match the black seats and dashboard. And if I get to paint the car in dark pink one day, it will fit as well.
My watch is there to give you an idea of the size. We decided to not have the flowers too big, so the overall flower field will kind of cover the various recesses and lips our roof has from the inside (it was used as a mold plug and as such they added strength with wooden rails - laminated from the inside)
_________________
'73 Beach Buggy
'66 T1 Deluxe |
|
| Back to top |
|
|
andygere
Samba Member
Joined: January 31, 2014
Posts: 600
Location: Central Coast, CA
|
| Posted: Sun Feb 19, 2017 2:16 pm Post subject: Re: Hard Top Project |
|
|
| You may want to laminate the cloth in a clear polyester resin such as those used in surfboard building for better UV resistance. It's much cheaper, and so much easier to sand and polish than epoxy. It's also much less expensive. |
|
| Back to top |
|
|
barrist
Samba Member

Joined: September 04, 2010
Posts: 271
Location: South Bend,IN
|
| Posted: Sun Feb 19, 2017 6:24 pm Post subject: Re: Hard Top Project |
|
|
A "Hard Top" on a dune buggy,,,,,,,WTF ? 
Have a Great Day,
Bill
_________________
Back to work after a 6 year lack-of-motivation !
Still looking for the GAS CAP (check that,Done)
Thank YOU , this site works |
|
| Back to top |
|
|
germanx
Samba Member
Joined: July 29, 2010
Posts: 326
Location: Germany
|
| Posted: Mon Feb 20, 2017 12:48 am Post subject: Re: Hard Top Project |
|
|
| andygere wrote: |
| You may want to laminate the cloth in a clear polyester resin such as those used in surfboard building for better UV resistance. It's much cheaper, and so much easier to sand and polish than epoxy. It's also much less expensive. |
Yes, agree. Actually I used polyester resin - just didn't recall from the top of my head as I last worked with it some years ago....
The roof is made with polyester resin, so I had to use this type. Far less dangerous than the other stuff....
_________________
'73 Beach Buggy
'66 T1 Deluxe |
|
| Back to top |
|
|
|


