Hello! Log in or Register   |  Help  |  Donate  |  Buy Shirts See all banner ads | Advertise on TheSamba.com  
TheSamba.com
 
Truck gate repair
Forum Index -> Split Bus Share: Facebook Twitter
Reply to topic
Print View
Quick sort: Show newest posts on top | Show oldest posts on top View previous topic :: View next topic  
Author Message
nlorntson
Crazy VW Lady


Joined: March 13, 2004
Posts: 3783
Location: Twin Cities, MN
nlorntson is offline 

PostPosted: Tue Dec 16, 2014 10:18 pm    Post subject: Truck gate repair Reply with quote

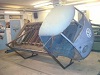
We are restoring a 1963 Double cab so I thought it might be nice to share some pictures of the gate repairs.

The bottom rails on all three gates were pretty rough although it was not evident at first glance because a PO had filled every dent and rust hole with bondo and sculpted it to look nice.

Each of the spotwelds holding the rib to the outer panel and vertical ribs must be drilled out. If you remove the paint and get down to metal you can see where each one is.

It appears VW never painted the inside of these gates so they rust like crazy. Here is the bottom rib mostly removed:

Image may have been reduced in size. Click image to view fullscreen.


Image may have been reduced in size. Click image to view fullscreen.


Here is one of the vertical ribs removed. Note the drain pressing on the top rib. The KF green replacement pieces don't have this drain pressing.

Image may have been reduced in size. Click image to view fullscreen.


The bottom rib has the outer skin spot welded and crimped tightly around the lower edge. To separate the two, each spot weld must be ground off and the two pieces gently spread apart. Too much and the crimp will be torn or too stretched to redo.

Image may have been reduced in size. Click image to view fullscreen.


Image may have been reduced in size. Click image to view fullscreen.


Image may have been reduced in size. Click image to view fullscreen.


We sand blasted the gates once the pieces to be replaced were all removed:

Image may have been reduced in size. Click image to view fullscreen.


Image may have been reduced in size. Click image to view fullscreen.


The KF pieces also don't come wtih the drain holes so we added them too.

Image may have been reduced in size. Click image to view fullscreen.


The hinges did not fit the profile of the KF green piece. Here you can see the difference. We had to remove some of the lip of the hinge to get it to drop down in the rib properly.

Image may have been reduced in size. Click image to view fullscreen.


Image may have been reduced in size. Click image to view fullscreen.


The hinges are mounted to the gate via quite a few tiny spotwelds

Image may have been reduced in size. Click image to view fullscreen.


Image may have been reduced in size. Click image to view fullscreen.


Here is the part number of the hinge.

Image may have been reduced in size. Click image to view fullscreen.


Once everything is cleaned up the piece can be slipped in and positioned. It is important that the gate be straight first. This gate had a slight bow in it caused by two dents in the top rib.

These dents were worked out and the bow was removed.

Image may have been reduced in size. Click image to view fullscreen.


Once the gate is straight the new piece will slip right in. Welding is straight forward by flipping the gate over and welding from the outside.

Image may have been reduced in size. Click image to view fullscreen.


The corners and center ribs are welded

Image may have been reduced in size. Click image to view fullscreen.


Lastly the crimp is welded and gently restored.

Image may have been reduced in size. Click image to view fullscreen.


Image may have been reduced in size. Click image to view fullscreen.


The gate looks much better now!

Image may have been reduced in size. Click image to view fullscreen.


A bit more welding and grinding to be done.

These are a lot of work but they can be done. We blasted as much as we could up inside the other ribs, but I think we will probably coat the inside with some type of chassis internal frame coating or similar befoe we start the bodywork on them.
Back to top
View user's profile Send private message Visit poster's website Gallery Classifieds Feedback
kalymnos Premium Member
Samba Member


Joined: January 22, 2010
Posts: 112
Location: Hamburg/Germany
kalymnos is offline 

PostPosted: Wed Dec 17, 2014 3:02 am    Post subject: Reply with quote

Thank you for sharing your experience.
Love this kind of contributions on "TheSamba"; love "TheSamba" at all.
Back to top
View user's profile Send private message Send e-mail Gallery Classifieds Feedback
Huetti_1989
Samba Member


Joined: February 13, 2011
Posts: 1135
Location: Austria
Huetti_1989 is offline 

PostPosted: Wed Dec 17, 2014 2:16 pm    Post subject: Reply with quote

Thanks you too for sharing!

Did the outer skin is in good shape at all?

I must replace the outer skin at some points too, this is bad i think...
Back to top
View user's profile Send private message Gallery Classifieds Feedback
cru62
Samba Member


Joined: December 31, 2002
Posts: 4117
Location: Margaritaville.....24/7
cru62 is offline 

PostPosted: Wed Dec 17, 2014 6:30 pm    Post subject: Reply with quote

I really, really like this stuff and the application method.-

http://www.eastwood.com/internal-frame-coating-w-spray-nozzle-qt.html
_________________
"My biggest worry is that when I die, my wife will sell all my parts for what I told her I paid for them"-Jon

Jokes about German sausage are the wurst.

Stop dead photo links! Post your photos to The Samba Gallery!
Back to top
View user's profile Send private message Gallery Classifieds Feedback
Alexmobil
Samba Member


Joined: November 28, 2010
Posts: 71
Location: El Salvador
Alexmobil is offline 

PostPosted: Thu Dec 18, 2014 5:54 pm    Post subject: Reply with quote

Excelent!
IŽll have to do the same job with the DC dropgates and this thread will be a great reference.
Back to top
View user's profile Send private message Gallery Classifieds Feedback
easy e
Samba Member


Joined: May 28, 2008
Posts: 3931
Location: 1 hr north of Santa Barbara
easy e is offline 

PostPosted: Thu Dec 18, 2014 7:33 pm    Post subject: Reply with quote

Nice job on the gates!

The part number on the hinge, shown above (261829365)... is for what I suspect to be the hinge half.... but maybe not?

The barndoor part number for the full hinge is 261829171.
As seen here (#43): http://www.oacdp.org/5054part/294.jpg
And listed here: http://www.oacdp.org/5054part/302.png

261829361 for post barndoor:
Diagram (#72): http://www.oacdp.org/5867part/423.png
List: http://www.oacdp.org/5867part/429.png

Just posting it in case anyone is ever tearing into their gates & decides on looking for new hinges... they might be able to search a few part numbers to get a hit.
e
Back to top
View user's profile Send private message Instagram Gallery Classifieds Feedback
nlorntson
Crazy VW Lady


Joined: March 13, 2004
Posts: 3783
Location: Twin Cities, MN
nlorntson is offline 

PostPosted: Thu Dec 18, 2014 8:24 pm    Post subject: Reply with quote

easy e wrote:
Nice job on the gates!

The part number on the hinge, shown above (261829365)... is for what I suspect to be the hinge half


Thank you e!

Yes, that part number is on the piece that attaches to the truck.
Back to top
View user's profile Send private message Visit poster's website Gallery Classifieds Feedback
mr white
Samba Member


Joined: October 02, 2005
Posts: 1193
Location: beautiful Oregon & Mohave County, AZ
mr white is offline 

PostPosted: Sat Dec 20, 2014 8:26 pm    Post subject: Reply with quote

I vote sticky! Good clean honest info here. Nice job Sir,thanks for taking the time to share.
Back to top
View user's profile Send private message Send e-mail Gallery Classifieds Feedback
Display posts from previous:   
Reply to topic    Forum Index -> Split Bus All times are Mountain Standard Time/Pacific Daylight Savings Time
Page 1 of 1

 
Jump to:  
You cannot post new topics in this forum
You cannot reply to topics in this forum
You cannot edit your posts in this forum
You cannot delete your posts in this forum
You cannot vote in polls in this forum

About | Help! | Advertise | Donate | Premium Membership | Privacy/Terms of Use | Contact Us | Site Map
Copyright © 1996-2023, Everett Barnes. All Rights Reserved.
Not affiliated with or sponsored by Volkswagen of America | Forum powered by phpBB
Links to eBay or other vendor sites may be affiliate links where the site receives compensation.