| Author |
Message |
ToughBug
Samba Member
Joined: July 22, 2014
Posts: 354
Location: Carlisle, Pennsylvania

|
 Posted: Fri Jul 29, 2016 7:30 pm Post subject: My vinyl wrap story Posted: Fri Jul 29, 2016 7:30 pm Post subject: My vinyl wrap story |
 |
|
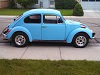
Recently decided our DIY paint job wasn't good enough. Opted to try vinyl wrapping instead. It was hard to find information about wrapping a beetle. So, here's our experience.
We ordered from Feller's and got 13 yards (6'width) of Avery-Dennison color change wrap, ands couple of felt scrapers. Using my wife's hair drier.
Cleaned body parts with isopropanol. Let dry. All of parts are off, since this was a full body off rebuild of a 74 body + 73 chassis super beetle.
Started with the front hood.
Nothing ever comes with instructions. But watched 4-5 videos. Never done this before. It quickly becomes clear that applying very thin, flat vinyl which is tacky in one side and heated, so as to cover curved surfaces without wrinkles or bubbles is defying the laws of physics. Never before have I really thought about how curvey a VW super beetle is. It's nothing like the panel vans or BMWs in the videos. Nothing, at all.
Our color indicated there would be no bleed through of the bright color underneath and amazingly, there is not.
It good took 2 hours with two people pulling and stretching and cursing. The product goes down and come back up and can be heated to stretch or reform. Any imperfections show through the vinyl - in our case two layers of master series silver and two layers of AG111 paint applied with a roller. So, some ridges. To be expected. But sand the body smooth, or be ok with imperfections. Curves and corners are tough and there are a lot of those. Fold under lips and ridges and when you are sure it's good trim to about an inch over and tuck it under. Too much excess makes a mess. A day later we had a few small holes along the front lip. Disappointing. Not sure why. Shrinkage maybe? Sharp imperfections? We cut a patch and applied over and that actually looks ok. We plan a sort of nose guard later anyway. We worked on a clean wood floor and having the hood upside down made very small marks l, where imperfections were pressed through. Also disappointing, but only we will ever notice them. In the end the color is good and the finish is exactly as smooth as what is underneath. And much better than our DIY paint job.
Since that we have done two fenders and the sunroof. Each fender took 90 minutes with two people.
You must get on with your partner well. And it's OK to swear up and down. Your fingers will ache and hurt from handling hot vinyl.
I was a bit concerned about the edges, wrapping the vinyl underneath the fenders, for example. But it seems fine. FYI the product seems less eager to stick to primer. Make sure you clean underneath with isopropanol too. And let it evaporate.
I suppose that is an IMPORTANT safety tip. Isopropanol is flammable, so like let is totally evaporate and put the bottle away before hearing with the hair drier.
I'm guessing the whole car will be 25 hours of two people working together. I anticipate the problem areas to be the engine compartment (might not wrap that) and door hinges (maybe fashion a rubber covering instead) and the doors. But more on those later on.
Maybe a heavy duty product (thicker) would survive the edges better - but it might also be tougher to flex around curves.
So far I'm happy with it. It's frustrating and take loads of patience. But we also enjoy it - learning and making a little progress each day.
I'll post some photos eventually. No free hands so far.
Tom
_________________
1973 chassis + 1974 body = super beetle saved |
|
| Back to top |
|
 |
ToughBug
Samba Member
Joined: July 22, 2014
Posts: 354
Location: Carlisle, Pennsylvania
|
| Posted: Sat Jul 30, 2016 10:12 am Post subject: Re: My vinyl wrap story |
|
|
_________________
1973 chassis + 1974 body = super beetle saved |
|
| Back to top |
|
|
ToughBug
Samba Member
Joined: July 22, 2014
Posts: 354
Location: Carlisle, Pennsylvania
|
| Posted: Sat Jul 30, 2016 10:13 am Post subject: Re: My vinyl wrap story |
|
|
This door, front and back, took 4 hours with 2 people.
_________________
1973 chassis + 1974 body = super beetle saved |
|
| Back to top |
|
|
ps2375
Samba Member
Joined: April 24, 2014
Posts: 2471
Location: Meridian,ID
|
| Posted: Sat Jul 30, 2016 11:36 am Post subject: Re: My vinyl wrap story |
|
|
| If the paint is as rough as it looks in the pics, couldn't you have block sanded it to make it smooth? Then the vinyl would have turned out much smoother. Having worked in a sign shop for a time, I know how it is handling large sections of vinyl, lots of water with a touch of soap can help, but it is still work. |
|
| Back to top |
|
|
ToughBug
Samba Member
Joined: July 22, 2014
Posts: 354
Location: Carlisle, Pennsylvania
|
| Posted: Sat Jul 30, 2016 1:57 pm Post subject: Re: My vinyl wrap story |
|
|
Yep, it's not professionally smooth underneath. Super rusty but got the full treatment including two coats of master series silver. I understood we you shouldn't sand it too much or else the rust barrier is compromised. I light sanded it but it had brush strokes still. The AG 111 red picked up those. We applied with rollers. (I know, had to economize as car needed way more fixing than anticipated and have to save budget for engine, etc.) We wet sanded between all two or three coats of red - turned he red into a hazy pink. Buffing and clear coat in a little section did nothing for that. Nor did application of their thinner, a suggestion of the nice MS folks. Not a great success, so the vinyl. We did one last sanding with 180 grit to knock the big stuff down. But you're right, it is not super smooth. We're learning. And it looks way, way better than the red did. And it *should* have super rust protection.
I'll do a patch of another door I have with "real" auto paint and take a photo to compare.
We've had far more challenges than I ever imagined and this car is now really the working parts of two. So I'm trying to focus on the learning, and the enjoyment, and then one day driving the heck out of this bug.
_________________
1973 chassis + 1974 body = super beetle saved |
|
| Back to top |
|
|
ToughBug
Samba Member
Joined: July 22, 2014
Posts: 354
Location: Carlisle, Pennsylvania
|
| Posted: Sun Jul 31, 2016 5:58 am Post subject: Re: My vinyl wrap story |
|
|
10 hours Saturday, and we finished he second rear quarter panel. Back at it today.
_________________
1973 chassis + 1974 body = super beetle saved |
|
| Back to top |
|
|
ToughBug
Samba Member
Joined: July 22, 2014
Posts: 354
Location: Carlisle, Pennsylvania
|
| Posted: Sun Jul 31, 2016 7:33 pm Post subject: Re: My vinyl wrap story |
|
|
Put in 25 hours from Friday until 11pm Sunday night. Have done three fenders, one door, both rear quarter panels, one front quarter panel, and engine lid and area. It's a real workout. We'll no doubt need more vinyl. The primary challenge is the curviness. Did the tail end - a nice flat area - and boy that was easy. Easy! Everything else is twists and turns, so it takes a while. We do like how it looks however. No photos today. We were focused on making progress.
_________________
1973 chassis + 1974 body = super beetle saved |
|
| Back to top |
|
|
Cali_Army_Guy
Samba Member
Joined: March 19, 2015
Posts: 2094
Location: Stockton, CA
|
| Posted: Thu Aug 04, 2016 7:45 pm Post subject: Re: My vinyl wrap story |
|
|
Why didn't you just plasti dip it? Would have been cheaper, faster, easier, and the end result would look better.
https://www.dipyourcar.com
_________________
2015 VW Passat Wolfsburg Edition
1966 VW Beetle - Sold |
|
| Back to top |
|
|
ToughBug
Samba Member
Joined: July 22, 2014
Posts: 354
Location: Carlisle, Pennsylvania
|
| Posted: Fri Aug 05, 2016 4:36 pm Post subject: Re: My vinyl wrap story |
|
|
That looks interesting. I'd never heard of it. We're in too deep now, so we'll see how it ends up.
_________________
1973 chassis + 1974 body = super beetle saved |
|
| Back to top |
|
|
Keith
Samba Member

Joined: August 15, 2005
Posts: 3634
Location: Brodheadsville, PA
|
| Posted: Mon Aug 08, 2016 10:38 am Post subject: Re: My vinyl wrap story |
|
|
| Cali_Army_Guy wrote: |
Why didn't you just plasti dip it? Would have been cheaper, faster, easier, and the end result would look better.
https://www.dipyourcar.com |
X2.
_________________
Formerly known in the forums as "OVALTEEN"
"I firmly believe that some villagers from Botswana could probably build a better road than PennDot."- Splitty
"If you do anything to your car someone will hate on you for it. People absolutely love to complain and find fault with others. Don't let it bother you. Just live and have fun."- Lind |
|
| Back to top |
|
|
ToughBug
Samba Member
Joined: July 22, 2014
Posts: 354
Location: Carlisle, Pennsylvania
|
| Posted: Tue Aug 09, 2016 1:43 pm Post subject: Re: My vinyl wrap story |
|
|
Well, like I said I'd never heard of the plastidip. It does look like a good option. Maybe for my next build. We're almost done now. In fact the sound-proofing is in and the headliner is almost done. The seats are done and ready to install too. Just waiting on another few yards of vinyl to finish up. So I'll share the rest of the story to help anyone else who might be thinking about it. I'm sure someone more experienced could get the surface smoother.
A few things I've learned:
Fellers is great. Good technical service. The first shipment of vinyl arrived in least then 48 hours with no special shipping cost.
The vinyl works well for some interior parts - especially on my 74 super that is not naturally good looking on the inside - and pulls the look together.
The sealing tape is bueno for under the fender and hood, to secure the vinyl.
Biggest challenge is "bump in" angles, where bubbles tend to form. Care installation helps. Heat helps. I built a special tool to pop the remaining bubbles and get them to adhere.
The Avery product really covers - no hint of the red underneath.
_________________
1973 chassis + 1974 body = super beetle saved |
|
| Back to top |
|
|
mergedown
Samba Member
Joined: March 13, 2016
Posts: 299
Location: Columbus, OH
|
| Posted: Tue Aug 09, 2016 1:51 pm Post subject: Re: My vinyl wrap story |
|
|
Plastidip is awesome stuff! I've used it on my last few cars, and currently have my Wrangler wheels painted with it so they are black. Pretty durable stuff!! And when you're done, it peels right off.
I've also used it on headlight/taillight rings, hood scoops, gas caps, etc. to usually de-chrome. I've always used rattle cans, but it can also be sprayed out of a gun.
dipyourcar.com sells all of the required materials, but it would be cheaper to source it yourself as their upcharges are mostly for convenience purposes.
ALL of that said, I too have thought about wrapping my beetle, so I appreciate the thread and info.
_________________
1978 Convertible Fuel Injected - Blue (originally white...wait...maybe red?) |
|
| Back to top |
|
|
ToughBug
Samba Member
Joined: July 22, 2014
Posts: 354
Location: Carlisle, Pennsylvania
|
| Posted: Sat Aug 20, 2016 8:12 am Post subject: Re: My vinyl wrap story |
|
|
Update: We're almost finished. Here are some things you'd want to know if you try it. We needed another 4 yards of vinyl to wrap it up. haha. We have something over 40 hours into it. We like the color. I has been, however, a tough job. The curves, gutters, etc. make it challenging. The wrap doesn't "like' to go up and over, or adhere to negative angles, dips, etc. So the shape that makes the bug so awesome works against it. Door hinges are a challenge too. And the vents, oh my. We feel like we could do a pretty nice job on a modern car, with flat surfaces and hidden hinges. This is a bit different. So, a learning experience. Again, we do like the color. The surface is about as smooth as whatever is underneath and there is not bleed through of the color below, which is impressive. Bubbles were inevitable where there are uneven surfaces. We have devised a way to address that with a needle filed with weak adhesive solution. And some wrinkles were just impossible to get out, given the degree of curves and turns on the fenders, for example. We tried the adhesive glue sold by Fellers - basically a mixture of nasty solvents - where we hoped to make sure things didn't peal up....link inside the gutters where we hid a seam. That wasn't good - it didn't adhere at all and has a yellow color when dried. The tape seems more useful - under fenders, hoods, etc. Keep in mind, we are not professionals and this is the first car we wrapped. I think it will be ok in the end - we're not after a show car. The headliner looks great. The exterior bits are going on and look good. Mostly, we are tired and our fingers ache from pulling and stretching the vinyl. In the beginning is was exciting but by the end, not so much.
I've learned a lot from the site so I wanted to be able to give something back and maybe help people make decisions on their builds and save people some time. Conclusion: it's possible to wrap a vintage beetle and kinda neat in the beginning but time-consuming and the finished product won't approach the quality of good paint. I had a really amazingly good partner in crime with this too. Most of it is simply not possible without good help. But you probably don't want the kids around, lest they learn some new blue words.
I'll put some photos on my build thread in a few weeks when things are all together....we're moving on the brakes, wiring, and carpets.
_________________
1973 chassis + 1974 body = super beetle saved |
|
| Back to top |
|
|
v8fettler
Samba Member
Joined: September 06, 2016
Posts: 10
Location: Leeds, UK
|
| Posted: Wed Sep 07, 2016 3:12 am Post subject: Re: My vinyl wrap story |
|
|
Hey there Tough Bug, I'm just about to try wrapping my Bay. Ive bought enough Vinyl for the front face, just to see if it works and I like the colour.
If it all goes OK, I'll wrap the rest of the lower half. This will be great for many reasons. Were going to be renting the van, so they tend to pickup scratches etc where there not looked after as much, so the film will protect it from that. It also means we can freshen them up easier, without huge expense. The front will obviously get more wear, so we can simply replace this and the rest still match.
My Bay window van is that off-white colour, but has red wheels, and a red/white candy stripe pop-top, so I'm kinda limited to colour choice.
I've opted for 3M's Gloss Dragon Fire Red. I figure the metalic element will hide imperfections better than a flat colour wrap.
Ill take plenty of photos, and possibly do a timelapse video to show it going on.
Unlike your beetle, there's not as many curves/folds and details etc. so Im hoping its a tad easier.
I'm only going up to the waistline too, so I don't have to worry about the curved roof! 
Thanks for posting your pictures, It shows that with a small amount of time invested, we can achieve reasonable results!
  |
|
| Back to top |
|
|
|


