| Author |
Message |
grandpa pete
Samba Member

Joined: July 06, 2008
Posts: 6426
Location: St. Petersburg, FL

|
|
| Back to top |
|
 |
raycer60
Samba Member

Joined: January 15, 2013
Posts: 167
Location: H Town Texas
|
 Posted: Mon Jan 04, 2016 8:51 am Post subject: Re: 1959 Beetle "Petunia" Posted: Mon Jan 04, 2016 8:51 am Post subject: Re: 1959 Beetle "Petunia" |
 |
|
I have been looking for a reason to put together my sand blasting cabinet from HF. No excuses now! Have to clean my steering box so I can do the rebuild. Found the 2 seals it needs in thesamba. Oldveedubs Ryan has an ad. Good guy to deal with! 2nd purchase from him in the past week.
I will post the part numbers for the seals and hopefully the process of rebuilding the box.
Once I can steer, I will tow my pan to carwash to be power washed.
_________________
59 De Luxe Sedan with grafted ragtop |
|
| Back to top |
|
|
Joseph DR
Samba Member
Joined: December 20, 2004
Posts: 180
Location: Texas
|
| Posted: Mon Jan 04, 2016 9:18 am Post subject: Re: 1959 Beetle "Petunia" |
|
|
| raycer60 wrote: |
I have been looking for a reason to put together my sand blasting cabinet from HF. No excuses now! Have to clean my steering box so I can do the rebuild. Found the 2 seals it needs in thesamba. Oldveedubs Ryan has an ad. Good guy to deal with! 2nd purchase from him in the past week.
I will post the part numbers for the seals and hopefully the process of rebuilding the box.
Once I can steer, I will tow my pan to carwash to be power washed. |
Be sure to caulk the seams, joints and whatnot with window sealant when you put together your blasting cabinet. Otherwise you'll get media leaking from everywhere. Happened to my brother's HF cabinet.
_________________
1964 Beetle |
|
| Back to top |
|
|
grandpa pete
Samba Member
Joined: July 06, 2008
Posts: 6426
Location: St. Petersburg, FL
|
|
| Back to top |
|
|
raycer60
Samba Member
Joined: January 15, 2013
Posts: 167
Location: H Town Texas
|
| Posted: Mon Jan 04, 2016 10:43 am Post subject: Re: 1959 Beetle "Petunia" |
|
|
| Joseph DR wrote: |
| Be sure to caulk the seams, joints and whatnot with window sealant when you put together your blasting cabinet. Otherwise you'll get media leaking from everywhere. Happened to my brother's HF cabinet. |
Ah, great advice. I will do!
And GP...I will do that too.
_________________
59 De Luxe Sedan with grafted ragtop |
|
| Back to top |
|
|
raycer60
Samba Member
Joined: January 15, 2013
Posts: 167
Location: H Town Texas
|
| Posted: Wed Jan 06, 2016 8:10 am Post subject: Re: 1959 Beetle "Petunia" |
|
|
I know there are probably a few "how to rebuild your early bug steering box" threads but I have spent time searching and can't find a detailed one yet until now: http://www.kustomcoachwerks.com/forums/viewtopic.php?t=5530
I have been putting together my new blasting cabinet and is almost ready for it's first task: steering box cleanup.
_________________
59 De Luxe Sedan with grafted ragtop |
|
| Back to top |
|
|
raycer60
Samba Member
Joined: January 15, 2013
Posts: 167
Location: H Town Texas
|
| Posted: Tue Aug 16, 2016 8:20 am Post subject: Re: 1959 Beetle "Petunia" |
|
|
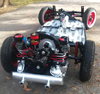
I've been busy finishing "other" projects and managed to get to my 59 again! The blast cabinet has been ready for a while and have yet to be tested by cleaning up my steering box. It just happens that early this year while bringing out my pan to get things going I had this idea of building a lift so the car would not sit on it's tires while spending most of it's life stored. Not trying to re-invent the wheel, but wanting to make/design something that would entertain and get my old man's bearings to spin and keep him occupied. He is a retired PHD civil engineer and loves challenges. Gave him some idea of what I had in mind and he came back with plans and calculations of what his take was on how this lift had to be built. I am by far a welder but do own a small HOBART 140 MIG machine that I wanted to use in this project. It was a blast to see how my Dad got into it and to feel his excitement while discussing this project is priceless to me. I am going to share a few pictures of the process and what the end product is looking like.
The basic concept:
Materials and cutting/drilling of parts:
Test fitting the components and making sure it works as intended:
Joining the 2 sides:
Once we had the 2 sides joined and working together, it was time to fabricate the lifting mechanism:
First test:
Time to finish welding and add some structural pieces:
Painting and putting together the parts:
Cleared space in the garage and first test with pan:
Calling this project DONE!! Thank you Dad for all the input and wisdom.
I can now get started with my build... FOR REAL!!
_________________
59 De Luxe Sedan with grafted ragtop |
|
| Back to top |
|
|
flyboy161
Samba Member

Joined: December 26, 2009
Posts: 2091
Location: Perry, GA
|
|
| Back to top |
|
|
Mr. Mike 
Samba Member

Joined: January 30, 2015
Posts: 513
Location: Shoreline, WA
|
| Posted: Tue Aug 16, 2016 10:08 am Post subject: Re: 1959 Beetle "Petunia" |
|
|
Wow, what a great project! Nice work!!
_________________
1964 Sedan 6 volt |
|
| Back to top |
|
|
tisius
Samba Member

Joined: July 11, 2011
Posts: 1570
Location: Rotterdam,NL (+Chicago,IL)
|
| Posted: Thu Aug 25, 2016 1:55 am Post subject: Re: 1959 Beetle "Petunia" |
|
|
really nice lift, well built .... but I'm just a tiny bit curious: why could you not lift such a relatively modest height by using a floor jack and then putting the car on jack stands? In other words: what is the benefit of having that lift?
_________________
drive it like you just robbed the bank
you don't have to be crazy to be into VW's, but it sure helps!!
.... if it ain't dutch, it ain't much! |
|
| Back to top |
|
|
raycer60
Samba Member
Joined: January 15, 2013
Posts: 167
Location: H Town Texas
|
| Posted: Thu Aug 25, 2016 6:59 am Post subject: Re: 1959 Beetle "Petunia" |
|
|
Thank you flyboy161 and Mr. Mike. I enjoy as much time as I can with my old man for as long as I have him. And I got allot of welding hours too! which I hope will help in my next build phase.
| tisius wrote: |
| really nice lift, well built .... but I'm just a tiny bit curious: why could you not lift such a relatively modest height by using a floor jack and then putting the car on jack stands? In other words: what is the benefit of having that lift? |
I need my jack stands for... nah!  The real answer is 3 posts up^^^ The real answer is 3 posts up^^^
The challenge, the learning how to weld, the camaraderie with my dad, the... bunch of other things which become a benefit/satisfaction for me and no one else. Why buy a bug in pieces and not a driver? Too many answers and what is valid for me might not be for you or anyone else.
I can say that with a few pumps to the bottle jack the car is up in the air and no need for jack stands. Quicker/less effort than your suggestion? Better?: Not necessarily. Does anyone else need this?: Probably not. For me: Challenge and Satisfaction!
There are plenty of lifts out in the market I know, and probably do a better job, but... Challenge and Satisfaction.
Thanks for your comments -tisius-. I like to hear from all.
_________________
59 De Luxe Sedan with grafted ragtop |
|
| Back to top |
|
|
raycer60
Samba Member
Joined: January 15, 2013
Posts: 167
Location: H Town Texas
|
| Posted: Thu Aug 25, 2016 7:16 am Post subject: Re: 1959 Beetle "Petunia" |
|
|
Need to refurbish the steering box first so I can steer. It has no movement at the moment. I will clean the outside, tear it apart, clean the inside and inspect and hopefully just have to replace the 2 seals and fill up with fresh fluid.
little dry on the inside? that explains why it "froze"!
and my parts wash container
I will finish cleaning and then put it all back together. Hope it works!
_________________
59 De Luxe Sedan with grafted ragtop |
|
| Back to top |
|
|
TinCanFab
Samba Member
Joined: April 04, 2006
Posts: 2743
Location: Waterford, California
|
|
| Back to top |
|
|
raycer60
Samba Member
Joined: January 15, 2013
Posts: 167
Location: H Town Texas
|
| Posted: Fri Aug 26, 2016 7:01 am Post subject: Re: 1959 Beetle "Petunia" |
|
|
| roachdub58 wrote: |
| I just did my box and have to recommend using the John Deere Corn Head grease instead of gear oil. It's about $4 a tube available at any dealer that does Ag equipment. It is like caramel in consistancy instead of thick like other grease. I see why everyone raves about the stuff, it steers better than ever! |
Great! I was about to use gear oil but I will stop at the JD dealer and try the corn head grease. Can't beat 4 bucks!
_________________
59 De Luxe Sedan with grafted ragtop |
|
| Back to top |
|
|
raycer60
Samba Member
Joined: January 15, 2013
Posts: 167
Location: H Town Texas
|
| Posted: Sat Aug 27, 2016 11:21 am Post subject: Re: 1959 Beetle "Petunia" |
|
|
This morning went and got the corn head grease as recommended above. Got home and started cleaning my parts that had been soaking in mineral spirits. Got everything clean and ready for reassemble but came across what I believe is an old problem. The inside of the box cover has pitting and one of the bolt holes has part of the wall missing and it probably leaks from there. I can see that this box has been repaired or refurbished before because it has rubber seals and not originals.
Anyone have a way to repair this pitting? Can JB Weld work and last? I can JB Weld all pitting and then file flat the part where it seals against the box body but I don't know if it will last. Hard to find a used replacement cover and when available most are asking close to what a new TRW box will cost.
This is what I got:
_________________
59 De Luxe Sedan with grafted ragtop |
|
| Back to top |
|
|
Sharp64
Samba Member

Joined: August 27, 2015
Posts: 5305
Location: Central Florida
|
| Posted: Sat Aug 27, 2016 11:55 am Post subject: Re: 1959 Beetle "Petunia" |
|
|
| I would think JB Weld or Lab Metal would do the job as long as you let it cure fully. I also typed in "VW steering box cover" and some billet ones popped up. Alternatively, try to check the classifieds for someone parting out a similiar year? Swap meet? |
|
| Back to top |
|
|
raycer60
Samba Member
Joined: January 15, 2013
Posts: 167
Location: H Town Texas
|
| Posted: Sat Aug 27, 2016 12:17 pm Post subject: Re: 1959 Beetle "Petunia" |
|
|
| Sharp64 wrote: |
| I would think JB Weld or Lab Metal would do the job as long as you let it cure fully. I also typed in "VW steering box cover" and some billet ones popped up. Alternatively, try to check the classifieds for someone parting out a similiar year? Swap meet? |
I did my search before posting my question. The billet does not look like it works with my early box and the one in the classifieds is close to the price of a new one. Swap meet is a long term solution and I am waiting to fix this so I can continue with my build. Thank you for posting.
I might try the aluminum brazing rod method.
_________________
59 De Luxe Sedan with grafted ragtop |
|
| Back to top |
|
|
TinCanFab
Samba Member
Joined: April 04, 2006
Posts: 2743
Location: Waterford, California
|
|
| Back to top |
|
|
raycer60
Samba Member
Joined: January 15, 2013
Posts: 167
Location: H Town Texas
|
| Posted: Mon Aug 29, 2016 7:18 am Post subject: Re: 1959 Beetle "Petunia" |
|
|
I finished cleaning the steering box and put it all back together with new seals and used corn head grease.
I thought I would replace the damaged top cover as soon as I could come across a better one. Everything seem to work well but I can feel that the bearings on the worm shaft are not turning smooth. I don't know if I could get the replacement bearings that easy so I just went ahead and ordered a new trw box. I will look for the bearings and top cover and refinish that box at a later time.
Now to power washing the pan so I can put some paint on it.
_________________
59 De Luxe Sedan with grafted ragtop |
|
| Back to top |
|
|
raycer60
Samba Member
Joined: January 15, 2013
Posts: 167
Location: H Town Texas
|
| Posted: Wed Oct 05, 2016 12:23 pm Post subject: Re: 1959 Beetle "Petunia" |
|
|
I did go and powerwash the pan and decided there were a few spots I wanted to make better. There is a battery pan replacement done by PO and then the points where the body attaches to the pan at the sides of the firewall/napoleon hat were showing some rust.
So I started by replacing the battery tray.
and then flipped the pan and continued working on the underside
welded my patches, did some seam sealer, paint primer and then sprayed some undercoating
Now I need to flip the pan so I can continue finishing my patches and then finish up that side with a coat of POR-15.
_________________
59 De Luxe Sedan with grafted ragtop |
|
| Back to top |
|
|
|


