| Author |
Message |
johnshenry 
Samba Member

Joined: September 21, 2001
Posts: 9364
Location: Northwood, NH USA

|
 Posted: Thu Jan 24, 2013 7:01 pm Post subject: Posted: Thu Jan 24, 2013 7:01 pm Post subject: |
 |
|
| sunroof wrote: |
You know John, I have enormous respect for your ability to innovate and improvise. I had a job years ago where I was responsible for the electronics in a medical research lab where 90% of what I did was inventing so I have an idea of what is involved. My great weakness however was mechanical design, I usually farmed that out to a machine shop. Having said all that... I wonder if the method you are looking for is to roll a mandrell over the tubing being held in a jig that clamps it in place. I think a lot less force would be needed and maybe a draw over center latch could provide the force necessary and a big crank to crank the tubing thru the device. Sort of like a bead roller. Just my 2 cents worth.
Don |
Actually at some point Don, Eric Jones (forget his Samba name here) and I were trying to get this done. He had a shop that could do custom bead rolled type tubing. The problem was, when you bead rolled the crease in, the change in stress on the crease side caused the the tubing to curve as it left the rollers. There didn't seem to be any way around that.
This is all kind funny to me as it has become, over the years, kind of a personal challenge to me to figure out a way to do this. It's not like I will retire early and make fortune if I am successful..... but there are, maybe half a dozen people, who will be very happy to see this replacement part done. The fun is in the "niche details" with these early engines, and all the quirky parts that they had. Especially the poorly engineered ones that got swept under the rug and most people don't even know about.
Interestingly, if you go all the way back to page 1 of this thread, you can see that about this time in 2006, I was figuring out a way to make a reasonable facsimile of this intake out of the 36hp "701E" intakes. Now I have at least 3-4 of these originals with rotted off heat riser legs and I want to figure out how to make a more accurate repro or replacement part.
It's all part of the sickness. But if I get some more tools out of the deal and get to weld some stuff.... it's all good. 
_________________
John Henry
'57 Deluxe
'56 Single Cab |
|
| Back to top |
|
 |
sunroof
Samba Member

Joined: October 06, 2006
Posts: 1773
Location: Winnipeg
|
| Posted: Fri Jan 25, 2013 10:46 am Post subject: |
|
|
One thing I forgot to mention in my post was how much fun it was fabricating electronic devices from scratch and how much I enjoyed the challenge of creating something that had never been done before. I told you at Bad Camberg last year how much I liked the spycam so keep it coming. The fact that you tried the bead roller and it didn't work tells you something about why I don't do mechanical design, I find it impossible to have a good simple idea. However, I would have fit right in in the engineering department helping design British cars in the 60s and 70s. I have a 1970 TR6 and it is an abomination of bad mechanical design.
Don |
|
| Back to top |
|
|
johnshenry
Samba Member
Joined: September 21, 2001
Posts: 9364
Location: Northwood, NH USA
|
| Posted: Fri Jan 25, 2013 11:15 am Post subject: |
|
|
| sunroof wrote: |
| ...... The fact that you tried the bead roller and it didn't work tells you something about why I don't do mechanical design, I find it impossible to have a good simple idea. |
Well easy there, it's not like we knew it wouldn't work before we tried it!
If I have a humanistic goal in life it is to inspire people to beleive in themselves and TRY to do something, and not write themselves off because they "already know they can't do/make it". I could fill a warehouse with the stuff I tried and failed at (I only post the successes in this thread of course;-)). But the reward is when you do succeed and meet your own expectations.
Life is all about solving problems and whether it is pressing some metal piece, getting a job, cooking something or having a good relationship with someone... persistence in your efforts will always make you a better person. Expect perfection in everything you do .... but accept less, and even failure, then move on and try again. You will be a better person because of it.
</philosophy>
_________________
John Henry
'57 Deluxe
'56 Single Cab |
|
| Back to top |
|
|
Grant Reiling
Samba Slow-Change Artist
Joined: November 28, 2003
Posts: 491
Location: behind the wheel
|
| Posted: Fri Jan 25, 2013 11:49 am Post subject: |
|
|
| johnshenry wrote: |
| sunroof wrote: |
| ...... The fact that you tried the bead roller and it didn't work tells you something about why I don't do mechanical design, I find it impossible to have a good simple idea. |
Well easy there, it's not like we knew it wouldn't work before we tried it!
If I have a humanistic goal in life it is to inspire people to beleive in themselves and TRY to do something, and not write themselves off because they "already know they can't do/make it". I could fill a warehouse with the stuff I tried and failed at (I only post the successes in this thread of course;-)). But the reward is when you do succeed and meet your own expectations.
Life is all about solving problems and whether it is pressing some metal piece, getting a job, cooking something or having a good relationship with someone... persistence in your efforts will always make you a better person. Expect perfection in everything you do .... but accept less, and even failure, then move on and try again. You will be a better person because of it.
</philosophy> |
Hear, hear, a fine outlook indeed!
As Garth Stein writes: "There is no dishonor in losing the race.
There is only dishonor in not racing because you are afraid to lose." 
Wouldn't we all be fortunate if our elected representatives took heed as they work to resolve our vexing fiscal and legislative problems?    
_________________
1952 Azure Blue 12G (LHD Deluxe 3-fold sunroof Sedan).
"What you really know is possible in your heart is possible.
We make it possible by our will.
What we imagine in our minds becomes our world. Thats just one of many things I have learned from water."
Misaru Emoto
The Hidden Messages in Water |
|
| Back to top |
|
|
nlorntson
Crazy VW Lady

Joined: March 13, 2004
Posts: 3783
Location: Twin Cities, MN
|
| Posted: Fri Jan 25, 2013 12:51 pm Post subject: |
|
|
| johnshenry wrote: |
If I have a humanistic goal in life it is to inspire people to beleive in themselves and TRY to do something, and not write themselves off because they "already know they can't do/make it". I could fill a warehouse with the stuff I tried and failed at (I only post the successes in this thread of course;-)). But the reward is when you do succeed and meet your own expectations.
Life is all about solving problems and whether it is pressing some metal piece, getting a job, cooking something or having a good relationship with someone... persistence in your efforts will always make you a better person. Expect perfection in everything you do .... but accept less, and even failure, then move on and try again. You will be a better person because of it.
</philosophy> |
Amen. |
|
| Back to top |
|
|
ZwitterND
Samba Member
Joined: September 08, 2005
Posts: 1451
Location: Fargo, ND
|
| Posted: Fri Jan 25, 2013 4:19 pm Post subject: |
|
|
I am a designer in an R&D department and daily I confirm Edison's quote "I have not failed, I just found 10,000 ways that won't work". Keep the faith John and thanks for sharing the fails as well as the success.
_________________
Bill |
|
| Back to top |
|
|
sunroof
Samba Member
Joined: October 06, 2006
Posts: 1773
Location: Winnipeg
|
|
| Back to top |
|
|
johnshenry
Samba Member
Joined: September 21, 2001
Posts: 9364
Location: Northwood, NH USA
|
| Posted: Fri Jan 25, 2013 8:07 pm Post subject: |
|
|
Very cool Don. I work with a guy who rebuilds tube amps and is a guitar player.
Anyway, some cool additional progress in the shop tonight with the press die.
I created the guides for the press die, welded them to the jig, and made a new press die with a 1/2" rod welded along the bottom.
You can slide the press die out of the end of the jig.
I thought about adding springs to make the press retract in the frame. I spent a good 20 minutes trying to fit these springs in the jig just for this pic, they kept flying out !!!
Here's some results from some test pressings. The one on the left is a short (3") piece of 2mm wall tubing that I use to make the Jacketed K manifold replacement legs. The profile is very nice... but I seriously doubt that this press has the power press a piece 10" long. For bending however, this thicker tubing bends better, will have to see how it does in the mandrel bender.
The original HR tubing piece is in the middle.
On the right is s short (3") piece of the expensive metric spec tubing I bought (not electrical conduit). I wanted to see how it formed. A little bit disappointed that the crease was not more rounded at the bottom with the new press die with the 1/2" rod. But really, it does not matter much as when welded on to an intake, you will never be able to see this profile section.
Encouraged by the results! Looking forward to trying the tubing in the mandrel bender that I hope have next week.
_________________
John Henry
'57 Deluxe
'56 Single Cab |
|
| Back to top |
|
|
Jacks
Samba Member
Joined: July 15, 2006
Posts: 2348
Location: San Clemente, Ca.
|
| Posted: Fri Jan 25, 2013 11:05 pm Post subject: |
|
|
John, after talking to my co-worker today, we threw our cast press plates in the scrap metal barrel. Didn't want someone to use them by mistake after the great heads up on this thread. Our press is 12 ton. Very nice work BTW
_________________
Jack Staggs
Actual name |
|
| Back to top |
|
|
johnshenry
Samba Member
Joined: September 21, 2001
Posts: 9364
Location: Northwood, NH USA
|
| Posted: Sat Jan 26, 2013 8:46 am Post subject: |
|
|
Yeah, I did some searching on line, and these exploding plates are apparently fairly common. I guess the issue is when they get a bend type stress, when you are using one of the openings to support things. Cast steel does not bend!
A few places online are selling replacements 1" or 1 1/2" cold rolled steel, but they are $100-$160 a pair. I think the way I am using them probably isn't putting much local bend stress on them, but I will replace them anyway. I am going to visit a few steel supplier fabricator businesses that have scrap bins and sell by the pound. I may just suck it up and buy the $100 set also.
_________________
John Henry
'57 Deluxe
'56 Single Cab |
|
| Back to top |
|
|
Isbrand52
Samba Member
Joined: February 23, 2010
Posts: 55
Location: Ontario,Canada
|
| Posted: Wed Jan 30, 2013 7:18 pm Post subject: Red Generator |
|
|
Thank you John
With your tutelege I was able to rebuild my generator. Charging 7.03 volts with regulator attached. look forward to your future updates of all the projects you help all of us accomplish Thanks Bob |
|
| Back to top |
|
|
johnshenry
Samba Member
Joined: September 21, 2001
Posts: 9364
Location: Northwood, NH USA
|
| Posted: Mon Feb 04, 2013 8:41 pm Post subject: |
|
|
Some really encouraging progress tonight on the Zwitter intake repair piece and a first complete prototype!
I had to modify the mandrel tubing bender quite a bit. I had hoped that one of the SAE size rollers and dies would fit the 18mm tubing, as on my hydraulic bender, the shoe that bends the metric tubing perfectly is marked "3/8" on one side and "10" (mm?) on the other (??). Yet across it's opening it is about 19mm. On these die and roller sets, 3/8" is exactly 3/8" across. So I had to widen the 5/8" die and roller set. Took a while. Here I have the roller on it's bolt, chucked in the drill press with a spring to take up the slack on the bolt and keep the roller from spinning. The grindstone had worn to exactly 18mm some time ago. A poor man's metal lathe.....
Had some conduit sections in the freezer already, with the frozen water blasting media mix. Untaped the end and you can see how it expanded here, pushing the tape out.
Measuring the drop angle of the heat riser as it bends out and down from the intake runner.
Setting up the press die in the press was a bit of a trick. I had to elevate the jig a bit with a piece of plywood to be able to get the drop angle on the tubing correct.
... but the pressing came out splendid!
So here are some shots of the section cut down, and bolted to the jig next to a "701" intake (that is the one that was actually in the whine thread last week!). The flange is just kind of pressed on there, not welded. Interference pressure in the flange kind of holds everything in place. On the ones I restore, I will cut the original tubing out of the jacket to about 3/4" into it with some arthroscopic Dremel work and then use some high temp epoxy to fit it up. The frozen media stuff in the tubing for bending is working very well (but messy!)
An original 701 is placed next it for reference. For a first proto, I am VERY happy with the results. The bends are near perfect, and the mating to the intake runner is fantastic. You can see one small tooling dent on the repro tubing right between the two bends. This is from a die stop on the mandrel bender that I will re-create in a different design to spread the load. Worst case, I could easily MIG-fill a dent like that and flat file it.
I'm going to make 2-4 more of these out of conduit, just to prove my "recipe" to myself, know where to mark the bends, cut tubing to the minimum to reduce waste, etc. Has been very nice to be able to practice with this conduit. If I was using the metric spec stuff, I would have been through about $130 worth of material so far.
More pics to come!
_________________
John Henry
'57 Deluxe
'56 Single Cab |
|
| Back to top |
|
|
johnshenry
Samba Member
Joined: September 21, 2001
Posts: 9364
Location: Northwood, NH USA
|
| Posted: Thu Feb 14, 2013 9:21 am Post subject: |
|
|
Next comes the "surgery" of extracting part of the original heat riser from the jacket. I have been doing this for years replacing legs on the jacketed K manifolds, but this is little more delicate as the jacket is very thin and will crack easily.
I use some deburring bits in the dremel to slice the tubing inside the jacket into 2 pieces, then use an inverted cone bit to cut a circumferential line about 3/4" inside the jacket. I tried all kinds of screwdrivers, awls, and even tried making a "sardine can key" out of a long M10 bolt to "curl peel" the tubing away (worked a bit, then broke). Eventually I fired up the trusty MIG welder, welded a nice blob on the end of the piece, gripped it with vice grips and wiggled it until it came out. You can see the pieces below.
Here's a pic of a custom mandrel die tubing clamp that I had to make to keep the clamp from marring/denting the tubing. The clamp that came with the tool is at the bottom. This bender is used to make the second bend, and where the tubing exits the clamp, it bends sharply upward. The original clamp was leaving a visible dent on the tubing. Lots of grinding and fitting here, but eventually I got bends with tooling marks at all. This one distributes the pressure along a larger area of the tubing.
_________________
John Henry
'57 Deluxe
'56 Single Cab |
|
| Back to top |
|
|
Grant Reiling
Samba Slow-Change Artist
Joined: November 28, 2003
Posts: 491
Location: behind the wheel
|
| Posted: Thu Feb 14, 2013 4:34 pm Post subject: |
|
|
| johnshenry wrote: |
Next comes the "surgery" of extracting part of the original heat riser from the jacket. I have been doing this for years replacing legs on the jacketed K manifolds, but this is little more delicate as the jacket is very thin and will crack easily.
I use some deburring bits in the dremel to slice the tubing inside the jacket into 2 pieces, then use an inverted cone bit to cut a circumferential line about 3/4" inside the jacket. I tried all kinds of screwdrivers, awls, and even tried making a "sardine can key" out of a long M10 bolt to "curl peel" the tubing away (worked a bit, then broke). Eventually I fired up the trusty MIG welder, welded a nice blob on the end of the piece, gripped it with vice grips and wiggled it until it came out. You can see the pieces below.
Here's a pic of a custom mandrel die tubing clamp that I had to make to keep the clamp from marring/denting the tubing. The clamp that came with the tool is at the bottom. This bender is used to make the second bend, and where the tubing exits the clamp, it bends sharply upward. The original clamp was leaving a visible dent on the tubing. Lots of grinding and fitting here, but eventually I got bends with tooling marks at all. This one distributes the pressure along a larger area of the tubing.
|
Very nice work, John Thanks for documenting (and sharing) the process.
Isn't that how mankind went from Clovis to Pilgrim to Intergalactic explorer?
Keep up the good work!
Grant 
_________________
1952 Azure Blue 12G (LHD Deluxe 3-fold sunroof Sedan).
"What you really know is possible in your heart is possible.
We make it possible by our will.
What we imagine in our minds becomes our world. Thats just one of many things I have learned from water."
Misaru Emoto
The Hidden Messages in Water |
|
| Back to top |
|
|
johnshenry
Samba Member
Joined: September 21, 2001
Posts: 9364
Location: Northwood, NH USA
|
| Posted: Sun Feb 17, 2013 4:59 pm Post subject: |
|
|
Wow, 7 years and 11 days later (after my first post in this thread about trying to replicate these intakes), I finally have one done. This one was actually done using the "701E style" intake with the 18mm heat riser tubing. It has 36hp endcastings, I'll mill them down for 25hp later.
This was not the best repro tube section I have made so far, I have a couple others that are much closer to perfect. I didn't want to make my first intake with the best repair section I had... always best to perfect your technique first. Check out the fit into the jacket! I never would have guessed I could fabricate a part that could fit into an aluminum jacket so snugly. It is epoxied in there.
This one had some tiny "kink" dimples in the inside corner, and a tooling mark where it left the press jig. You can see that I have applied some JB weld there that I will file down and smooth them out before painting.
Wasted maybe $35 of metric tubing, I am still getting inconsistent results on the benders, some kink badly, others come out perfect, not sure why. Process is the same.
I was able to scavenge some heat riser flanges from some old intakes to use on the replacement legs. The originals are about 5.5 mm thick, pressed on with copper rings, no milled bolt head seats like the earlier K manifolds. And of course the later 701E flanges are used with 20mm thick tubing, so those are not right either. The flange on this intake is welded underneath. I'll use a little bit of JB Weld on it to seal off the tiny visible gap around the tubing on the top of the flange.
Is consensus that these Zwitter intakes were painted black? Jacket left bare or painted also?
{Click on the pics for a bigger view}
_________________
John Henry
'57 Deluxe
'56 Single Cab |
|
| Back to top |
|
|
aa390392
Samba Member
Joined: March 28, 2007
Posts: 3602
Location: So.Cal
|
| Posted: Mon Feb 18, 2013 1:28 pm Post subject: |
|
|
I'm super impressed...great work,great success,useful can do philosophy as well.
_________________
.
getting grumpy & less tolerant!
55 ragtop
56 delux sedan
56 Kabriolet |
|
| Back to top |
|
|
bwaz
Samba Member

Joined: August 24, 2004
Posts: 1780
|
| Posted: Mon Feb 18, 2013 2:47 pm Post subject: |
|
|
| Looks fantastic JH, fine work! |
|
| Back to top |
|
|
johnshenry
Samba Member
Joined: September 21, 2001
Posts: 9364
Location: Northwood, NH USA
|
| Posted: Mon Feb 18, 2013 5:57 pm Post subject: |
|
|
Thanks for the kind words, it is pretty gratifying when something comes out well and meets your own expectations.
Is consensus that these Zwitter intakes were painted black? Jacket left bare or painted also?
_________________
John Henry
'57 Deluxe
'56 Single Cab |
|
| Back to top |
|
|
ZwitterND
Samba Member
Joined: September 08, 2005
Posts: 1451
Location: Fargo, ND
|
| Posted: Mon Feb 18, 2013 6:39 pm Post subject: |
|
|
I am convinced they looked like this...
_________________
Bill |
|
| Back to top |
|
|
splitjunkie
Samba Member
Joined: April 04, 2006
Posts: 4094
|
| Posted: Mon Feb 18, 2013 7:02 pm Post subject: |
|
|
| johnshenry wrote: |
Thanks for the kind words, it is pretty gratifying when something comes out well and meets your own expectations.
Is consensus that these Zwitter intakes were painted black? Jacket left bare or painted also? |
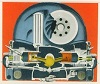
The jacket was painted the same color as the rest of the manifold. You can see it clearly in this assembly line photo.
This pic from a few years earlier and the manifold appears to be painted the same color as the muffler.
Both pictures depict a flat finish.
_________________
Chris
You know, a lot of these scratches will buff right out... Jerry Seinfeld |
|
| Back to top |
|
|
|


