| Author |
Message |
Northof49
Samba Member
Joined: July 22, 2013
Posts: 1759
Location: Winnipeg, Manitoba, Canada

|
 Posted: Tue Oct 07, 2014 7:26 am Post subject: Posted: Tue Oct 07, 2014 7:26 am Post subject: |
 |
|
| yancyholden wrote: |
| This might be a stupid question but is it possible to remove a ball joint that was pressed in misaligned and then put it back in correctly? |
I would if I was confident that it wasn't damaged on the way out, and that it was a tight fit on the second install.
_________________
1958 Karmann Ghia owner |
|
| Back to top |
|
 |
jasengine
Samba Member
Joined: June 07, 2012
Posts: 95
Location: Wales
|
| Posted: Sun Nov 16, 2014 8:07 am Post subject: |
|
|
My method of removing the old ball joints. A 4.5" grinder fitted with a thin cutting disc, a hack saw, steel drift, nice big vise and a heavy hammer is all I used.
|
|
| Back to top |
|
|
The_Dave
Samba Member
Joined: May 22, 2015
Posts: 1
Location: Olympia WA
|
| Posted: Fri May 22, 2015 6:40 pm Post subject: |
|
|
| I just got ball joints and the little notches on the new ones and the old ones weren't in the same spots so now I don't know how to get them to line up right. Does anyone know of a way to line them up without the notches? |
|
| Back to top |
|
|
alikatcraig
Samba Member

Joined: September 09, 2007
Posts: 556
Location: Anaheim, CA
|
| Posted: Sat May 23, 2015 2:29 pm Post subject: |
|
|
Just pulled my Ghia ones out. Grind the back surface a little and then pound the shaft out through it. Pull the plastic liner and clean inside what remains. Apply a bead of weld with a mig all around the inside, drop in a bucket of cold water, and then one or two small taps with a hammer will have it drop out. No more pounding or beating on it or ridiculous press tonnage on home made tooling! Much safer.
_________________
1967 Ghia
1971 Deluxe Microbus
1974 Convertible Bug
1973 Standard Bug
1998 Mexican Bug |
|
| Back to top |
|
|
quattroginger
Samba Member
Joined: June 22, 2015
Posts: 22
Location: Southern Maryland
|
| Posted: Mon Jun 22, 2015 9:09 am Post subject: |
|
|
Nice info. just purchased my first air cooled. 67 beetle. starting ball joint replacement.
EDIT: got my ball joints replaced over weekend. ended up having to press them out with my buddy's 12ton Harbor Freight press.
i did run into a issue pressing in the front lowers. i used the "lowered cars" ball joint and the gold rings that hold the boot on do not fit through the control arm. i had no choice but to just push it through, it bent the rings and even left someone hanging out of the pressed side so i just clipped it off. the boot didn't rip so seems to be ok. i also had to use zip ties on boots to fit through hole.
i got stuck removing 1 of the camber adjusters for the upper front arms. in case anyone else runs into this or doesn't want to bang on these to break loose i rented a jaw puller tool from Autozone for free. had it off in less than 2 minutes.
Last edited by quattroginger on Mon Jun 29, 2015 3:20 am; edited 1 time in total |
|
| Back to top |
|
|
NorcalVW
Samba Member
Joined: September 07, 2013
Posts: 5
Location: Elk Grove California
|
| Posted: Thu Aug 06, 2015 4:31 pm Post subject: Just did uppers and lowers.... |
|
|
Completed Balljoints today......Without a doubt i will be buying a Hyd Press from Harbor Freight. A trip to the scrap yard to make all the adapters i can think of. Screw those stupid little tools from Autozone, it didn't have enough torque. I used the adapters (NICE) but had to get it done in my monster vise and even used a few impact sockets ....there was violence in the garage today. Ha!
20 ton Hydraulic press is only way to go, period. |
|
| Back to top |
|
|
SkooobaSteve
Samba Member
Joined: March 23, 2005
Posts: 3152
Location: Dothan Alabama
|
|
| Back to top |
|
|
johndl58
Samba Member
Joined: October 01, 2013
Posts: 422
Location: westchester ny
|
| Posted: Fri Aug 07, 2015 7:17 am Post subject: |
|
|
| Universal tool from autozone worked mint after I tried every other way to do it. I used a torch to heat as I went and they all came out with a bang. On re-installation, I put the new BJs in the freezer for a while and they pressed right in. Easy peezy. |
|
| Back to top |
|
|
gargamel
Samba Member
Joined: December 20, 2011
Posts: 693
Location: Orange Grove, Texas
|
| Posted: Fri Aug 07, 2015 8:30 am Post subject: |
|
|
The FLAPS Universal tool worked for you? 
Lucky.
I had to resort to a local club's press to get these beasts out and new ones in. If I could get that tool to work, I'd buy one and be more self-sufficient. |
|
| Back to top |
|
|
johndl58
Samba Member
Joined: October 01, 2013
Posts: 422
Location: westchester ny
|
| Posted: Fri Aug 07, 2015 8:53 am Post subject: |
|
|
| Yup. The c clamp looking one with all the different cups and stuff. It took a little experimenting to get the right combo of cups but a little torque, a little heat, a little torque, a little heat, BAM! Out they came. |
|
| Back to top |
|
|
20bugsys
Samba Member
Joined: February 13, 2006
Posts: 43
Location: Detroit Area, MI
|
| Posted: Wed Mar 09, 2016 7:49 am Post subject: Re: Replace ball joints |
|
|
I am replacing my beam and putting in new ball joints myself for the first time so I had the control arms off the car. I have the HF 20 ton press but I had a hard time with the lower ball joints. The lower control arms are not flat on the receiving cup side to press the ball joints out. No matter what you really need to pull the grease boot off and a deep socket will fit over the threaded spindle part of the joint so I didn't need to cut it off or otherwise destroy the ball joint.
I originally tried a heat and hammer in the vise method using an air chisel and a big ass hammer with no luck. (now the ball joint is destroyed)
Eventually I just welded a small piece of 3/8" square rod about 1.5 inch long to the end of the control arm so that it would sit flat and square on the press. The heat from welding did wonders to break the rust and when I was done pressing the new ball joints in I cut the rod off and ground the welds down.
In the end, this method actually saved me a ton of time and saved me and the parts from a beating. Originally, I was going to just take them to a local shop but I persisted and I am glad I did.
Also, I did try to rent the ball joint tool from the local auto parts store, but the selection of cups wasn't great so I never used it.
One other thing a previous poster mentioned was that he couldn't get the spring and boot for the lower joint to fit through the hole in the control arm without destroying it. I fought this fight as well and eventually won. I clamped the BJ in a vise facing up, greased the outside of the boot with brake parts assembly lube and then rotated the control arm as I pushed it over the boot. Rotating it comrpessed the spring a bit around the boot and got it to slide through.
_________________
1960 | Beetle | Jade Green | 36hp OG Car
1969 | Beetle | Cherry Red | 1914cc
1984 | Vanagon Tin Top | Subaru EJ25, 5 Speed
1986 | Vanagon Syncro | Restoration to bone stock
@myescapepod
@crusty_syncro |
|
| Back to top |
|
|
heimlich 
VWNOS.com

Joined: November 20, 2016
Posts: 6617
Location: Houston, Texas

|
| Posted: Thu Jan 12, 2017 4:58 pm Post subject: Re: Replace ball joints |
|
|
I tried the hacksaw way and that worked well for one ball joint and possibly another I have yet to remove.
The other way that worked for me was to get the right size cup (came with the set from autozone) but this only worked on two ball joints. The same cup didn't fit the other two. For the two it did fit the best way that worked for me was once I get it snugly on there was to attach an impact wrench and hold it down until it went through. The electric harbor freight one did the job.
Where can we buy cups for the ball join tool that fit the Beetle? It seems another way which might work is get a somewhat close to fit cup and then weld it to the arm and then press it out after which unweld but I have not tried this. Any thought from those more wiser and more experienced in the ways of ball join removal? |
|
| Back to top |
|
|
ashman40
Samba Member

Joined: February 16, 2007
Posts: 15985
Location: North Florida, USA
|
| Posted: Fri Jan 13, 2017 9:10 am Post subject: Re: Replace ball joints |
|
|
| alikatcraig wrote: |
| Apply a bead of weld with a mig all around the inside, drop in a bucket of cold water, and then one or two small taps with a hammer will have it drop out. No more pounding or beating on it or ridiculous press tonnage on home made tooling! Much safer. |
| kawfee wrote: |
| ... It seems another way which might work is get a somewhat close to fit cup and then weld it to the arm ... |
If you have access to a welder, you should try the method alikatcraig mentions above... welding a bead inside the old BJ cup and flash cool it. When the weld cools it shrinks and pulls the cup inward and you just tap it out. This would seem like less effort than the hacksaw or press method.
_________________
AshMan40
---------------------------
'67 Beetle #1 {project car that never made it to the road  } }
'75 Beetle 1200LS (RHD Japan model) {junked due to frame rot}
'67 Beetle #2 {2019 project car - Wish me luck!} |
|
| Back to top |
|
|
heimlich
VWNOS.com
Joined: November 20, 2016
Posts: 6617
Location: Houston, Texas
|
| Posted: Fri Jan 13, 2017 9:20 am Post subject: Re: Replace ball joints |
|
|
Have you tried it?
I've only got one more left to do but maybe next time I will try this way. |
|
| Back to top |
|
|
heimlich
VWNOS.com
Joined: November 20, 2016
Posts: 6617
Location: Houston, Texas
|
| Posted: Fri Jan 13, 2017 5:54 pm Post subject: Re: Replace ball joints |
|
|
Titanium drill bit and hacksaw worked on the last one.
They are as bad to put in as take out. I just ruined two ball joints using a impact wrench trying to drive them in. Don't do that. Slow and easy is the way to go. |
|
| Back to top |
|
|
pwmcguire
Samba Member

Joined: January 30, 2011
Posts: 1108
Location: Kennesaw GA
|
| Posted: Fri Jan 13, 2017 6:19 pm Post subject: Re: Bottom Ball Joints proves difficult. |
|
|
| max16v wrote: |
im in the process of replacing my ball joints right now. i was reading some threads that Glenn posted and that answered several questions except one....
I have rented the BJ tool from AutoZone and the Top ball joints came out with no problem but the Bottoms are giving me trouble. The AZ tool is generic and i cant figure out a way to press the bottom bj's out. If any one has had success using the generic tool let me know. Thanks. |
I have had success, just keep trying. |
|
| Back to top |
|
|
pwmcguire
Samba Member
Joined: January 30, 2011
Posts: 1108
Location: Kennesaw GA
|
| Posted: Fri Jan 13, 2017 6:24 pm Post subject: Re: Bottom Ball Joints proves difficult. |
|
|
| max16v wrote: |
im in the process of replacing my ball joints right now. i was reading some threads that Glenn posted and that answered several questions except one....
I have rented the BJ tool from AutoZone and the Top ball joints came out with no problem but the Bottoms are giving me trouble. The AZ tool is generic and i cant figure out a way to press the bottom bj's out. If any one has had success using the generic tool let me know. Thanks. |
I have had success, just keep trying. |
|
| Back to top |
|
|
heimlich
VWNOS.com
Joined: November 20, 2016
Posts: 6617
Location: Houston, Texas
|
| Posted: Sat Jan 14, 2017 7:21 pm Post subject: Re: Replace ball joints |
|
|
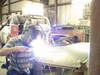
You don't need a fancy tool. The one from autozone (OEM) works fine for the new ball joints. I was able to do everything with the little cup.
Here is a picture of pressing the lower one in:
I was able to press the lower one (new one) out with the small cup.
I saw someone post a comment on one of these forums saying ball joints could be done in 90 minutes. Once I became familiar with the tool it was much simpler. You'll install a whole set of ball joints to become familiar. Have fun! |
|
| Back to top |
|
|
heimlich
VWNOS.com
Joined: November 20, 2016
Posts: 6617
Location: Houston, Texas
|
| Posted: Sun Jan 15, 2017 6:54 am Post subject: Re: Replace ball joints |
|
|
How do you get those nuts to tighten on the lower ball joint and keep the ball from spinning?
I have the same problem with the tie rod on drivers side. |
|
| Back to top |
|
|
heimlich
VWNOS.com
Joined: November 20, 2016
Posts: 6617
Location: Houston, Texas
|
| Posted: Mon Jan 16, 2017 4:22 pm Post subject: Re: Replace ball joints |
|
|
| It ended up being the threads so be careful when putting them in and do not damage the threads. |
|
| Back to top |
|
|
|


