| Author |
Message |
cugir
Samba Member
Joined: February 13, 2007
Posts: 297
Location: WA

|
 Posted: Sun Jun 28, 2009 3:27 pm Post subject: Posted: Sun Jun 28, 2009 3:27 pm Post subject: |
 |
|
Since this thread is bumped I thought I'd add that the chart above uses measurements taken from my 69 square, YMMV.
Original thread and videos here..
http://www.thesamba.com/vw/forum/viewtopic.php?t=222251
_________________
remember, it's peanut butter THEN jelly, not the other way around... - Steve Upton |
|
| Back to top |
|
 |
DUBL-DUBL
Samba Member
Joined: March 14, 2008
Posts: 8
Location: Ontario Canada
|
| Posted: Mon Jul 06, 2009 6:45 am Post subject: |
|
|
Awesome, thanks everyone!
I thought according to the chart a combo move would only be 1/3 of an inch change, or is a tuning move and a combo move 2 totally different things?
Seems like alot of work for not much difference if it's only 1/3 of an inch, but it would be worth it if it was an inch.
So, a couple more questions since there's no point in starting a new thread.......
I was going to get the EMPI lowered struts for the front, but just read on here that they were junk and to get KYB ones instead....
Could someone please tell me which KYB lowered ones I am after? lol
I know they are meant for a lowered type 1, but apparently they fit type 3's, too.
Not sure what they are called, but my struts have the loops at both ends, as opposed to the ones with the post at the top end.
Thanks a bunch in advance!
And sorry for so many stupid questions. 
Cheers!
Craig |
|
| Back to top |
|
|
KTPhil 
Samba Member

Joined: April 06, 2006
Posts: 34013
Location: Conejo Valley, CA
|
| Posted: Mon Jul 06, 2009 8:45 am Post subject: |
|
|
My numbers are rough and from memory, but to clarify: you get about 2 inches if you change one spline at just one end of the torsion bar. If you move one spline inner and then one spline outer in an opposite direction, you get the 1/3 inch change.
EDIT: I'm talking front here.
Last edited by KTPhil on Mon Jul 06, 2009 2:27 pm; edited 1 time in total |
|
| Back to top |
|
|
DUBL-DUBL
Samba Member
Joined: March 14, 2008
Posts: 8
Location: Ontario Canada
|
| Posted: Mon Jul 06, 2009 9:09 am Post subject: |
|
|
I understand that part, I just don't understand how to lower it one inch.
I know how to lower it 2 inches, or 1/3 of an inch, but not 1 inch.
Do I just do 3 inners, then 3 of the opposite direction on the outers, so it would be 1/3" x 3 = 1inch?
Thanks again,
Craig |
|
| Back to top |
|
|
KTPhil
Samba Member
Joined: April 06, 2006
Posts: 34013
Location: Conejo Valley, CA
|
| Posted: Mon Jul 06, 2009 9:50 am Post subject: |
|
|
| Yes, but as a practical matter, you may not be able to do 3 then 3 directly, because it will not push home 3 clicks off. You probably will have to go 1-1, then another 1-1, then a final 1-1, to get to the total 3 each way. Make sense? It's a little tedious, but by the third click you will be doing it in your sleep. |
|
| Back to top |
|
|
DUBL-DUBL
Samba Member
Joined: March 14, 2008
Posts: 8
Location: Ontario Canada
|
| Posted: Mon Jul 06, 2009 10:12 am Post subject: |
|
|
Cool, yeah that makes sense.
And yeah, tedious would be a good word for it.
It might be easier to just go find a big boulder to throw in the back. lol  |
|
| Back to top |
|
|
Mike Fisher
Samba Member

Joined: January 30, 2006
Posts: 17970
Location: Eugene, OR
|
| Posted: Mon Jul 06, 2009 10:46 am Post subject: |
|
|
A $5 magnetic angle gauge takes most of the guesswork out of it!
_________________
https://imgur.com/user/FisherSquareback/posts
69 FI/AT square Daily Driver
66 sunroof,67,70,71,71,71AT,72,72AT,73 Parts
two 57 oval ragtops sold
'68 Karmann Ghia sold
Society is like stew. If you don't keep it stirred up you end up with a lot of scum on the top! - Russ_Wolfe/Edward Abbey |
|
| Back to top |
|
|
W1K1
Samba Member

Joined: March 04, 2004
Posts: 4921
Location: Southern AB
|
|
| Back to top |
|
|
DUBL-DUBL
Samba Member
Joined: March 14, 2008
Posts: 8
Location: Ontario Canada
|
| Posted: Mon Jul 06, 2009 1:26 pm Post subject: |
|
|
Cool, thanks for the replies everyone!
So does anyone know which KYB shocks I am after for the front?
I need lowered shocks and was gonna get the EMPI lowered ones, but I read they are junk and to get KYB....I just don't know which ones to get because they are meant for a beetle, and I don't want to order the wrong ones.
Thanks again!
Craig |
|
| Back to top |
|
|
madmax31
Samba Member
Joined: June 19, 2009
Posts: 44
Location: san francisco
|
| Posted: Tue Aug 11, 2009 9:32 pm Post subject: |
|
|
[quote="cugir"]
What do the minutes in this chart mean? I've looked everywhere and can find the defintion |
|
| Back to top |
|
|
cugir
Samba Member
Joined: February 13, 2007
Posts: 297
Location: WA
|
| Posted: Tue Aug 11, 2009 11:44 pm Post subject: |
|
|
[quote="madmax31"]
| cugir wrote: |
What do the minutes in this chart mean? I've looked everywhere and can find the defintion |
from wiki
A minute of arc or arcminute (MOA) is a unit of angular measurement, equal to one sixtieth (1/60) of one degree. Since one degree is defined as one three hundred sixtieth (1/360) of a circle, 1 minute of arc is 1/21,600 of the amount of arc in a closed circle. ...
minutes are used here in the chart to calculate the exact difference between inner and outer splines. It doesn't mean much to the end user but is helpful when trying to figure out 'which way is up'. Degrees are too coarse a measurement when doing the math.
you can see the 'tuning move' on the rear is 49 minutes. That's a little more precise than saying 'a little less than one degree'.
If you're talking about firearms... one MOA is about 1 inch at 100 yards. If you can shoot 1 MOA you are doing pretty darn good.
_________________
remember, it's peanut butter THEN jelly, not the other way around... - Steve Upton |
|
| Back to top |
|
|
Meyer
Samba Member

Joined: October 30, 2003
Posts: 807
|
| Posted: Wed Dec 30, 2009 6:10 am Post subject: |
|
|
I just got done with a front-end height adjustment on a 1965 Squareback.
I had previously swapped in a later-model beam - I've been told that it is a 1973 build and that it has stiffer torsion bars than what was on the car in '65. The front end was way too high, especially on the passenger's side front. I think that the car had been hit in the front and some part of the frame was out of kilter, even though the car drove good. But it was to the point where the camber adjustment was maxed out on both sides in the front, so I knew I had to lower it and get it level - although my intention was to keep it as stock as possible and not just dump it on its nuts.
So naturally, I went and read all of the T3 "lowering" threads and viewed the excellent videos that are available, then did the work. I'm a first-timer here: so I hope you all will forgive me where I repeat what has already been stated - or where I am just plain wrong - but there are one or two things that I wished people would have told me before I went into this thing that I didn't see in the aforementioned threads. So if it is OK with you, I'd like to share my notes. Yes, I'm a complete amateur, so anybody who wants to is welcome to disagree with any of my points: I'll even number them for your convenience:
1) Fill your T3 completely up with gas before starting front-end height adjustments. After I put my new front end in, I loaded the front cargo area with 120 pounds of sand to work the suspension in. Turns out that it didn't do the job, but it learned me that weight in the car makes a difference, so why not go with the worst-case scenario before you begin? After you do each adjustment, you will see how the car sits on a full tank of gas, which is probably better than otherwise.
2) I found that taking accurate measurements before you start and also while you are going through the process is extremely important. Therefore, you need to have a car-sized, flat and level surface to work on before you start. To most people, this should be obvious, but it is up to you: are you measuring your ride-height, or are you measuring the variances in the ground?
3) Then you need to decide where you are going to take your starting measurements from. I started out measuring from points on the bumpers, but soon realized that the chassis was the only place that you can really trust in order to determine the effects of the adjustments that are being contemplated. Other people might differ, but for my purposes the best points for measurements are the points just behind the front wheel wells and just in front of the rear wheel wells - basically figuring the lay of the rocker panels. Anything else, like bumpers, might not be level wirth respect to the chassis, so why measure it?
4) Raising or lowereing either side of a T3 requires only a few things and the entire process can be done in under a half-hour if you are prepared. But this is only true if you are trying to LEVEL your car or alter the stance. If you are truly trying to dump your car on its nutz, stop reading here.
Still here?
Good. Regardless of which of the three methods below you use to raise or lower your T3 front end, there are a couple of things you will need to do. First, take the bolt and lock washer off of the lower shock mount. Then take the top nut and washer off of the lower ball joint - it is acceptable to loosen from the bottom for the lower ball joint, but then you risk messing with the camber.
Whoops. Just realized that no matter what you do as far as raising or lowereing the front end of your T3, you really ought to take it in when you are done and get it fully alligned by a professional. That is what I plan to do.
I don't know what the torque specs are on the shock mount, but the top nut on the ball joint is a 30mm fitting that requires 80 ft/lbs.
Three ways to alter the stance of your T3 using only the parts that came with the car:
4a) Outer spline adjustment. You really should have a Bentley's manual at this point. This is achieved by removing the torsion arm from the torsion bar momentarily and replacing it one or more splines up or down from where you started. Regardless of whatever method you choose, it is extremely important to mark your starting point with a good metal punch and hammer before starting (see other threads on how this is done).
I suppose that there are many ways to remove the torsion arm from the torsion bar, but I was lucky enough to have a friend send me tool "VW 276a" torsion-arm extractor. Other people have been known to jam a fitting bolt where the grub screw goes and bang on it with a 2x4 and a mallet. But if you want a working facimilie of VW Extractor 276a, feel freee to contact me, and I may be able to put you in touch with a guy who can build one for you. Here are a couple of pictures of the original that was sent to me, with scale.....
But you could just as easily remove the retaining bolt and grub screw and insert something else in there and bang the thing off the outer torsion spline. Doesn't matter. Only thing you need to know is that when you put the grub screw back, it needs to be put back at 22 ft/lbs so as to avoid damage to the outer spline.
But this was the big surprise for me: I had no idea that as I pulled the torsion arm out, it really looked like the entire torsion bar was coming out along with it. As bad as it looks, it really isn't. As long as that bolt is affixed on the other end of the beam, you are OK. Don't worry.
4b) Inner spline adjustment. You really, really should have a Bentley's manual at this point.
The Inner Spline adjustment ... well, that has been fully explained in other threads, and I have not attempted it personally. But I think that there is some controversy here that probably needs to be argued out by more experienced people than myself. But we'll try to get you the meat of it, even lacking real experience.
The most important thing to know is that the inner spline adjustment - as opposed to the outer spline adjustment - is a bigger amount of change as regards lowering or raising of your front end. One spline inner is more change than one spline outer. The method for doing this has been detailed in other videos and threads quite well, so no need for me to go into the 'hows'.
And this is where I kind of wonder why the bulk of the front-end stuff so far on the Samba seems to concentrate on inner spline adjustments. Outer spline adjustments have a finer granularity, so why start with the inner? What's more, I have a friend who was factory-trained who tells me that back in the day they were told that inner spline changes were only needed as a last resort. I'm a newbie here, but if you have the right tools, why would you start with an inner as opposed to an outer spline adjustment? To me, it defies logic.
4c) "Control" adjustment. Absolutely paramount that you get a Bentley maual here. The "Control" adjustment is a way of adjusting the "inner" one way, and the "outer" the opposite way and thereby acheiving a smaller adjustment up or down. I haven't done it myself, so this is up to you to figure out.
5) Getting the torsion arm back in took a little bit more persuasion than I expected. A mallet with a 2x4 was not enough. I have this big brass thing that is larger in diameter than the torsion rod end that was very helpful in driving it home with a big-ass hammer.
More to follow.........
|
|
| Back to top |
|
|
Meyer
Samba Member
Joined: October 30, 2003
Posts: 807
|
| Posted: Wed Dec 30, 2009 6:33 am Post subject: |
|
|
This should give you a good idea of what dropping one outer spline will do, by measurement.
Dropping one outer spline on both sides in the front:
Measuring at the bumper (the top of the chrome button on each corner):
LF went from 14 5/16" to 12 11/16"
RF went from 14 9/16" to 12 14/16"
LR went from 13 14/16" to 14 7/16"
RR went from 13 13/16" to 14 6/16"
Measuring at the rockers aft of the front wheel wells and fore of the rear wheel wells:
LF went from 9 11/16" to 8 11/16"
RF went from 9 11/16" to 8 11/16"
LR went from 9 1/16 to 8 11/16"
RR went from 9 1/16 to 8 12/16" |
|
| Back to top |
|
|
Meyer
Samba Member
Joined: October 30, 2003
Posts: 807
|
| Posted: Wed Dec 30, 2009 6:40 am Post subject: |
|
|
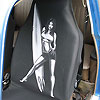
I dropped two outer splines on the passenger's side and one outer spline on the driver's side, and these are the comparsions:
BEFORE:
AFTER:
|
|
| Back to top |
|
|
Meyer
Samba Member
Joined: October 30, 2003
Posts: 807
|
| Posted: Wed Dec 30, 2009 6:50 am Post subject: |
|
|
BEFORE:
AFTER:
|
|
| Back to top |
|
|
Meyer
Samba Member
Joined: October 30, 2003
Posts: 807
|
| Posted: Wed Dec 30, 2009 6:55 am Post subject: |
|
|
Before:
After:
|
|
| Back to top |
|
|
Mike Fisher
Samba Member
Joined: January 30, 2006
Posts: 17970
Location: Eugene, OR
|
| Posted: Wed Dec 30, 2009 8:49 am Post subject: |
|
|
Squarebacks seemed to come originally with a nose High stance. I had to drop the fronts 1 inner and raise the left rear(sag) 1 inner to get my 67 to sit level. The 71 I just bought has a 100 lb bag of sand in the frunk!
_________________
https://imgur.com/user/FisherSquareback/posts
69 FI/AT square Daily Driver
66 sunroof,67,70,71,71,71AT,72,72AT,73 Parts
two 57 oval ragtops sold
'68 Karmann Ghia sold
Society is like stew. If you don't keep it stirred up you end up with a lot of scum on the top! - Russ_Wolfe/Edward Abbey |
|
| Back to top |
|
|
Russ Wolfe
Samba Member

Joined: October 08, 2004
Posts: 25187
Location: Central Iowa
|
| Posted: Wed Dec 30, 2009 12:03 pm Post subject: |
|
|
That is a good looking stock stance.
_________________
Society is like stew. If you don't keep it stirred up, you end up with a lot of scum on the top!--Edward Abbey
Gary: OK. Ima poop. |
|
| Back to top |
|
|
squaretobehip
Samba Member

Joined: August 23, 2004
Posts: 3693
Location: San Jose, CA
|
| Posted: Wed Dec 30, 2009 3:39 pm Post subject: |
|
|
that is the stance i'm gonna go for on my square. very nice car!
_________________
1963 Notchback - Ruby Red
1963 Squareback - Pearl White
1965 Squareback - Baltic Blue
Follow ISP West on:
Facebook - www.facebook.com/ispwest
Instagram - @ispwest - www.instagram.com/ispwest |
|
| Back to top |
|
|
Bobnotch
Samba Member

Joined: July 06, 2003
Posts: 22425
Location: Kimball, Mi
|
| Posted: Wed Dec 30, 2009 8:09 pm Post subject: |
|
|
| Meyer wrote: |
I dropped two outer splines on the passenger's side and one outer spline on the driver's side, and these are the comparsions:
Left AFTER:
Right After:
|
These are with a full tank of fuel? If so, and you don't have any rubbing, I think you're pretty close. Looks good. 
And yes, I have played with inner and outer splines, and on both ends of the car. You really have to think, otherwise you can mess up in a hurry. An angle finder is a must if doing inner & outer spline work.
_________________
Bob 65 Notch S with Sunroof
71 Notch ...aka Krunchy; build pics here;
http://www.thesamba.com/vw/forum/viewtopic.php?t=249390 -been busy working
64 T-34 Ghia...aka Wolfie, under construction... http://www.thesamba.com/vw/forum/viewtopic.php?t=412120
| Tram wrote: |
| "Friends are God's way of apologizing for relatives." |
| Tram wrote: |
| People keep confusing "restored" and "restroyed". |
|
|
| Back to top |
|
|
|


