| Author |
Message |
stumpie
Samba Member
Joined: April 03, 2005
Posts: 87
Location: carlisle, pa.

|
 Posted: Fri Oct 13, 2006 2:35 pm Post subject: guages Posted: Fri Oct 13, 2006 2:35 pm Post subject: guages |
 |
|
Aaaah , Which one moniters the tire pressure???  |
|
| Back to top |
|
 |
aviatorjames
Samba Member

Joined: March 01, 2005
Posts: 232
Location: Half Moon Bay, California
|
| Posted: Sat Oct 14, 2006 8:55 pm Post subject: |
|
|
For Dan & Jared...
That cover pulls STRAIGHT rearward.
It slides on plastic rails and there is a catch when it's full forward.
I pulled until I thought it was going to break...
...then closed my eyes and pulled even more!!
It came off without damage.
Just be sure to pull it straight back.
james
_________________
...some days it's not even worth chewing through the restraints... |
|
| Back to top |
|
|
24inchstance
Samba Member

Joined: March 01, 2005
Posts: 133
Location: Santa Cruz, Ca
|
| Posted: Wed Oct 18, 2006 2:49 pm Post subject: Dragonfly Gauges |
|
|
I got this set of vanagon gauges from DragonFly in Seattle. This is a prototype set and ive been really stoked on the placement, Quality and ease of install. They look very clean, like a factory part. Ive recieved many compliments from other van owners. I need to post up some night shots cause they look really f*&kin cool all lit up...
|
|
| Back to top |
|
|
1621
Samba Member
Joined: May 15, 2006
Posts: 2174
|
| Posted: Wed Oct 18, 2006 3:41 pm Post subject: Re: Dragonfly Gauges |
|
|
| 24inchstance wrote: |
I got this set of vanagon gauges from DragonFly
in Seattle. This is a prototype set and ive been really stoked on the placement, Quality and ease of install. They look very clean, like a factory part. Ive recieved many compliments from other van owners. I need to post up some night shots cause they look really f*&kin cool all lit up...
|
Are those 45 degree PVC bends? That would certainly make for viewing a lot easier. Have you had any interference issues? (i.e. dropping stuff on them, bumping them, etc.) Pretty creative set up, good work.
Lundy |
|
| Back to top |
|
|
24inchstance
Samba Member
Joined: March 01, 2005
Posts: 133
Location: Santa Cruz, Ca
|
| Posted: Wed Oct 18, 2006 4:07 pm Post subject: |
|
|
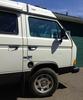
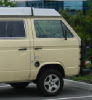
He has another set that bends up further but these have worked really good so far..Ive had no issues with anything bumping into them, I thought shifting into 3rd would but it has plenty of clearance. Ive taken them up gnarly dirt roads with no issues either. Im really diggin the placement cause they are more low key and still easy to glance at. Same place youd find em in older GTi. He has them installed in two of his syncros and they stay put in there too... Heres a shot of his camper at Syncro de Mayo this year...
|
|
| Back to top |
|
|
McHuntley
Samba Member
Joined: November 12, 2002
Posts: 791
Location: Costa Mesa, CA
|
| Posted: Wed Oct 18, 2006 4:16 pm Post subject: |
|
|
How well do they work with an auto?
How much are they/will they be?
I want more gauges!
Matt
_________________
Any opinions stated here are my own, otherwise someone else would have said them. |
|
| Back to top |
|
|
wbx
Samba Member
Joined: April 11, 2005
Posts: 1254
Location: Monterey, CA
|
| Posted: Wed Oct 18, 2006 4:58 pm Post subject: Re: Dragonfly Gauges |
|
|
| 24inchstance wrote: |
I got this set of vanagon gauges from DragonFly in Seattle. This is a prototype set and ive been really stoked on the placement, Quality and ease of install. They look very clean, like a factory part. Ive recieved many compliments from other van owners. I need to post up some night shots cause they look really f*&kin cool all lit up...
|
I can totally see the vwrx 3-gage pod mounted in the location you've shown there. The angle wouldn't quite be as much, but it would look pretty sweet, and would indeed be in a nice spot like you have.
-Damon
_________________
'84 Westy (first owner).......but my daily driver has pedals
My "perspective" mantra:
A Volkswagen Vanagon is just a material thing,
As such, it is of the earth,
And if i need to, I can let my Van go. |
|
| Back to top |
|
|
mellow cat
Samba Member
Joined: September 21, 2006
Posts: 236
|
| Posted: Wed Oct 18, 2006 7:30 pm Post subject: Gauges |
|
|
If your are interested in the gauge pods that are seen on 24 inchstances' van, drop a line to
[email protected].
I currently have three kits made. They are prototypes. There is a "core" involved. I build them from the lower skirt. kit is complete, gauges, vdo only, red green or natural lighting, senders, ( varies depending on your motor,) available for suby, Tiico, 5 cyl, or waterboxer. single "gang" plug for quick and easy removal of lower skirt. Very "traditional" VW/Audi feel to them. in black or brown.
let me know.
Cheers
Mellow Cat |
|
| Back to top |
|
|
fatboypaul
Samba Member

Joined: August 24, 2004
Posts: 432
Location: Emeryville, Ca, SF Bay.
|
| Posted: Thu Nov 02, 2006 9:17 pm Post subject: Any input on gauge placement? |
|
|
I stuck my new gauges here, had a spare cluster cover. Any input?
Very few vanagons had the green eject button in the lower right hand corner, however this one tends to malfuntion............. when I push it , the girlfriend wacks me on the back of the head.
|
|
| Back to top |
|
|
kevinbassplayer
Samba Member

Joined: June 15, 2006
Posts: 1041
Location: Nor-Cal
|
| Posted: Sat May 19, 2007 11:34 am Post subject: |
|
|
Just getting around to posting my "updated" gauge position!
|
|
| Back to top |
|
|
Dogpilot
Samba Member

Joined: October 03, 2005
Posts: 4205
Location: Flagstaff, AZ
|
| Posted: Sat May 19, 2007 7:19 pm Post subject: |
|
|
I know many feel that parallax is a problem. I spent literally thousands of hours behind banks of instruments. You don't read them all, and they can't all be right in front of you. You look for relative changes, not absolute numbers, besides these gauges are not that accurate. The Brits, god bless them, modify all their cockpits. The rotate all guages so they point straight up in cruise. That way if one is not pointing up, something is wrong, pay attention to me! It does make their instrument panels look as if a half wit put the instruments in on the ground.
One other felt that cutting holes in the panel would somehow weaken it. On the late model Vans, the AC controls are mounted in a large square cut-out to the right of the radio. Squares do weaken structure, round holes do not. We cut all kinds of round holes in the ribs and spars of aircraft to lighten them. It does not affect their strength a whit. I just thought this was much cleaner, without projections in the dash, which do cause problems in crashes, especially when your head hits them, or they hit you when the come off. Which is probably what my GPS will do when I center a tree or such.
Now the latest in my 16 year old, this is cool, change, I did this to the display on the radio:
_________________
Geology with a Syncro rocks!
86 Syncro Westy AKA "The Bughunter"
98 Disco I
08 Range Rover SC
08 VW Rabbit S
1951 O-1G |
|
| Back to top |
|
|
vwjedi
Samba Member

Joined: November 29, 2005
Posts: 1463
Location: G-ville, FL - hopefully on a trail.
|
| Posted: Sun May 20, 2007 8:21 am Post subject: |
|
|
Just when I think Dogpilot can't get any cooler, he shows up with Syncro and a VW emblem on the face of his radio. 
You allready get to play in the dirt for a living and drive a Syncro Westy.  Dogpilot is my Idol! Dogpilot is my Idol!
_________________
1987 Wolfsburg T25 still riding out. A bunch of other VW's passed on... |
|
| Back to top |
|
|
lovedavdubs
Samba Member

Joined: April 30, 2004
Posts: 1597
Location: New York, NY.
|
| Posted: Sun May 20, 2007 10:36 am Post subject: |
|
|

Oh-my-GOD! How on earth did you do that?  That's awesome! That's awesome!
_________________
82 Air-cooled Westy (Lola)...My other vehicle is a subway. |
|
| Back to top |
|
|
Dogpilot
Samba Member
Joined: October 03, 2005
Posts: 4205
Location: Flagstaff, AZ
|
| Posted: Sun May 20, 2007 12:26 pm Post subject: |
|
|
I am balding and not exactly a chick magnet anymore. If I'm an idol, then it is the chubby smiling Budda style. I suppose that is why people put coins in my cup and rub my belly. So I fiddle when bored. The Panasonic 8xxx series has software you can download and create images to display on the radio as the wall paper. It will also do moving images if your into that sort of thing. I did rip off other talented people's images and used them in Photoshop to make the graphic.
http://panasonic.co.jp/pas/en/software/customize/color06/index.html
_________________
Geology with a Syncro rocks!
86 Syncro Westy AKA "The Bughunter"
98 Disco I
08 Range Rover SC
08 VW Rabbit S
1951 O-1G |
|
| Back to top |
|
|
izzydog
Samba Member

Joined: April 28, 2005
Posts: 665
|
| Posted: Mon May 21, 2007 10:39 am Post subject: |
|
|
Here's mine. I like the white faces but I do not recommend this mod for the faint of heart or the shakey of hand. Getting the two needles off the speedo and tach is a high-stress operation. The pod was $9 from ePay. Gauges are VDO from eGauges. Ran the 12V for the gauge lights through the dash dimmer. Mounted the whole shebang on top of the cover because the covers are cheap enough to replace if you don't like the mod. I am 6 ft and this arrangement suits my height very well. Looks to me like the steering wheel would be in the way for shorter folks with this setup. There is a slight amount of reflection from the gauge lights at night onto the windshield which I could solve by either changing the angle of the pod or attaching small hoods to each gauge. Not a big deal so I've done neither yet.
Jeff / 87 Syncro Westy 2.2 Subie
|
|
| Back to top |
|
|
Gritty
Samba Member
Joined: January 08, 2007
Posts: 26
Location: Seattle
|
| Posted: Mon May 21, 2007 12:01 pm Post subject: |
|
|
| Izzy - Can you provide more detail for me on removing the needles? What was your technique, or do you have some advice? Also, did you you photoshop the white faces for the speedo and tach or buy them? Thx |
|
| Back to top |
|
|
izzydog
Samba Member
Joined: April 28, 2005
Posts: 665
|
| Posted: Mon May 21, 2007 1:58 pm Post subject: |
|
|
Gritty,
I got the files from Brent Weide, a member of the Subaru/Vanagon list. The file belongs to him so contact him and send him a few bucks for doing all the initial work---that's what I did. I PhotoShopped his file into a simpler version for my own use. I printed mine out on Tyvek paper---a plastic paper that will not tear or deteriorate. I used a color laser printer that I have at my office. A good inkjet will give you better color than color lasers. I got a pack of 25 sheets at Office Depot. Here's Brent's site: http://www.weidefamily.net/vanagon/
Getting the needles off is a pain. One of them---can't remember which---was really easy and the other was really hard. You have to try and pry the needle straight up or you'll start bending/breaking things. A fork works well but do not use it as a lever against the instrument face or you'll put a ding in it. Put the fork on there and pull straight up. I thought I was going to break mine---I had to pull it that hard.
I attached my new faces with a coat of spray glue on both surfaces. Its tricky to get them lined up properly and you only get one chance because the glue is so sticky. I used two of the screw holes for the instrument faces to line up where to drop the new faces on the old face plates. The Tyvek is really great because if you screw it up, you can just pull it off and start over---you can't tear Tyvek so any mistakes come off in one piece.
After you stick down the new faces, you'll need a #11 Exacto blade and knife to cut out the little odometer windows. I did mine by slicing tiny pilot holes in each little window and carefully cutting each one out from the front side, not the back side. The Exacto is also handy for cutting out the tiny screw holes for the screws that hold down the face plates. Remember, if you botch it up somehow, you be looking at your mistake every time you look at your gauges. You also don't want to be yanking the instrument needles off more than once in my humble opinion.
The whole operation requires a fairly steady hand, patience and some teeny screwdrivers and pliers. Lots of stuff has to come apart to get to the two faces. Lots of tiny screws and bits that can get lost easily. Not hard---just tedious. Good luck!
Jeff |
|
| Back to top |
|
|
Van-go108
Samba Member

Joined: November 23, 2006
Posts: 2995
Location: Southwestern, NM
|
| Posted: Mon May 21, 2007 3:34 pm Post subject: |
|
|
That's the same Tyvek material that Dupont created to use as a Vapor Barrier or House/Stucco Wrap? Too cool. With 3m spray Adhesive?
_________________
"Okay, so there's 6 beers and 5 of us. You know what this means don't you? 4 of you are going to have to leave."
1973 Thing
1957 Continental Mark II Click to view image |
|
| Back to top |
|
|
izzydog
Samba Member
Joined: April 28, 2005
Posts: 665
|
| Posted: Mon May 21, 2007 4:11 pm Post subject: |
|
|
Same Tyvek but slightly better grade for office use. It has a bit of "tooth" to it to hold type and images to it. It has a matte finish so it isn't reflective, either. Looks just like paper, too. I've seen field manuals made out of this stuff where you can literally just hose them off when they get dirty. Wish the Bently was made of Tyvek.
Yes, 3M Super77 adhesive. Comes out in a spray vs. a stream like their other spray adhesives (Super74 and Super90) The Super76 High Tack is also excellent but not available in CA. = (
jeff |
|
| Back to top |
|
|
lovedavdubs
Samba Member
Joined: April 30, 2004
Posts: 1597
Location: New York, NY.
|
| Posted: Mon May 21, 2007 5:04 pm Post subject: |
|
|
| izzydog wrote: |
Gritty,
I printed mine out on Tyvek paper---a plastic paper that will not tear or deteriorate. I used a color laser printer that I have at my office. A good inkjet will give you better color than color lasers. I got a pack of 25 sheets at Office Depot.
Jeff |
Hey izzydog nice work Does that Tyvek paper have gloss or mat finish? I have yet to find a mat surface that wont bleed. I had to use assitate.
_________________
82 Air-cooled Westy (Lola)...My other vehicle is a subway. |
|
| Back to top |
|
|
|


