| Author |
Message |
Hugo Stiglitz
Samba Member

Joined: August 07, 2009
Posts: 782
Location: Southern California

|
 Posted: Tue Oct 06, 2009 1:51 pm Post subject: How To: Metal fuel line replacement w/pics Posted: Tue Oct 06, 2009 1:51 pm Post subject: How To: Metal fuel line replacement w/pics |
 |
|
DISCLAIMER: You perform this at your own risk! You assume sole responsibility of execution and outcome. I will not be held responsible if something goes wrong. AKA If you just so happen to burn your shit to the ground, its all on you.
Ok, so I have seen a lot of semi-how-to articles on replacing the fuel line that runs in the tunnel of cars. I've also seen a lot of questions as far as how it is done. Im in the middle of doing a pan off resto on my '63 and needed to replace the OEM copper-plated line (if it was in anywhere near the same shape as the rest of the car, it definitely needed replacing) so I took some pictures along the way.
Sorry for you guys who are trying to do this with the body ON the pan, but hoepfully it will give you some insight for what needs to happen for you to accomplish this task. I was able to do this by myself in about 30 minutes with my pan in this state.
Summary:
1.Cut and pull out old fuel line
2.Run new line from back to front
3.Secure fuel line in tunnel
So here we go...
1. First we have to get rid of the original fuel line. There are three tabs that secure the fuel line in the tunnel.
Starting from the back of the car there is one that secures the fuel line to the driver side heater control tube right under the rear access panel:
I had to use a dremel to cut the tack weld that was holding this one in place. The picture shown here is with the tab already removed, but atleast you get an idea of location...
The next tab is in the middle of the tunnel, somewhere between the e-brake hole and the shifter hole. This is the most difficult tab to get to. I have an access hole that was cut into the tunnel by a previous owner right under the shifter:
Even with this hole there, I still could not get to the middle tab. Here's a pic of the middle tab just for reference of it's location:
It was also the hardest to get a good picture of.
The last tab is towards the front of the car (around where your pedals are located). I had to start pulling the fuel line out to get this picture, but you can see the last tab that holds the line:
I used a dremel at the access hole I have in the middle of the car to cut the fuel line as clost to the middle tab as I could.
DISCLAIMER: MY CAR HAS BEEN SITTING FOR I DO NOT KNOW HOW LONG. THERE WAS ABSOLUTELY NO GAS IN THE LINE WHAT SO EVER. THE CAR DID NOT EVEN COME WITH A GAS TANK. DO NOT USE A DREMEL ON YOUR FUEL LINE IF YOU HAVE ANY REMNENCE OF GAS IN THE LINE OR TUNNEL. YOU WILL CATCH ON FIRE!
After I cut it at that point I was able to pull the front part of the line out with a little effort.
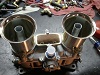
This is the copper line after it was out of the car:
I then took my dremel (remember the DISCLAIMER) to the back access panel and cut the line as far toward the front of the car as I could reach. Then I pulled the line out of where it comes through the frame horn. I had to kind of curl it as it was coming out:
That takes care of the removal of the fuel line.
2.Now we run the new fuel line. I bought a 25' roll of 1/4" steel line from the local auto shop in town for $25. It looks like this:
You wont need 25' feet, you'll only need about 12-13' but it was cheaper to buy the whole roll then it was to buy 13' by the foot. I might also be running a second line for a fuel injection kit somewhere in the near future.
I ran the line from the back to the front. You need to make sure and tape the leading end of the fuel line before you start feeding it through the tunnel.
After you tape the end, you can start feeding it through:
This part takes a little finesse. You need to straighten the line a little as you are feeding it down the tunnel. I was able to feed if all the way up to the shifter area without any snags. Remember I said to tape the end of the line before you start feeding it? This is why:
From here I repositioned the line, kind of bent it flat, so I could run it under where the front tab was for the original fuel line. Then I went to the back of the car and fed it some more. You need to feed the line all the way through the front access panel:
Once you are through the front access panel you need to put a bend in the end of the line so you can feed it up through the hole under the gas tank. It should look a little like this when you are done:
Then you will want to feed the line back towards the rear of the car slowly. You need to use finesse here as well so you can get the line to meet the hole where it comes through the tunnel:
Then I grabbed the line with some needle nose pliers and pulled it up through the hole.
3. Now comes securing the line in the tunnel so it doesn't rattle around. This part is very important. If you don't secure the line sufficiently you run the risk of the line vibrating and possibly wearing a hole into the line or breaking all together and then leaking gas and then FIRE!!
I secured the line in three places just like they did at the factory. One in the rear, one towards the middle, and then got the line to fit into the original front tab.
For securing I had some vinyl tubing lying around the garage. I cut a couple inch long pieces or so then cut a slit down the side.
Then I used the tubing and a couple zip ties to secure the line to the same spot in the rear:
I did the same thing in the middle of the tunnel and attached the fuel line to the clutch cable tube. I didn't take a picture of that one, but I tried to get is as close to the same position as the stock fuel line mount there in the middle. Then for securing the line up front I was able to bend open the front tab slightly and manuever the line into it:
Then I bent the tab back shut to hold the line good and tight.
From here you can cut the line at the rear (make sure and leave a little extra just in case) and install new rubber grommets around the fuel line when it comes through the tunnel. I know Wolfsburg West sells them, you will need two.
TADAAAHHHH! You're done. New hard fuel line installed. No bloody knuckles or sweaty brows.
I hope this helps. Post up any questions you might have and I will try to answer them as best as I can.
Last edited by Hugo Stiglitz on Wed Oct 07, 2009 10:40 am; edited 1 time in total |
|
| Back to top |
|
 |
hpw
Samba Member
Joined: July 17, 2006
Posts: 3010
Location: memphis
|
|
| Back to top |
|
|
glutamodo 
The Android

Joined: July 13, 2004
Posts: 26311
Location: Douglas, WY
|
| Posted: Tue Oct 06, 2009 3:41 pm Post subject: |
|
|
Well, the old one is held in there at that clip by the clutch pedal pretty well, When I went to try to yank my old line out, I popped that clip off entirely. Not that it mattered, in my case I found it was going easier to route my new line over the pedals. But before I yanked it out, I did take this photo of it:
Another note I wanted to make, the original line was not copper. It was copper plated, but a steel line under the plating. I have this picture comparing the stainless line I used to the original:
|
|
| Back to top |
|
|
Hugo Stiglitz
Samba Member
Joined: August 07, 2009
Posts: 782
Location: Southern California
|
| Posted: Tue Oct 06, 2009 3:45 pm Post subject: |
|
|
copper, copper plated. Its still a tube that needs to be replaced for some.
And it's your preference as far as cutting it out, yanking it out, or just cutting back a couple of inches at each end. I didn't want to have extra line rattling around somewhere down the road. I was already there, I figured I would just get rid of it. |
|
| Back to top |
|
|
glutamodo
The Android
Joined: July 13, 2004
Posts: 26311
Location: Douglas, WY
|
| Posted: Tue Oct 06, 2009 4:52 pm Post subject: |
|
|
| Just mentioned it becuase solid-copper line for replacement is not a preferred option. Steel or stainless is the way to go. |
|
| Back to top |
|
|
EMPIImp69
Samba Member

Joined: April 17, 2006
Posts: 3374
Location: Dirty Jersey
|
| Posted: Tue Oct 06, 2009 5:29 pm Post subject: |
|
|
Awesome job Xskull
_________________
1963 Ragtop Bug |
|
| Back to top |
|
|
Culito
11010101

Joined: December 07, 2006
Posts: 5865
Location: Columbia Missourah
|
| Posted: Tue Oct 06, 2009 6:12 pm Post subject: |
|
|
Nice writeup. I just did this on mine. (You can see the fuel line coiled up at the back frame horn.)
I just removed the bits that got in the way and used the old line to tie to - to keep the new line from rattling around. I didn't have that handy access hole, either!
_________________
Copyright CJ Industries, Inc.
'64 standard w/2.0L type 4
'62 bug
| johnnypan wrote: |
| ...dont pay no attention to Culito,he's a cornhole.. |
|
|
| Back to top |
|
|
Hotrodvw
Samba Member
Joined: July 06, 2004
Posts: 6327
Location: Orygun
|
| Posted: Tue Oct 06, 2009 11:02 pm Post subject: |
|
|
| glutamodo wrote: |
| Just mentioned it becuase solid-copper line for replacement is not a preferred option. Steel or stainless is the way to go. |
You are correct sir. Copper plated, or copper annealed tubign is for corosion reisistence. Actual Copper tubing has an oil oxidizer in it, and will cause a sludge to form on the ID when exposed to petroleum products.
_________________
'67 Sunroof
Eric
78x94 with IDA's....oober fun
Horsepower is an addiction........Addictions cost
lots of money!
Hose & Fittings |
|
| Back to top |
|
|
tspot100
Samba Member
Joined: March 26, 2006
Posts: 464
|
| Posted: Wed Oct 07, 2009 4:15 am Post subject: line |
|
|
| very nice. i did mine a few years ago and found it much easier to feed the line from the front to the back. took me 20 minutes... thanks to bill may. |
|
| Back to top |
|
|
Shadd
Samba Member
Joined: January 18, 2007
Posts: 883
Location: Lancaster, Ohio
|
| Posted: Wed Oct 07, 2009 7:54 am Post subject: |
|
|
| Hotrodvw wrote: |
| glutamodo wrote: |
| Just mentioned it becuase solid-copper line for replacement is not a preferred option. Steel or stainless is the way to go. |
You are correct sir. Copper plated, or copper annealed tubign is for corosion reisistence. Actual Copper tubing has an oil oxidizer in it, and will cause a sludge to form on the ID when exposed to petroleum products. |
Really....I've never heard of this... I used copper line for an oil pressure gauge a few years back. For some reason it never worked quite right....  |
|
| Back to top |
|
|
spectre6000
Samba Member
Joined: April 19, 2009
Posts: 2014
Location: Broomfield, CO
|
| Posted: Sat Oct 17, 2009 11:10 am Post subject: |
|
|
This is excellent! I'm about to have to do this on my Ghia. Thanks for the step by step.
_________________
Jason Hopper
-'58 German Market Deluxe Beetle (in progress)
-'84 M1009 CUCV
-'81 K10
"Buy the best, cry once." -Gene Berg
"A cheap man will always buy the cheapest thing available, and then buys another one hoping for a better result, and then spends the rest of his life in misery complaining about it. A thrifty man will buy a good part once and never think about it again." -RockCrusher
"Don't feed the Shitty Parts Monster!" -Me |
|
| Back to top |
|
|
Faustuss
Samba Member

Joined: September 23, 2008
Posts: 206
Location: California
|
| Posted: Sat Oct 17, 2009 11:27 am Post subject: |
|
|
My only thought is to use something a bit sturdier than those tiny zip ties. They sure seem sturdy at first, but they degrade much faster than anything else in your tunnel will and might be a problem down the road.
_________________
What was done to me created me. It is a basic principle of the universe.
1967 type 1 |
|
| Back to top |
|
|
Detroit73super
Samba Member

Joined: October 03, 2009
Posts: 611
Location: Detroit
|
| Posted: Sat Dec 05, 2009 6:31 pm Post subject: |
|
|
| tryin to remove / replace fuel line on 73 Super, and fuel line takes a 90degree turn and exits the tunnel on passenger side right in front of framehead.....How do you accomplish this ????? |
|
| Back to top |
|
|
mooks73
Samba Member
Joined: June 08, 2006
Posts: 422
Location: fontana ca
|
| Posted: Sun Dec 06, 2009 11:04 am Post subject: |
|
|
| nice thread.i was about to do that to my 62 vert,but i bought a c.b fuel injection set up and am going to route the new feed and return lines like they say to do. |
|
| Back to top |
|
|
Bruce
Samba Member
Joined: May 16, 2003
Posts: 17285
Location: Left coast, Canada
|
| Posted: Sun Dec 06, 2009 6:37 pm Post subject: Re: line |
|
|
| tspot100 wrote: |
| ..... found it much easier to feed the line from the front to the back. took me 20 minutes... |
I also put a line in from the front. Took me only 10 min, with the body on.
_________________
| overheard at the portland Swap Meet... wrote: |
| ..... a steering wheel made from a mastadon tusk..... |
|
|
| Back to top |
|
|
Rowroy
Samba Member

Joined: November 07, 2006
Posts: 1012
Location: The ass of nowhere
|
| Posted: Mon Dec 07, 2009 6:19 am Post subject: |
|
|
| Culito wrote: |
Nice writeup. I just did this on mine. (You can see the fuel line coiled up at the back frame horn.)
I just removed the bits that got in the way and used the old line to tie to - to keep the new line from rattling around. I didn't have that handy access hole, either! |
So you're using a cave as a garage, eh? 
_________________
Suicide is man's way of telling God, "You can't fire me; I quit!" - Bill Maher |
|
| Back to top |
|
|
Hotrodvw
Samba Member
Joined: July 06, 2004
Posts: 6327
Location: Orygun
|
| Posted: Mon Dec 07, 2009 8:12 am Post subject: |
|
|
No that's the Dungeon.....That's where the wife sends him when he screws up. Not always a bad thing....
_________________
'67 Sunroof
Eric
78x94 with IDA's....oober fun
Horsepower is an addiction........Addictions cost
lots of money!
Hose & Fittings |
|
| Back to top |
|
|
tspot100
Samba Member
Joined: March 26, 2006
Posts: 464
|
| Posted: Mon Dec 07, 2009 9:03 am Post subject: fuel line |
|
|
| for the 73. install the line from front to back...go past point, bend the 90 degree you need and push it out the front pass. side. VERY simple..again...thanks to bill may. |
|
| Back to top |
|
|
CrashedAgain
Samba Member
Joined: June 06, 2007
Posts: 328
Location: Saskatchewan Canada
|
| Posted: Wed Dec 09, 2009 2:18 pm Post subject: |
|
|
| Shadd wrote: |
| Hotrodvw wrote: |
| glutamodo wrote: |
| Just mentioned it becuase solid-copper line for replacement is not a preferred option. Steel or stainless is the way to go. |
You are correct sir. Copper plated, or copper annealed tubign is for corosion reisistence. Actual Copper tubing has an oil oxidizer in it, and will cause a sludge to form on the ID when exposed to petroleum products. |
Really....I've never heard of this... I used copper line for an oil pressure gauge a few years back. For some reason it never worked quite right.... |
It is only gasoline that is affected by copper, oil should be OK.
More information in this thread: http://www.thesamba.com/vw/forum/viewtopic.php?t=388599&sid=04bb8feaf8dd2c63b4f3195cd67bebf1 |
|
| Back to top |
|
|
Hotrodvw
Samba Member
Joined: July 06, 2004
Posts: 6327
Location: Orygun
|
| Posted: Wed Dec 09, 2009 2:23 pm Post subject: |
|
|
Why copper at all????? I wouldn't use it for fuel OR oil.....period.
_________________
'67 Sunroof
Eric
78x94 with IDA's....oober fun
Horsepower is an addiction........Addictions cost
lots of money!
Hose & Fittings |
|
| Back to top |
|
|
|


