| Author |
Message |
René R.
Samba Member

Joined: July 06, 2015
Posts: 1712
Location: No. Calif.

|
 Posted: Tue Aug 04, 2015 2:58 pm Post subject: Posted: Tue Aug 04, 2015 2:58 pm Post subject: |
 |
|
| Just found this thread, I must say I am very impressed! Amazing work. I look forward to seeing pictures of the finished car. |
|
| Back to top |
|
 |
54bugn
Samba Member

Joined: April 28, 2005
Posts: 493
Location: Parksville BC, Canada
|
| Posted: Tue Aug 04, 2015 3:37 pm Post subject: |
|
|
Thanks Rene R. Appreciate the comments. I work out of town so my updates can be on and off, but I am still making slow progress. I am currently working on my August 54 km speedo and a spare March 54 speedo I have, while away. I will post pics soon.
Cheers,
Mike
_________________
"Schwing wrote:
You either have to be too cheap to hire a pro or determined to do it yourself, but it helps to be both!"
54 European Sedan deluxe
Build thread: http://www.thesamba.com/vw/forum/viewtopic.php?t=414940 |
|
| Back to top |
|
|
54bugn
Samba Member
Joined: April 28, 2005
Posts: 493
Location: Parksville BC, Canada
|
| Posted: Fri Aug 07, 2015 7:11 am Post subject: |
|
|
Ok, so I am actually away at work, but decided to bring some smaller items that needed repairing with me, first two items up: my August 1954 European km speedometer and a spare March 1954 mph speedo.
I should have taken more before pics of my August 54 speedo but imagine rust dirt, stuck seals etc here is the only one I have:
There was enough rust damage on the back of the speedo cover that I had to paint it inside and out, looks pretty good I think.
My backup March 54 speedo was in far better shape and I have kept the original metal finish:
So the needles on both had become very yellowed and were extremely brittle as can be seen on the following pic at lower right:
So after doing a search and request for info on the samba, thank you, I was able to find needles for sale from Econo International supply. I ordered one clear and one (what they call) yellow which is almost clear. Both have a brass, nickel plated, centre cap and shaft piece which has a rough surface on the cap. If you compare the Next picture showing my original shaft cap swapped into the new clear needle bottom with the yellow needle above with the EIS cap you will see how much nicer I think it looks:
Interesting to note that my August 54 centre shaft and cap are also one piece, but my March 54 was a separate shiny cap bonded to the needle instead of being one piece as shown above. I was able to file down the edge of the replacement cap and bond the original shiny cap overtop.
As noted on another forum, thanks John Henry, there is about an 8 mph preload on the needle so as you can see in the next pick once the needle was carefully pulled above the stop peg, it came to rest at the marked position:
So here is the new clear needle with original centre shaft and cap reinstalled and preloaded against peg:
So here is the pre final assembly pics showing it all cleaned up, gears lightly lubed, light sockets and new 12volt bulbs, note high beam tube:
Here is the March 54 with new slightly yellow needle with original vw cap bonded on needle and preload set and installed on speedo face:
I forgot to mention I had to rebond the red and green gels on the back of the speedo faces, the March 54's gels were in good shape and bonded in original position, the August 54 were very faded where they lined up with the original position but we're big enough to shift slightly and bond showing good color. Here are the two speedos before glass install as a comparison:
And final assembly pics with original rings, I think they turned out ok:
Thanks for watching more to come. Cheers,

_________________
"Schwing wrote:
You either have to be too cheap to hire a pro or determined to do it yourself, but it helps to be both!"
54 European Sedan deluxe
Build thread: http://www.thesamba.com/vw/forum/viewtopic.php?t=414940 |
|
| Back to top |
|
|
glideking
Samba Member

Joined: February 02, 2013
Posts: 990
Location: California
|
|
| Back to top |
|
|
54bugn
Samba Member
Joined: April 28, 2005
Posts: 493
Location: Parksville BC, Canada
|
| Posted: Sun Nov 15, 2015 6:01 pm Post subject: Re: My 54 european deluxe from start to finish |
|
|
So I am finally getting started repairing the rust and damage to the body. There is quite a lot to do, and I had no idea where to start, so I decided to start at the right rear wheel well and rear valance.
Some time in the past the muffler was replaced, with a later model, and to get it to fit they beat the valance out of shape on the right and middle and cut out the left side, sheesh. Anyway repairs begin.
The beat in metal by the right hand tip starts to take shape.
My custom tool made of phenolic blocks to help straighten out the valance:
Starting to come out straighter:
From the inside it is getting there. Now to fix the left side:
Had to drill out a snapped off bolt (fwd) and start to repair a crack by the aft welds:
Fwd edge of fender mount is in rough shape, I may try to weld up the upper holes, obviously lower section will be replaced:
Ok more to come tomorrow, stand by.
Mike
[/img]
_________________
"Schwing wrote:
You either have to be too cheap to hire a pro or determined to do it yourself, but it helps to be both!"
54 European Sedan deluxe
Build thread: http://www.thesamba.com/vw/forum/viewtopic.php?t=414940 |
|
| Back to top |
|
|
54bugn
Samba Member
Joined: April 28, 2005
Posts: 493
Location: Parksville BC, Canada
|
| Posted: Mon Nov 16, 2015 5:03 pm Post subject: Re: My 54 european deluxe from start to finish |
|
|
Welding started today, a little out of practice, but holes filled and its solid. Some finishing to do to make it smooth. An expert on this I'm not.
More repair tomorrow,
Cheers.
Mike
_________________
"Schwing wrote:
You either have to be too cheap to hire a pro or determined to do it yourself, but it helps to be both!"
54 European Sedan deluxe
Build thread: http://www.thesamba.com/vw/forum/viewtopic.php?t=414940 |
|
| Back to top |
|
|
Joey
Samba Member

Joined: August 12, 2005
Posts: 5366
Location: Nova Scotia - Canada
|
| Posted: Wed Nov 18, 2015 10:22 am Post subject: Re: My 54 european deluxe from start to finish |
|
|
| 54bug'n wrote: |
| Welding started today... An expert on this I'm not. |
You will be when it's done... but, won't ever want to do it again!
_________________
Joey
60 Kombi - '74 Bus - '79 Panel - '65 Beetle |
|
| Back to top |
|
|
54bugn
Samba Member
Joined: April 28, 2005
Posts: 493
Location: Parksville BC, Canada
|
| Posted: Thu Nov 19, 2015 8:21 pm Post subject: Re: My 54 european deluxe from start to finish |
|
|
Thanks Joey, you are right. I will keep posting as I go.
Cheers,
Mike
_________________
"Schwing wrote:
You either have to be too cheap to hire a pro or determined to do it yourself, but it helps to be both!"
54 European Sedan deluxe
Build thread: http://www.thesamba.com/vw/forum/viewtopic.php?t=414940 |
|
| Back to top |
|
|
54bugn
Samba Member
Joined: April 28, 2005
Posts: 493
Location: Parksville BC, Canada
|
|
| Back to top |
|
|
54bugn
Samba Member
Joined: April 28, 2005
Posts: 493
Location: Parksville BC, Canada
|
| Posted: Mon Nov 23, 2015 6:38 pm Post subject: Re: My 54 european deluxe from start to finish |
|
|
Final repair picks for this time home, have to go back to work to make more repair money. Check back in three weeks when the repairs continue. Check out the before pictures above and the current pics posted below. A good start anyway:
Stand by, thanks for watching.
Mike
_________________
"Schwing wrote:
You either have to be too cheap to hire a pro or determined to do it yourself, but it helps to be both!"
54 European Sedan deluxe
Build thread: http://www.thesamba.com/vw/forum/viewtopic.php?t=414940 |
|
| Back to top |
|
|
Schwing
Samba Member

Joined: May 10, 2009
Posts: 2506
Location: Centreville, MD
|
|
| Back to top |
|
|
54bugn
Samba Member
Joined: April 28, 2005
Posts: 493
Location: Parksville BC, Canada
|
| Posted: Tue Dec 08, 2015 11:24 am Post subject: Re: My 54 european deluxe from start to finish |
|
|
Thanks Schwing, looking forward to carrying on with more patches, thanks for the inspiration.
Cheers,
Mike
_________________
"Schwing wrote:
You either have to be too cheap to hire a pro or determined to do it yourself, but it helps to be both!"
54 European Sedan deluxe
Build thread: http://www.thesamba.com/vw/forum/viewtopic.php?t=414940 |
|
| Back to top |
|
|
54bugn
Samba Member
Joined: April 28, 2005
Posts: 493
Location: Parksville BC, Canada
|
| Posted: Wed Dec 23, 2015 7:01 pm Post subject: Re: My 54 european deluxe from start to finish |
|
|
Hello all. Made it back home before the holidays and dug into the 54 some more. I still had two more holes to weld up under the passenger side engine compartment side panel. They were both on the inner side of the bumper mount. I didn't get a pic of the repair on the first hole but you can see the more forward hole cleaned up as best I could in the tight space.
And here is the after of the same side:
And here is the next repairs to go, drivers side and its even worse. Going to replace this one with new metal.
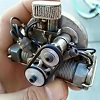
And on another front I was able to obtain an original 54 36 hp crank pulley and fuel pump, thanks Adam.
Ok back to work, but wishing everyone a very Merry Christmas.
Cheers,
Mike
_________________
"Schwing wrote:
You either have to be too cheap to hire a pro or determined to do it yourself, but it helps to be both!"
54 European Sedan deluxe
Build thread: http://www.thesamba.com/vw/forum/viewtopic.php?t=414940 |
|
| Back to top |
|
|
My57Oval
Samba Member

Joined: March 10, 2005
Posts: 624
|
| Posted: Thu Dec 24, 2015 7:16 am Post subject: Re: My 54 european deluxe from start to finish |
|
|
Hi. Nice work!
What is specific about a 54 36HP pulley vs. other years? The slots, markings?
Rob |
|
| Back to top |
|
|
Joey
Samba Member
Joined: August 12, 2005
Posts: 5366
Location: Nova Scotia - Canada
|
| Posted: Thu Dec 24, 2015 7:46 am Post subject: Re: My 54 european deluxe from start to finish |
|
|
I can't see the repair... I'm calling Photoshop on this one... 
_________________
Joey
60 Kombi - '74 Bus - '79 Panel - '65 Beetle |
|
| Back to top |
|
|
54bugn
Samba Member
Joined: April 28, 2005
Posts: 493
Location: Parksville BC, Canada
|
| Posted: Thu Dec 24, 2015 12:02 pm Post subject: Re: My 54 european deluxe from start to finish |
|
|
Hello My57Oval, Rob, the crank pulley isn't specific to a 54 36 hp but is the last year it was used from what I have learned. The main difference from the next generation is that it has no curled lip around the outer edge, if you look at later ones.
Ha ha Joey, my welding is improving, solid but not pretty, so I cleaned it up applied a little professional filler to smooth it out and etch primed. I will take progress pics next time.
Cheers and Merry Christmas
_________________
"Schwing wrote:
You either have to be too cheap to hire a pro or determined to do it yourself, but it helps to be both!"
54 European Sedan deluxe
Build thread: http://www.thesamba.com/vw/forum/viewtopic.php?t=414940 |
|
| Back to top |
|
|
txoval
Samba Member
Joined: January 23, 2004
Posts: 3552
Location: The Woodlands, TX
|
| Posted: Fri Dec 25, 2015 8:23 am Post subject: Re: My 54 european deluxe from start to finish |
|
|
| Yes, I still kick myself for throwing my 54 crank pulley away because a minor dent in the small lip...so many parts I've thrown away over the years that are worth big $$$ now. Door handles and ribbed pulls/window cranks come to mind |
|
| Back to top |
|
|
54bugn
Samba Member
Joined: April 28, 2005
Posts: 493
Location: Parksville BC, Canada
|
| Posted: Fri Dec 25, 2015 12:31 pm Post subject: Re: My 54 european deluxe from start to finish |
|
|
One has to be careful as to what one holds on to for sure txoval. Much to the chagrin of my wife I have tried to hold onto anything 54 ish and anything I am unsure of. I just keep telling her once I am done the 54, I will clear some of the spare bits, we will see if that actually happens? 
Cheers,
Mike
_________________
"Schwing wrote:
You either have to be too cheap to hire a pro or determined to do it yourself, but it helps to be both!"
54 European Sedan deluxe
Build thread: http://www.thesamba.com/vw/forum/viewtopic.php?t=414940 |
|
| Back to top |
|
|
3foldfolly
Samba Member
Joined: March 08, 2009
Posts: 894
Location: Edwardsville, Il
|
| Posted: Fri Dec 25, 2015 5:57 pm Post subject: Re: My 54 european deluxe from start to finish |
|
|
| The way I understand it is the thin lipped crank pulley was used until the beginning of the 56 model year production. The 25 hp and 36 hp pulleys look identical except that the 25 hp has a wider belt groove. The belt width was changed to 9.5mm with the introduction of the 36 hp engine beginning in 54. So, the correct pulley is 54-55 only |
|
| Back to top |
|
|
txoval
Samba Member
Joined: January 23, 2004
Posts: 3552
Location: The Woodlands, TX
|
| Posted: Fri Dec 25, 2015 7:13 pm Post subject: Re: My 54 european deluxe from start to finish |
|
|
Before my 54, all my VW's were 64 and newer. So being my first Oval and not understanding the differences between 53-55 and 56-57 Ovals and used to 99% of replacement parts being available, I threw away a lot of parts when rebuilding my 54. Crank pulley, front hood handle and latch/spring plunger, window cranks, etc. Heck I even sold my five(5) 1954 stock rims like an idiot.
Live and learn with these early cars...
| 54bug'n wrote: |
One has to be careful as to what one holds on to for sure txoval. Much to the chagrin of my wife I have tried to hold onto anything 54 ish and anything I am unsure of. I just keep telling her once I am done the 54, I will clear some of the spare bits, we will see if that actually happens?
Cheers,
Mike |
|
|
| Back to top |
|
|
|


