| Author |
Message |
joebug1956
Samba Member

Joined: August 08, 2006
Posts: 362
Location: Richmond VA

|
 Posted: Tue May 07, 2013 7:16 pm Post subject: Posted: Tue May 07, 2013 7:16 pm Post subject: |
 |
|
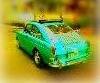
Love this build. I have an original 1962 type 152 rhd vert. I have been trying to find out how many were produced but have had no luck. Mine was a US Tourist import. (ordered from a dealership in the states, then picked up on a European vacation and brought back to the USA as a part of VW's tourist import program!)
If you ever find details about how many were made please let me know!!! There can't be too many 152's still out there!!
_________________
My 62 RHD Vert
http://www.thesamba.com/vw/forum/viewtopic.php?t=467238&highlight=rhd+vert |
|
| Back to top |
|
 |
vladve
Samba Member

Joined: May 15, 2010
Posts: 67
Location: Australia
|
| Posted: Wed Jul 17, 2013 6:10 am Post subject: |
|
|
Hi all, I have eventually reached a major milestone the entire body is ready for paint. Everything has been cleaned, sanded, assembled and adjusted. The car actually looks like a real thing now which is such a relief after almost two years of dealing with bits pieces all over the place.
Now it will be picked up by the professional body shop the coming Saturday. The guys will do the final sanding, prep and two pack paint cycle after long considerations I decided to let the pros do the work. Besides the quality of the finish it will also speed the project up substantially for me.
To assist the guys in moving the car around the shop I have welded a trolley. I was trying to come up with something that would be structurally sound and would provide good bracing to the body. Check out what I have come up with. The trolley sits between reinforcements of heater channels and repeats the shape of the floor pan.
After landing the body I have also added rear and front supports to bolt on to the mounts. The whole assembly is pretty rigid doors gaps are still fine and everything is well aligned.
Another good news Ive come across a stock 1,200CC engine which is an exact match to my chassis. It has been reconditioned, including the case, main bearings, heads etc. it was all done by an old VW mechanic in Queensland hes used NOS genuine VW parts. Ive heard it running sounds very smooth! Ive got it for $1,800, which included the fitting of the brand new clutch, exhaust, 6V starter and shipping from QLD to VIC. Yes the engine is still 6V and this fact has actually converted my thinking to keep the entire car 6V. Note the old school dog house no vents!
Now the time is to start the chassis assembly. The goal is to finish it before the body is back aprox 3 months.
Cheers! |
|
| Back to top |
|
|
Hansolo99
Samba Member
Joined: December 04, 2010
Posts: 524
Location: So Cal
|
| Posted: Wed Jul 17, 2013 7:28 am Post subject: |
|
|
| WOW! What a transformation! That looks great-AWESOME job.......... |
|
| Back to top |
|
|
vladve
Samba Member
Joined: May 15, 2010
Posts: 67
Location: Australia
|
| Posted: Fri Jul 19, 2013 4:58 pm Post subject: |
|
|
Thanks!
The body has been picked up this morning to go to the paint shop - a very thrilling moment!
Here it is sitting in a lonely corner, waiting for the true transformation to commence...
I've asked the guys not to rush and take it slowly. I think it'll take about 3 months now. I'll post some photos of the process as I come to pay it a visit once in a while. |
|
| Back to top |
|
|
DONGKG
The Araneta Boys
Joined: August 28, 2006
Posts: 5475
Location: Cainta, Rizal, Philippines, "A Certified Type 3 and Karmann Ghia Maniac"
|
|
| Back to top |
|
|
vladve
Samba Member
Joined: May 15, 2010
Posts: 67
Location: Australia
|
| Posted: Sun Sep 22, 2013 2:31 am Post subject: |
|
|
Hey guys, here is a quick update. I know its been a while since the last one; however Im pleased to say the work is progressing. So once the body was sent off, I started working on the chassis. I pulled out the gearbox from the donor chassis, which was terribly filthy, but was in perfect operating order. Initially I considered rebuilding it, however after a thorough assessment it appeared to be rock solid. I cleaned it, replaced the oil and worked on axle tubes. Replaced all gaskets there, and then main bearings, seals etc. Not many pictures it was a relatively trivial process. Here is what it looked at one stage:
Then, well it was simply starting to put the new stuff together pedal cluster, brake pipes I damaged one set before I mastered the technique of artistic finger-bending. By the way I tried to use one of those pipe-bending tools quite useless I should say. It does deliver a nice curvature, but it is somewhat cumbersome and not very handy to use, especially for small radius curves thumbs absolutely rule here.
I was focusing on finalising the rear end first. Almost everything is new there now. Here are couple of shots of a finished rear end.
Recently I paid a visit to the body shop where the bugs body is being worked on. Guys are doing absolutely exceptional job! All external (bolt-on) panels have already been finished and primed.
Cant wait until it is finished should be another 2 months or so. The goal is to try and finish the chassis completely by then. I'll start working on the front end now. |
|
| Back to top |
|
|
vladve
Samba Member
Joined: May 15, 2010
Posts: 67
Location: Australia
|
| Posted: Fri Sep 27, 2013 7:38 pm Post subject: |
|
|
This is very minor, but I thought it might be handy in case someone is having a similar issue. Whilst working on the chassis I noticed the RH heater duct opening was missing. This has been changed on later bugs to a round shape - mine are still oval, to fit in kick-panels, and apparently are quite rare. After browsing the net for a while without any results, I decided to try and replicate it myself.
The starting point was somewhat roughly resembling the part it was a stainless steel piece, something to do with domestic heating/ventilation picked it up at Bunnings (our DIY store) for 3$.
Here is the transformation in stages:
The result is good the shape fits perfectly in the under seat kick-panel and it should be just as functional as the original one. |
|
| Back to top |
|
|
dubjeep
Samba Member
Joined: December 24, 2011
Posts: 354
Location: Rhode Island
|
|
| Back to top |
|
|
vladve
Samba Member
Joined: May 15, 2010
Posts: 67
Location: Australia
|
| Posted: Sun Nov 24, 2013 12:51 am Post subject: |
|
|
And here it comes.
After 5 months of sitting at the paint shop, the panel beating stage is over! No more welding-grinding! The finally sprayed body was delivered yesterday.
I spent lots of time considering the colour. The intention was to go with L334 Glazier Blue Poly or L232 Iris Blue Poly. Both are of a classic light blue type with a dash of grey. The convertible top I have pre-ordered came in dark navy blue, and I thought it would suit it well. Unfortunately the PPG codes I brought to the shop didn't really help - apparently these are all very outdated indexes. So I just went with matching paint cards to the actual colour as best as I could.
Here are some pics highlighting the final stages of the process. Guys at the shop have done an absolutely outstanding job they took their time without rushing, worked thoroughly on each panel and the result is quite spectacular!
Primed fenders and doors:
The entire body is primed and ready - waiting for me to stop coming up with new colour choices:
And here comes out the beauty:
Loading the car. The dolly I welded worked great, however out of 6 wheels, unfortunately 3 snapped. My mistake, I picked up the wrong ones - too small for the load, or maybe just poor quality. However the remaining 3 ones somehow survived and maintained the manoeuvrability
Back at home:
Guys at the shop took the initiative and sprayed all inside areas in a proper black underlay and then matt chassis black. The finish is superb but I'm not sure if this would be the right thing to do. It does look neat, I admit, and very practical, though I suspect it is not very authentic. But there is not much I can do at this stage, so we'll go with it as is:
And in between I spent 5 months getting the rear-end ready. I was lucky to source the exact type of stale air heater boxes - thanks to theSamba's Classifieds! And now I know these inside out - shout me a question if anyone enquires about the internals for these:
The engine is now up and running. It had some valve noises when I started it initially. Adjusted it to 0.004'' and it runs really well now.
The next step is finishing the front suspension, and then the actual assembly of all fittings: handles, mouldings, wiring etc. I've got the majority of these re-chromed during the last year - will post some pics as the assembly is progressing. |
|
| Back to top |
|
|
Walter64
Samba Member

Joined: December 06, 2013
Posts: 146
Location: Sydney
|
| Posted: Sat Jan 04, 2014 12:21 pm Post subject: |
|
|
You come along way, I'm impressed.
_________________
VW fan & Real Estate Agent at www.argyproperty.com.au
66 RHD teak T34 karmann |
|
| Back to top |
|
|
vladve
Samba Member
Joined: May 15, 2010
Posts: 67
Location: Australia
|
| Posted: Sun Jan 05, 2014 3:32 am Post subject: |
|
|
@Walter64 - thanks, much appreciated!
The time-off I have had over Christmas came in very handy. I could start assembling bits and pieces on the body and today have reached another important milestone the chassis is now complete.
Here are couple of photos.
Complete chassis:
The front axle is ready. It actually took me a while to get everything together had to buy one of those special tool kits to change bearing races in drums. Also the left side was missing the thrust washer and one of the lock-nuts. Originally the main nut (one only) was tightened directly over the bearing - that's a real disgrace.
All fenders, lids, rubbers etc., have been fitted:
Restored and installed rear quarter windows, including the lifting mechanism:
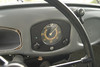
The dashboard is generally ready. I know the switch to the right of the ashtray is actually a dome light switch that should be under the dash. Unfortunately I forgot to weld-in this opening before taking the car to paint, hence I need to figure our something now. Other options might be a hazard light, or may be the manual choke? (which wasn't fitted originally to my car but I guess I could retrofit it)
The boot space is coming together. The tank has been repaired (was leaking of course) and painted in POR. Need to finish the sending unit and it should be ready for wiring harness.
Cheers to all! |
|
| Back to top |
|
|
63CabDriver
Samba Member

Joined: November 10, 2006
Posts: 512
|
| Posted: Sun Jan 05, 2014 9:29 am Post subject: |
|
|
Very nice! 
I had a 64 convertible once. Wish I never got rid of it..... Oh well, keep the updates coming. |
|
| Back to top |
|
|
vladve
Samba Member
Joined: May 15, 2010
Posts: 67
Location: Australia
|
| Posted: Sat Mar 01, 2014 11:39 pm Post subject: |
|
|
Hi all,
Ive been working on the car, however in small portions, mainly focusing on the body. I decided to finish the complete assembly of the body before marrying it up with the chassis. So far I have finished the restoration of all side glass, replacement of all rubbers and seals, fitting dash elements, mouldings badges etc. Ive also restored the steering wheel. It was the first time I attempted to do that and it wasnt actually so bad, just needed lots of patience: I opened up and filled the cracks with marine epoxy, and then wet sanded everything to matt smooth finish, including the indicator. It was then painted in two-pack beige Ive got the colour to be matched to the ivory knob. It turned out to look brand new and the finish is very strong, hopefully it will last as well. Give me a shout if anyone is interested in more details about side glass and weather-strips assembly I took me a very long time and unfortunately some errors to get it all straight.
I moved the dome light back to the stock position - next to the steering tube.
I've sourced and re-chromed the correct rear view mirror for convertible. The glass was removed for chroming and then a new one was cut and installed.
Cheers! |
|
| Back to top |
|
|
vladve
Samba Member
Joined: May 15, 2010
Posts: 67
Location: Australia
|
| Posted: Sun Mar 02, 2014 12:09 am Post subject: Turn signal indicator assembly repair |
|
|
When assembling the steering wheel I discovered that the turn signal indicator wasnt self-returning from the left position. It could have been used as is, I guess, but after some deliberations I decided to disassemble it and look inside whether it could be repaired. The disassembly is well described elsewhere, the most helpful for me was this one: http://www.thesamba.com/vw/forum/viewtopic.php?t=157894
I'll only focus on key elements relevant for my situation.
This is the top side, with the lever:
This is the bottom side. The vertical stop on the right was broken (missing), hence there was nothing to be pressed against the spring.
I repaired it by cold-welding a J shaped piece behind it, which was actually a cut off of IKEAs assembly key they provide with their flat packs.
Because it was sitting a bit further back now, I added a short-headed screw with a washer.
Then assembled everything and everything was working great springing back from either left or right position. Given I have cleaned and oiled the assembly it was now turning great, but now I discovered another problem the indicator wouldnt stay in the switched position any more. It would return back to neutral immediately.
Long story short the problem was with the worn surface where small levers are sliding and supposed to be anchored in edge positions. With a fine triangular file I made them a bit more prominent (marked with yellow/blue chevrons below) and that was it! The indicator was working as new now. Just be careful not to cut the metal too thin. I've seen some recommendations on samba that "if indicator is worn - it is worn". However as you can see it can actually be repaired - it is overall a very robust construction.
Cheers,
Vlad |
|
| Back to top |
|
|
vladve
Samba Member
Joined: May 15, 2010
Posts: 67
Location: Australia
|
| Posted: Fri Apr 18, 2014 1:09 am Post subject: |
|
|
Quick update on the progress of body assembly. I've finished installing the wiring, with now everything connected and working. I used original 1962 vert wiring, however intended for LHD, therefore I had to extend some wires to get them to the correct length. The fuse box for RHD cars is obviously on the right, with main cable traveling back also on the right (driver's side).
Here it is all coming back to live eventually:
|
|
| Back to top |
|
|
vladve
Samba Member
Joined: May 15, 2010
Posts: 67
Location: Australia
|
| Posted: Sat Apr 19, 2014 5:24 am Post subject: |
|
|
Hi All,
Today I've reached a major milestone as the work on the body has been kind of "officially" completed. Have had couple of beers towards that!
I've got original bumpers from chrome-plating place (took them 2 months, but they did an absolutely awesome job), reassembled and installed everything. As I filled all holes in the front bumper, I also fabricated a simple "floating" bracket to hold the number plate without drilling the bar again.
At the rear I installed original style engine insulation (tarboard), with all wiring now hidden behind.
Also I've got a nice original 6v radio, which I've cleaned, repainted the facia and installed with a stock speaker, alongside a dual mount antenna on the passenger's side. After some deliberations whether antenna should be angled and by how much, it ended up being just straight - I reckon the closest to the stock look.
I've also covered with Dynamat the rear parcel shelf, inside doors etc. Made a significant difference - no "beer can" noises on tapping anymore.
That's where it is all at the moment.
Now back to the chassis, to finish the 6v to 12v conversion (need to replace coil, generator, the stand and general tidy-up) before marrying the body. Will also look into the seat frames now, get it repaired, blasted and coated, before fitting new covers.
Cheers,
Vlad |
|
| Back to top |
|
|
bugmandave
Samba Member

Joined: December 30, 2005
Posts: 642
Location: Illinois
|
| Posted: Sat Apr 19, 2014 8:00 pm Post subject: |
|
|
nice work, I'm pretty close to the same stage with my 63 vert restoration. is the color a light blue or white? looks different in every picture. Dave
_________________
'63 Karmann Cabriolet L456 Rubin (Ruby Red)
'71 Westfalia campmobile tourist delivery
January '59 SWR panel
'63 Karmann Cabriolet L54 Poppy Red |
|
| Back to top |
|
|
vladve
Samba Member
Joined: May 15, 2010
Posts: 67
Location: Australia
|
| Posted: Sun Apr 20, 2014 3:55 pm Post subject: |
|
|
Hi Dave, thanks! The colour is pale blue. I was aiming at PPG L334 Glazier Blue, however the painter couldn't match it to the exact code (apparently it is too old), so he got it as close as he could.
Well done on your vert - you've done an absolutely fantastic job - very impressive! I wish I had enough patience to go to the same level of details. I guess as it is getting to almost 4 years of work on this project I now really look forward to getting it finished.
_________________
Vlad [ 1962 RHD Oz Vert resto ] |
|
| Back to top |
|
|
BUGBOY1976
Samba Member
Joined: August 21, 2004
Posts: 278
Location: Australia
|
| Posted: Wed May 14, 2014 3:04 am Post subject: |
|
|
| looking really nice, well done. |
|
| Back to top |
|
|
vladve
Samba Member
Joined: May 15, 2010
Posts: 67
Location: Australia
|
| Posted: Sat May 31, 2014 11:24 pm Post subject: |
|
|
This weekend was quite productive. After some thinking about body lifting/dropping exercises I purchased engine crane which came extremely handy for the entire procedure. For the final body adjustment I used two motorcycle lifts. These are also very handy as a general purpose side lifts.
Before marrying the body with chassis I laid sound deadener mats on the chassis and frame, and also refreshed the engine look (repainted tins, adjusted valves, replaced plugs, oil etc.). On the way I also converted the engine to 12V, whilst leaving the 6V starter. The voltage regulator remained on top of the generator I welded two small studs in generators retaining straps turned out to be very handy, given the wiring I had was cut for 6V distances.
Below are couple of photos depicting the entire process.
Chassis and the engine:
Starting the marriage:
All done.
Next step is finishing the wiring, installing the steering and interior.
_________________
Vlad [ 1962 RHD Oz Vert resto ] |
|
| Back to top |
|
|
|


