| Author |
Message |
waxhead
Samba Member

Joined: January 19, 2004
Posts: 946
Location: Philly 'burbs

|
 Posted: Fri Aug 01, 2014 4:43 pm Post subject: Posted: Fri Aug 01, 2014 4:43 pm Post subject: |
 |
|
Looks great - nice work!
_________________
Mike B. |
|
| Back to top |
|
 |
mkparker
Samba Member
Joined: October 12, 2004
Posts: 332
Location: Sherman, Tx
|
| Posted: Fri Aug 01, 2014 8:11 pm Post subject: |
|
|
That's very nice, thanks for the pics!
_________________
Michael
Pit Boy 6163 Spec Trophy Truck |
|
| Back to top |
|
|
Shoyrtt
Samba Member

Joined: August 21, 2010
Posts: 1009
Location: Redlands, CA
|
| Posted: Tue Aug 05, 2014 11:12 am Post subject: |
|
|
Thanks for the input! The kid agrees and we are going to match the bumpers to the cage. We might just get carried away and coat the engine tin and back seat backs in the same hammered tone.  Back to work on it after our vacation on 8-11. Back to work on it after our vacation on 8-11. |
|
| Back to top |
|
|
Shoyrtt
Samba Member
Joined: August 21, 2010
Posts: 1009
Location: Redlands, CA
|
| Posted: Thu Aug 14, 2014 4:48 pm Post subject: |
|
|
Back from the vacation, I got the bumpers and seat backs from blasting and powder coat....turned out nice!
And a close up of the powder coat:
|
|
| Back to top |
|
|
GI Joe
Samba Member
Joined: April 28, 2005
Posts: 2012
Location: Athens, TN
|
|
| Back to top |
|
|
mkparker
Samba Member
Joined: October 12, 2004
Posts: 332
Location: Sherman, Tx
|
| Posted: Mon Aug 18, 2014 9:36 am Post subject: |
|
|
I agree!! Very nice!
How was your V2R this year?
_________________
Michael
Pit Boy 6163 Spec Trophy Truck |
|
| Back to top |
|
|
Shoyrtt
Samba Member
Joined: August 21, 2010
Posts: 1009
Location: Redlands, CA
|
| Posted: Mon Aug 18, 2014 10:17 am Post subject: |
|
|
| mkparker wrote: |
I agree!! Very nice!
How was your V2R this year? |
Thanks! I thought I was going to ride in a 10 car but I ended up helping out at the pit at Redlich (rm305). Good time with good friends! How about you?
Worked on the Thing on Sunday. Due to the limited space between the front of the cage and the body, we fabbed up some windshield brackets to replace the lower latches. My son and I tackled the windshield install using baby powder to slide it right in.  I forgot however to install the new TTS lower frame seal that is in the mail, so it looks like we will have to pull the lower section of the frame to install the seal. I forgot however to install the new TTS lower frame seal that is in the mail, so it looks like we will have to pull the lower section of the frame to install the seal. 
The only trouble we are having is figuring out the hood latch. We bought a new cable, tubing and the lower receiver from TTS (they were all missing on the car). The latch on the hood itself is original. When we pull the cable at the glove box, the hood doesn't pop. If we use two people (one on the cable and one at the hood to pull) it pops but we can't get it open. I messed with the spring on the hood latch and the latch position but it doesn't seem to want to get better. A little more trial and error should do the trick.  |
|
| Back to top |
|
|
Ron Domeck
Samba Member
Joined: August 05, 2007
Posts: 1466
Location: louisville Ky
|
| Posted: Mon Aug 18, 2014 12:53 pm Post subject: |
|
|
| That lower windshield seal slides in, no need to take the lower part off. Fold down the windshield and slide the seal in. |
|
| Back to top |
|
|
Ron Domeck
Samba Member
Joined: August 05, 2007
Posts: 1466
Location: louisville Ky
|
| Posted: Mon Aug 18, 2014 1:00 pm Post subject: |
|
|
| Hood latch, I use a flashlight as I am lowering the hood down and adjust the upper latch so that the spring loaded part is centered the lower latch before pushing all the way down. To get the hood to pop up you may need to adjust down the rubber stops on both sides. If the hood won't latch adjust the spring assy. |
|
| Back to top |
|
|
Shoyrtt
Samba Member
Joined: August 21, 2010
Posts: 1009
Location: Redlands, CA
|
| Posted: Mon Aug 18, 2014 3:16 pm Post subject: |
|
|
Thanks for the tips Ron!!!!
I may run into trouble then with the hood. The PO drilled holes on each side of the hood where the rubber stops are mounted to use posts and pins to secure the hood.  I welded and cleaned up the exterior holes but didn't touch the underside. The underside of the hood might be too jacked up to put the stops in. I welded and cleaned up the exterior holes but didn't touch the underside. The underside of the hood might be too jacked up to put the stops in.  I guess I'll put in my weekly order to TTS and add in a pair of these: http://www.thethingshop.com/RUBBER-BUFFER-FRONT-HOOD/productinfo/311823499A/ I guess I'll put in my weekly order to TTS and add in a pair of these: http://www.thethingshop.com/RUBBER-BUFFER-FRONT-HOOD/productinfo/311823499A/
Hopefully a little Macgyvering with the underside sheet metal and we can get those mounted. |
|
| Back to top |
|
|
mkparker
Samba Member
Joined: October 12, 2004
Posts: 332
Location: Sherman, Tx
|
| Posted: Tue Aug 19, 2014 7:18 am Post subject: |
|
|
| Quote: |
| I thought I was going to ride in a 10 car but I ended up helping out at the pit at Redlich (rm305). Good time with good friends! How about you? |
We finished our first V2R, it took three tries but we did it! I think 13th unofficially out of 39 Class 10 cars. The engine developed a miss between Pit 9 and 10 while I was driving. Our guys in pit 10 didn't have much Ecotec experience so we limped it all the way to 11, replaced an injector and headed to Dayton.
_________________
Michael
Pit Boy 6163 Spec Trophy Truck |
|
| Back to top |
|
|
Shoyrtt
Samba Member
Joined: August 21, 2010
Posts: 1009
Location: Redlands, CA
|
| Posted: Tue Aug 19, 2014 12:23 pm Post subject: |
|
|
| mkparker wrote: |
We finished our first V2R, it took three tries but we did it! I think 13th unofficially out of 39 Class 10 cars. The engine developed a miss between Pit 9 and 10 while I was driving. Our guys in pit 10 didn't have much Ecotec experience so we limped it all the way to 11, replaced an injector and headed to Dayton.
|
Congratulations! The silt this year was brutal. I was out of Redlich by 6:30 and don't remember seeing your car. The last car we pitted was the COPS C1 buggy. I know your pain. Those Ecotecs sometimes hate the heat & pump gas and go into limp mode at the worst times.
Looking at my hood latch issue again, I think the fix is fairly easy. The holes for the hood stops are fine. The PO cut out the raised sheet metal bumps in the nose. A little welding should do the trick.
|
|
| Back to top |
|
|
Ron Domeck
Samba Member
Joined: August 05, 2007
Posts: 1466
Location: louisville Ky
|
| Posted: Tue Aug 19, 2014 1:18 pm Post subject: |
|
|
| If you weld these remember the front wire harness is right there. |
|
| Back to top |
|
|
Shoyrtt
Samba Member
Joined: August 21, 2010
Posts: 1009
Location: Redlands, CA
|
| Posted: Tue Aug 19, 2014 5:11 pm Post subject: |
|
|
| Ron Domeck wrote: |
| If you weld these remember the front wire harness is right there. |
Thanks for the tip. 
With so many orders to TTS, do they offer frequent flyer miles or some other incentives? Once a week like clock work, I'm ordering some little part that I need. Maybe with my other car, I'll just send them 4 or 5K as a retainer to have on hand.  |
|
| Back to top |
|
|
Shoyrtt
Samba Member
Joined: August 21, 2010
Posts: 1009
Location: Redlands, CA
|
| Posted: Tue Sep 16, 2014 3:51 pm Post subject: |
|
|
A little update on the progress (or lack thereof) on the yellow car. Still can't figure out the hood latch. I adjusted it with every plausible length on the plunger, lined it up (using Ron's flashlight method), got the little bumps from TTS and it still wont pop. I tried inserting the plunger without the hood, and it pops out great. The only thing I can figure is maybe the lack of a hood seal somehow affects it??? Maybe a shorter plunger and increase the length of the little bumps???
Still fiddling with the brakes. After sitting 27 years they needed a lot of work. Also finding a gremlin in the starter. Again, 27 years old it was being difficult. I hit it with a dead blow hammer and it came to life, only to quit later. More new parts to buy.  |
|
| Back to top |
|
|
Ron Domeck
Samba Member
Joined: August 05, 2007
Posts: 1466
Location: louisville Ky
|
| Posted: Tue Sep 16, 2014 5:22 pm Post subject: |
|
|
| With the hood latch off adjust the rubber bumpers so they keep a good gap all the way around the hood. Then put the latch back on and then adjust the plunger starting with it short then lengthen until it latches. |
|
| Back to top |
|
|
Shoyrtt
Samba Member
Joined: August 21, 2010
Posts: 1009
Location: Redlands, CA
|
| Posted: Mon Nov 17, 2014 10:42 am Post subject: |
|
|
So I decided to take a spin in the 73 this weekend. Turned the key and nothing. I figured the battery was dead so I pull out my trusty jumper box...still nothing. Now on to the volt meter. Battery good, ground is good. Maybe its the switch. I pulled the lead to the back of the switch and found power. Pulled the steering wheel, pulled the turn signal and the cover to the ignition (finding lots of dirt and debris) and wala:
I'm surprised it even worked. I did a few searches here on the Samba and found a thread saying the 73 switch was different than the 74 and that the aftermarket Bug switch was too short. Now that it is Sunday and my local family owned VW shop is closed, I decided to try Autozone. Even though I was warned here on the Samba that all switches are not created equal, I tried the 73 Bug switch. It looked like it was the same size, however it had one extra terminal that the Thing switch was missing. I cleaned everything up, installed the switch and ...nothing.
So today I'm off to see if my local shop has one. If not, I have another order going into TTS. |
|
| Back to top |
|
|
Shoyrtt
Samba Member
Joined: August 21, 2010
Posts: 1009
Location: Redlands, CA
|
| Posted: Tue Nov 18, 2014 7:24 pm Post subject: |
|
|
| Local shop had the switch. I installed it late last night and still no luck. I guess I will be chasing the Current Flow diagrams (from the great technical section) to see if I can find the issue. |
|
| Back to top |
|
|
Shoyrtt
Samba Member
Joined: August 21, 2010
Posts: 1009
Location: Redlands, CA
|
| Posted: Mon Dec 29, 2014 10:58 am Post subject: |
|
|
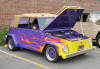
Finally got through all of my wiring issues. After dealing with the old harness, brittle and broken connectors and its numerous hacks, I picked up a new harness from Rebel Wire. Very simple install. It turns out my cracked ignition switch also fried the starter.  After that was replaced it was time for a winter drive. If you look closely, you can see the LED parking lamps are on. After that was replaced it was time for a winter drive. If you look closely, you can see the LED parking lamps are on. 
|
|
| Back to top |
|
|
GI Joe
Samba Member
Joined: April 28, 2005
Posts: 2012
Location: Athens, TN
|
|
| Back to top |
|
|
|


