| Author |
Message |
Roadhawg
Samba Member

Joined: February 21, 2011
Posts: 29

|
 Posted: Wed Feb 23, 2011 11:11 pm Post subject: Posted: Wed Feb 23, 2011 11:11 pm Post subject: |
 |
|
| Ben Scammell wrote: |
If it were me I'd look at getting the following done as a minimum:
damaged outriggers/jacking points
cargo floor holes
damaged outer sill/s (often meaning inner too, and strengthener)
gutters (breaking out badly)
Not meaning to rain on the parade but I can see a fair amount of work in that bus under the paint. I'd also check bulkhead seams, tophats where the floor is suspect, lower front valance inners etc
Of course, depends what level you want to take it too. But that's where I'd start...
Ben |
Yeah We realise there is a ton of work to come. Work and time we have, not so much money though 
I have a good relationship with a body/chassis guy who has done some work on my golf so we'll get him to fix any structural rust and that....some of those outriggers and cross bars on the chassis look pretty nasty.  |
|
| Back to top |
|
 |
Neuk
Samba Member

Joined: February 23, 2011
Posts: 123
Location: Johannesburg, South Africa
|
| Posted: Thu Feb 24, 2011 12:14 am Post subject: |
|
|
| Roadhawg wrote: |
| Im gonna go past the Workshop tomorrow and see how it's getting on. Need to find out what brake parts i need to buy and stuff. |
Do it already  |
|
| Back to top |
|
|
Neuk
Samba Member
Joined: February 23, 2011
Posts: 123
Location: Johannesburg, South Africa
|
| Posted: Thu Feb 24, 2011 12:16 am Post subject: |
|
|
| Roadhawg wrote: |
| Ben Scammell wrote: |
If it were me I'd look at getting the following done as a minimum:
damaged outriggers/jacking points
cargo floor holes
damaged outer sill/s (often meaning inner too, and strengthener)
gutters (breaking out badly)
Not meaning to rain on the parade but I can see a fair amount of work in that bus under the paint. I'd also check bulkhead seams, tophats where the floor is suspect, lower front valance inners etc
Of course, depends what level you want to take it too. But that's where I'd start...
Ben |
Yeah We realise there is a ton of work to come. Work and time we have, not so much money though
I have a good relationship with a body/chassis guy who has done some work on my golf so we'll get him to fix any structural rust and that....some of those outriggers and cross bars on the chassis look pretty nasty. |
Ben - Thanks for the input, as Roadhawg has said, we are newbies at this, so all the advice we can get is appreciated  The plan is not to do a full restoration just yet, but we obviously want to get any major or serious damage sorted out so she doesn't get any worse in years to come... The plan is not to do a full restoration just yet, but we obviously want to get any major or serious damage sorted out so she doesn't get any worse in years to come... |
|
| Back to top |
|
|
Roadhawg
Samba Member
Joined: February 21, 2011
Posts: 29
|
| Posted: Fri Feb 25, 2011 9:22 pm Post subject: |
|
|
Got a slight upate from the mechanic. Seems the master cylinder is dodgy and the wheel cylinders are "pitted". He says our local air-cooled place doesn't have stock at the moment but he's gonna see if he can hone and salvage them.
The master cylinder I'd really rather replace with a dual circuit setup. Mk1 golf parts are cheap as chips here so if we can manage the mods I'd love to use one of those. Seems to be a matter of a spacer, some longer bolts and grinding a bit off the pushrod???
Also he said: "Yeah, and it LOOKED. So nice from
The outside*laughs*"!!!

He said he lowered it onto trestles and it just sorta started sinking 
Seems the rockers and underbits are a lot more rotten than we had hoped. Gonna go have a look on Monday morning and take a ton of pics to try get an idea of where we should start. |
|
| Back to top |
|
|
Eric&Barb
Samba Member

Joined: September 19, 2004
Posts: 24759
Location: Olympia Wash Rinse & Repeat
|
|
| Back to top |
|
|
Roadhawg
Samba Member
Joined: February 21, 2011
Posts: 29
|
| Posted: Sun Feb 27, 2011 7:12 am Post subject: |
|
|
Thanks man.
this bit concerns me:
| Quote: |
CAUTION: It is essential to use a master cylinder
designed for disc brakes.
WARNING: If you use the front disc brake system
with a drum brake master cylinder,
the built-in residual pressure
valve will cause a steady pressure at
the front wheel, causing them to
drag, overheat and become
damaged.
- Please note that all vehicles with drum
brakes at the front need to change the master
cylinder to a disc-brake type. |
It seems all it takes to make a Mk1 master fit is a 1/2inch spacer and some longer bolts. But that master is designed for disc brakes.....is it gonna cause these problems on the original drums and shoes??? |
|
| Back to top |
|
|
Eric&Barb
Samba Member
Joined: September 19, 2004
Posts: 24759
Location: Olympia Wash Rinse & Repeat
|
| Posted: Sun Feb 27, 2011 9:49 am Post subject: |
|
|
Been using the 1972-79 bus dual circuit MC for over 100,000 miles in our 1960 walk thru panel camper conversion. The front brake shoes last over 30,000 miles! Have been using the same front drums for about 100,000 miles.
Have been able to do the conversion without the spacer.
_________________
In Stereo, Where Available! |
|
| Back to top |
|
|
Roadhawg
Samba Member
Joined: February 21, 2011
Posts: 29
|
| Posted: Sun Feb 27, 2011 11:35 pm Post subject: |
|
|
Shot!
It seems I totally misread that warning anyway! Seems more a warning that you must convert to a disc Master if you change to discs.
Thanks. I'll try get a mk1 master to work. |
|
| Back to top |
|
|
Eric&Barb
Samba Member
Joined: September 19, 2004
Posts: 24759
Location: Olympia Wash Rinse & Repeat
|
| Posted: Mon Feb 28, 2011 8:09 am Post subject: |
|
|
No problem.
Looking forward to seeing your bus getting fixed up.
_________________
In Stereo, Where Available! |
|
| Back to top |
|
|
Roadhawg
Samba Member
Joined: February 21, 2011
Posts: 29
|
| Posted: Mon Feb 28, 2011 11:19 am Post subject: |
|
|
Ok So here's a post i started a buid thread with on a local forum. Shows all the rot.....I'm a little daunted....I wont lie. I think it's time to buy a welder and some more tools.
Oh and sorry for any South Africanisms that don't translate.
| Quote: |
We have no name for it yet, so for now it's just "The Splitty"
Story till now: we heard through a friend that there was a splitty sitting in this dude's yard gathering rust.
We went and had a look at it, at night.....First mistake heheh. Looked alright. We were taken by the nice interior, the fact that the engine started fekking easy and the pretty decent paint. I went and had another look and decided fuck it....we buy it. We got the price of R20k.....And seeing busses for sale in the UK for upwards of 14kPounds (for rusty ones) we thought why not.
The brakes didnt work at all though. pedal goes straight to the floor. So we fetched it on a Piggyback and towed it straight to Tony's shop, Volksworx in town.
Anyhow it spent about a week there and I got a call......Basically it went like " Ah man....And it looked so nice from the outside! *laughter*"
So I was STRESSED!!
Besides the breaks (which we are gonna replace fully basically, all new wheel cylinders (6 of em) a bit of new brake line and the master cylinder. We're busy getting parts for this now. Tony is letting us buy our own parts which is REALLY cool and saves us some cash.
Anyhow I went past today and had a look at the rot. Basically both rocker panels are fucked up. Seems like theyre made of body filler. Some chassis bits and the Floor are also pretty Dodge. I spoke to tony's body guy also and i was getting more and more stressed looking at all the shit....eventually I asked him how much he'd charge to make 1 side rocker panel...not install....make from sheetmetal. I was expecing like 10k or something stupid...but he said R1000 a panel, which is fine!!! So I feel a bit better. If we do it bit by bit then we should be able to handle it.
At this point we are gonna ask tony's body guy for a quote on fixing the chassis bits and making a new floor....Just to get it safe for now so it can drive and not break into two.
Some pics:
right, this is on the passenger side (which is the worst side) looking towards the nose. Can see the damaged cross member around the heater tube. Incidentally i found a weld in replacement part on the net....15 pounds so thats not so bad. Similar prices for most oif the chassis bits....so Im tempted to import bits.
Passenger side rocker. Uhm...need I say more.
u can see the trestle is busy breaking it more hehe
This is the other end of that rocker, an outter chassis bit....they all look more or less like this.
Then the middle section of that member is also FARKED!!! Total hole, other side is starting too.
Passenger footwell rot. Can see the ro in the wheelarch also
Here you can see that damged front crossmember again. No idea how that happened.
More dodgy outter chassis bits. Are these outriggers?
Other rocker...can see its all dodgy....probably loads of filler and shit
Dodgy roofline...inside is rusty too in the same spots
So there we have it. It's gonna be a lot of work but after thinking about this all afternoon I think we'll be ok. We really have some great guys working on it. Tony is clearly a serious aircooled enthusiast and has a bunch of beetles and stuff he has worked on. His body guy Kobie seems to be pretty legit too. I'd love Barry to look at it too and give advise but Im super scared he will tell us to :gfa: and possibly hit me
Here ends the lecture. |
|
|
| Back to top |
|
|
Eric&Barb
Samba Member
Joined: September 19, 2004
Posts: 24759
Location: Olympia Wash Rinse & Repeat
|
| Posted: Mon Feb 28, 2011 6:43 pm Post subject: |
|
|
Never put jack stands under anything but the front beam and the rear torsion bar tubes. Anywhere else and you will bend/dent things up.
_________________
In Stereo, Where Available! |
|
| Back to top |
|
|
Emeritusx
Samba Member
Joined: June 20, 2008
Posts: 2775
Location: 12 inches behind the wheel
|
| Posted: Mon Feb 28, 2011 10:42 pm Post subject: |
|
|
it doesn't look too bad.. is something thats "dodge" f'd up?
we roll em a lot worse than that.. you did all right! |
|
| Back to top |
|
|
Roadhawg
Samba Member
Joined: February 21, 2011
Posts: 29
|
| Posted: Mon Feb 28, 2011 11:49 pm Post subject: |
|
|
Haha yes, Dodgy = broken, failing, rusty, f**ked up!
Yeah I was thinking about it all night and it's sitting better and better with me. The daunting thing is that we have no body work experience, have never welded anything together....hell i've never even touched a welder. So it all has to be done at a shop.
We are gonna sit down when we get the bus back from having the brakes fixed and decide what chassis bits to order from either your side or the UK and what parts to get made here. I think chassis first, then the dodgy rockers and roofline etc. |
|
| Back to top |
|
|
Emeritusx
Samba Member
Joined: June 20, 2008
Posts: 2775
Location: 12 inches behind the wheel
|
| Posted: Tue Mar 01, 2011 12:26 am Post subject: |
|
|
plus you meet VW freaks while you drive it and get connections on cheap or free parts and good body men etc... Driving it is the fun part.. Restore as you go so to say...  |
|
| Back to top |
|
|
sarel.wagner
Samba Member

Joined: September 06, 2010
Posts: 22
Location: Centurion, South Africa
|
| Posted: Tue Mar 01, 2011 4:13 am Post subject: |
|
|
Welcome here too boys! Nice bus, be on the lookout for Fig's Kaapse Kombi Kult ( won't write that shorthand here ) next year, its the best show in SA bar none.
Rgrds
_________________
http://konzeptdrei.blogspot.com/ my VW Build blog |
|
| Back to top |
|
|
AirBus
Samba Member
Joined: February 04, 2008
Posts: 290
Location: Holland
|
| Posted: Tue Mar 01, 2011 7:44 am Post subject: |
|
|
| volksfahrer.nl wrote: |
| Neuk wrote: |
| Roadhawg wrote: |
| BarryL wrote: |
| Beings it's Africa, is it one of those knocked down busses? |
What you mean?? |
Stu - I think BarryL means that it was largely manufactured overseas, and then transported here as a kit and assembled, instead of being manufactured here like the Polo's and Golf's are now... |
Since the South Arican language looks alot like Dutch; do you have any
idea what your nickname means in Dutch??? |

_________________
VW T1 1964 - Mouse Grey - Pearl White
Bagged, Porsche steeringrack/brakes..IRS, T1 1915cc |
|
| Back to top |
|
|
Eric&Barb
Samba Member
Joined: September 19, 2004
Posts: 24759
Location: Olympia Wash Rinse & Repeat
|
| Posted: Tue Mar 01, 2011 8:21 am Post subject: |
|
|
| Roadhawg wrote: |
Yeah I was thinking about it all night and it's sitting better and better with me. The daunting thing is that we have no body work experience, have never welded anything together....hell i've never even touched a welder. So it all has to be done at a shop. |
The welding is not all that hard. If you have any mechanical ability, and like to use your hands, get a wire feed welder with gas bottle and learn. Just make sure to get a good welder, not just the cheapest.
_________________
In Stereo, Where Available! |
|
| Back to top |
|
|
Neuk
Samba Member
Joined: February 23, 2011
Posts: 123
Location: Johannesburg, South Africa
|
| Posted: Mon May 19, 2014 1:37 am Post subject: |
|
|
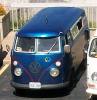
It has been way too long since we updated anything related to our bus, not that we have done much but we did get some work done on removing the 'new' paint this last weekend...
Some older pictures of when she was on the road, yo ucan see we started stripping the 'new' paint off the rear...
Pulling the engine to replace some bits and pieces and do a service...
Putting the engine back in...
And then one thing after another went wrong, starting with a stripped sump bolt hole, a lost accelerator cable part, leaking wheels/tyres, etc. culminating with my friend ending up in hospital after a bike accident that left him unable to use at least one of his hands but both broken...
And so this last weekend we tackled the paint again, down the LHS...
Filler for days...
This is the RHS currently...
_________________
Nic Catt
Current Garage:
Daily Drive: 2005 Audi B6 A4 1.8T (140kw) Avant
Project Fes: 1982 Golf GLS 1.5
Project FeO: 1966 Type 2 Transporter Kombi Split Window
Project XXXX: 1967 Volkswagen Type 3 Variant (Squareback)
Previous Garage:
Project Betty: 2005 Polo 1.9 TDI (PD130) Sportline
Weekend Warrior: 1993 Volkswagen Caddy 2.0 16v ABF on ITB's |
|
| Back to top |
|
|
novetti
Samba Member
Joined: August 15, 2004
Posts: 469
|
| Posted: Mon May 19, 2014 6:32 am Post subject: |
|
|
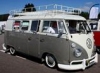
Cool ride Bru!
The white/blue looks a nice colour combination.
The rust is the standard minimum for the age and care of these kombis really, nothing to worry to much.
As mentioned by someone already, don't use the jacking points to lift the car. Lift only supported at the front beam tubes or the main beams near that point, and the rear torsion tubes housing.
cheers |
|
| Back to top |
|
|
Neuk
Samba Member
Joined: February 23, 2011
Posts: 123
Location: Johannesburg, South Africa
|
| Posted: Tue May 27, 2014 1:47 am Post subject: |
|
|
| novetti wrote: |
Cool ride Bru!
The white/blue looks a nice colour combination.
The rust is the standard minimum for the age and care of these kombis really, nothing to worry to much.
As mentioned by someone already, don't use the jacking points to lift the car. Lift only supported at the front beam tubes or the main beams near that point, and the rear torsion tubes housing.
cheers |
Thanks for the compliments and the tip novetti, came in handy this last weekend...
Jacked her up to get her on axle stands, sadly her tyres look to be fcuked but we are hoping to have at least one good set. Stripped bolt hole drilled out and terribly retapped with new stepped stud in place. Oil filter and sump plate back in place with some fresh 20w50 inside of her, fuel lines back on, accelerator cable hooked up and distributor wired up. And the battery is dead, lol...
Her battery is on charge and we hope to have the engine running again soon...
_________________
Nic Catt
Current Garage:
Daily Drive: 2005 Audi B6 A4 1.8T (140kw) Avant
Project Fes: 1982 Golf GLS 1.5
Project FeO: 1966 Type 2 Transporter Kombi Split Window
Project XXXX: 1967 Volkswagen Type 3 Variant (Squareback)
Previous Garage:
Project Betty: 2005 Polo 1.9 TDI (PD130) Sportline
Weekend Warrior: 1993 Volkswagen Caddy 2.0 16v ABF on ITB's |
|
| Back to top |
|
|
|


