| Author |
Message |
KombiMarc
Samba Member

Joined: January 29, 2010
Posts: 431
Location: Phoenix, Az

|
 Posted: Thu Apr 07, 2011 9:02 pm Post subject: 1965 Kombi Rebuild Thread - PIC Heavy Posted: Thu Apr 07, 2011 9:02 pm Post subject: 1965 Kombi Rebuild Thread - PIC Heavy |
 |
|
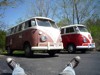
I figured it was time to get a rebuild thread going on my 1965 Kombi. I purchased this last year from a gentlemen in Tucson and have been working on it ever since. In hindsight I would have "enjoyed" it a bit more before tearing into it.
This is my second VW, first Bus. I have "done" several cars, but never undertook anything of this magnitude. I didn't really plan to get this involved, but you all know how that goes.
I did some lurking for a bit on TS and checked out a few buses, almost bought one from local phoenix guy, but ended up making the drive down to Tucson to see this Kombi. Once I drove her, I knew this was the one. I left leaving a deposit and went back down the next weekend to drive her home.
Overall she was in decent shape. Mechanically sound. I had no troubles on the drive home except sore cheeks from perma-grin and tennis elbow waving to all the passing traffic. The engine is a 1600 dp from a 71, Good compression all around and very peppy. The brakes are awesome, steering box recently rebuilt by PO. 12v conversion, except for the wipers, but at least they worked. I easily overlooked the duct tape "coupler" on the oil slinger because everything else checked out good mechanically.
Pretty dry bus all things considered. That did not stop me from getting a few surprises when I dove in, but what would be the fun if you knew everything you were getting into. 
I welcome comments/encouoragement/critics and suggestions. My intent is to do a well deserved restoration and then enjoy the heck out of her. I plan on driving her as much as the "dry heat" out here will allow. She will get a good rest every summer when its a million degrees outside. I plan on a "mostly" original rebuild, as much as my budget and patience will allow.
On with the pictures to go from "as purchased" to current status.
Thanks
Here Goes
Picking her up!!!
Thumbs UP!!!
Great Pic
HOME!!!
_________________
________________
Thanks Marc
________________
'65 Type I
'65 Type II Kombi Rebuild Thread
http://www.thesamba.com/vw/forum/viewtopic.php?t=459009 |
|
| Back to top |
|
 |
KombiMarc
Samba Member
Joined: January 29, 2010
Posts: 431
Location: Phoenix, Az
|
| Posted: Thu Apr 07, 2011 9:15 pm Post subject: |
|
|
Pass side front wheel well
Pass side rear corner
Pass side inner rocker
Nice Jack point
"puncture wound" wonder how this happened....filled with bondo
First batch of sheet metal, thanks to Ronnie. Picked up at Jerome Jamboree. Was there for the bus raffle...was one of 7-8 left "touching" the coveted prize, but alas, was not so lucky.
Yanked the wiring harness...here is whats left on the floor.
_________________
________________
Thanks Marc
________________
'65 Type I
'65 Type II Kombi Rebuild Thread
http://www.thesamba.com/vw/forum/viewtopic.php?t=459009 |
|
| Back to top |
|
|
KombiMarc
Samba Member
Joined: January 29, 2010
Posts: 431
Location: Phoenix, Az
|
| Posted: Thu Apr 07, 2011 9:28 pm Post subject: |
|
|
rear corner
Started cutting the passenger side
Got next order of Sheet metal, Klassic Fab. Thanks again to Ronnie and Bustoration.!!!
_________________
________________
Thanks Marc
________________
'65 Type I
'65 Type II Kombi Rebuild Thread
http://www.thesamba.com/vw/forum/viewtopic.php?t=459009 |
|
| Back to top |
|
|
KombiMarc
Samba Member
Joined: January 29, 2010
Posts: 431
Location: Phoenix, Az
|
|
| Back to top |
|
|
JonAllenRizzo
Samba Member
Joined: September 18, 2005
Posts: 283
Location: Grand Junction, CO
|
| Posted: Thu Apr 07, 2011 9:47 pm Post subject: |
|
|
Wow...looks great so far!
_________________
1985 Sunroof Vanagon |
|
| Back to top |
|
|
KombiMarc
Samba Member
Joined: January 29, 2010
Posts: 431
Location: Phoenix, Az
|
| Posted: Thu Apr 07, 2011 9:51 pm Post subject: |
|
|
Whew.....that was a lot of uploading.....That is how she sits.
I am opening up the front left jack point area tomake similar repairs to the passenger side. I need to make another metal run and get a long rocker, and drivers side B pillar. The driver side will be much easier then the passenger side.
I have a battery tray to replace as well I need to get the cabin floor and the windsheild repair piece as the bottom of the splits is pretty bad. My neighbors laugh because I still drive it around every week or so around the neighborhood all tore up...thats what makes them fun, so simple to operate and enjoy!!
Will update as I go. I will have a lot of questions and thoughts as I go, thanks in advance for everyone help !!!
_________________
________________
Thanks Marc
________________
'65 Type I
'65 Type II Kombi Rebuild Thread
http://www.thesamba.com/vw/forum/viewtopic.php?t=459009 |
|
| Back to top |
|
|
hubcap
Samba Member

Joined: December 05, 2006
Posts: 135
Location: Sussex UK
|
| Posted: Fri Apr 08, 2011 4:20 am Post subject: Greetings |
|
|
Hi Marc
Really nice work you are doing there! Always the way with the 'little' surprises that busses throw up.
Enjoy your project, you seem to be making pretty good progress, it looks to me that you are gong to end up with a really solid and straight bus.
What are your plans for paint etc, will you tackle it all your self? stock color scheme? do you know the busses original combination?
Keep up the good work! |
|
| Back to top |
|
|
Braukuche
Samba Member
Joined: September 03, 2004
Posts: 11005
|
| Posted: Fri Apr 08, 2011 6:19 am Post subject: Re: Greetings |
|
|
You don't play around. Nice work.
_________________
Go Reds! Smash state!
Retirement is here!
1956 Ghia
1959 SO-23 Westfalia
1960 double cab
1960 Baja Bug
1963 stretched double cab
1962 Golde sunroof Ghia
1963 356 B coupe
1963 Notchback
1967 21 window less rusty now |
|
| Back to top |
|
|
busmania
Samba Member

Joined: October 13, 2006
Posts: 1934
Location: Here
|
| Posted: Fri Apr 08, 2011 6:31 am Post subject: |
|
|
| Looks good. Sounds like you and I are both doing the exact same metal replacement. Your pics have helped a ton for me as I am in the process of doing the passenger side now. Keep us updated! |
|
| Back to top |
|
|
zuggbug
Samba Member

Joined: June 17, 2008
Posts: 3479
Location: Anderson SC
|
| Posted: Fri Apr 08, 2011 6:31 am Post subject: |
|
|
very nice - thanks for sharing
_________________
SOUTHERN INTEGRITY AIRCOOLERS
58 15 window
56 westy |
|
| Back to top |
|
|
66busman
Samba Motorcyclist
Joined: September 14, 2006
Posts: 1166
Location: Madison, Wisconsin
|
| Posted: Fri Apr 08, 2011 6:56 am Post subject: |
|
|
Wow, that bus looked pretty clean at first. Good on you for not backing down. Good luck, looks like you're more than halfway there.
_________________
'66 SO-42
'73 Bay
'75 Type 181 |
|
| Back to top |
|
|
Major Woody
Samba Enigma

Joined: December 04, 2002
Posts: 9010
Location: Portland, OR
|
| Posted: Fri Apr 08, 2011 8:05 am Post subject: |
|
|
| Nice looking work. Garage floor is scary clean. |
|
| Back to top |
|
|
KombiMarc
Samba Member
Joined: January 29, 2010
Posts: 431
Location: Phoenix, Az
|
| Posted: Fri Apr 08, 2011 8:57 am Post subject: |
|
|
Hubcap: the original paint was pearl white top and bottom. I do however like the two tone and will paint the entire car pearl white and then top it in white. I plan on tackling all the body work once the metal work is completed, get it all primed up and then get an expert in to shoot it. I just don't have guts to shoot the paint myself.
I have to say without the wealth of info on The Samba, I would have never jumped in this far. That was my motivation for posting up, hope to help someone else. In hind sight, I would not have made the first page so dang long...lol, didn't realize. Oh well.
I try to keep my floor clean, it's like getting new sneakers when you were 10 and they made you run faster..makes me work better.
Question: for a daily driver, what is the best undercoating? Just paint up the bottom to match the pearl white, black on the beams etc, or use a undercoating material, or I have seen a gray painted underbelly. Since it will see both paved and dirt roads, am leaning towards an undercoat, but want to consider what the next owner will appreciate as well.
Thanks all
_________________
________________
Thanks Marc
________________
'65 Type I
'65 Type II Kombi Rebuild Thread
http://www.thesamba.com/vw/forum/viewtopic.php?t=459009 |
|
| Back to top |
|
|
zuhaelter_82
Samba Member

Joined: June 23, 2009
Posts: 1506
Location: Lincoln
|
| Posted: Fri Apr 08, 2011 9:53 am Post subject: |
|
|
Looks awesome...
_________________
64 Type II
MKI Jetta Coupe Diesel
MKI Jetta Sedan w/TD swap
B5 V6 GLS
B7 TDI Passat SE |
|
| Back to top |
|
|
brettsvw
Samba Member
Joined: November 22, 2007
Posts: 2145
Location: Florida
|
|
| Back to top |
|
|
LAGrunthaner
Samba Member

Joined: March 18, 2007
Posts: 5509
Location: 1st Coast
|
| Posted: Fri Apr 08, 2011 3:24 pm Post subject: |
|
|
Factory chassis was grey.
| KombiMarc wrote: |
Hubcap: the original paint was pearl white top and bottom. I do however like the two tone and will paint the entire car pearl white and then top it in white. I plan on tackling all the body work once the metal work is completed, get it all primed up and then get an expert in to shoot it. I just don't have guts to shoot the paint myself.
I have to say without the wealth of info on The Samba, I would have never jumped in this far. That was my motivation for posting up, hope to help someone else. In hind sight, I would not have made the first page so dang long...lol, didn't realize. Oh well.
I try to keep my floor clean, it's like getting new sneakers when you were 10 and they made you run faster..makes me work better.
Question: for a daily driver, what is the best undercoating? Just paint up the bottom to match the pearl white, black on the beams etc, or use a undercoating material, or I have seen a gray painted underbelly. Since it will see both paved and dirt roads, am leaning towards an undercoat, but want to consider what the next owner will appreciate as well.
Thanks all |
_________________
American Red Cross Safe And Well:
https://www.redcross.org/about-us/news-and-events/...bsite.html
Maui Roadsters 
www.mauiroadsters.com
http://www.oacdp.org
| Lind wrote: |
| Have you considered simply starting with a nicer bus? I don't know what your skills are, but the race is easier if you can see the finish line. If you are not a runner, don't start off doing a marathon. |
|
|
| Back to top |
|
|
Steve. H
Samba Member
Joined: August 22, 2007
Posts: 84
|
| Posted: Fri Apr 08, 2011 4:39 pm Post subject: |
|
|
Great work. Keep those pictures coming.
_________________
Let's get dumber. |
|
| Back to top |
|
|
KombiMarc
Samba Member
Joined: January 29, 2010
Posts: 431
Location: Phoenix, Az
|
| Posted: Sat Apr 09, 2011 12:01 pm Post subject: |
|
|
So the plan is:
pearl white exterior, with white top.
Grey underbelly, black mechanicals underneath
Pearl front cab inside
Debating on grey cargo area or pearl throughout. Should the cabin match the cargo area typically?
I need to get everything welded up in the cargo floor. I do not have the correct middle seat, its from a bay window. The PO drilled a few extra holes in the floor to accommodate. I think I want to fill those in and the save up for the correct seat. I think the far back seats correct, is there any for sure way to tell? The lower portion fits nice, but the top part brackets do not match up with the holes in the side.... Any tricks to id'ing the correct seat for a 65?
Thanks
_________________
________________
Thanks Marc
________________
'65 Type I
'65 Type II Kombi Rebuild Thread
http://www.thesamba.com/vw/forum/viewtopic.php?t=459009 |
|
| Back to top |
|
|
KombiMarc
Samba Member
Joined: January 29, 2010
Posts: 431
Location: Phoenix, Az
|
| Posted: Sun Apr 10, 2011 10:22 pm Post subject: Update |
|
|
Started working on the drivers side jackpoint/outrigger/top hat/rocker/pillar intersection. Had much less fear on this side since there are no cargo doors/floors to figure into the mess.
Here it is "cleaned out"...
Here is image looking back from wheel well.
I was not planning to, but decided to make the inner rocker repair piece where it dies into the outrigger etc... what the heck, weather was nice, masters was on the TV, figured why not. It turned out great, I thought...
The fit was nice....
I also made the close out piece...again, decent fit...
Pic from the outside.....please bi kind on the welds....Initially to height was to high, so I had to trim and weld in the top part. Then I tought a couplt spots on the other folds would be prudent...
_________________
________________
Thanks Marc
________________
'65 Type I
'65 Type II Kombi Rebuild Thread
http://www.thesamba.com/vw/forum/viewtopic.php?t=459009 |
|
| Back to top |
|
|
KombiMarc
Samba Member
Joined: January 29, 2010
Posts: 431
Location: Phoenix, Az
|
| Posted: Sun Apr 10, 2011 10:38 pm Post subject: |
|
|
Now all I need to get is the Klassi Fab B Pillar and long rocker from Bustoration. I will repair the inner rocker in one other place, otherwise it is in good shape.
There is some work to do on the long side....one of the PO had a bad jacking experience and left a mark. I need to get a sheet metal order in, but have to Pay Uncle Sam first....Yeah! After the drivers side is completed I will replace the battery tray (have funky green already for that). Then The last major pireces are the cab floor and the front window sills.
I am contimplating repairng the sills my self......lots of curves.....ok, well maybe the green stuff would be better...
After all that, time to smooth everything out with some body work....primer.....OMG dare I think paint.... I have been on this for a year, to the day...and am anxious for some fun. Later.
_________________
________________
Thanks Marc
________________
'65 Type I
'65 Type II Kombi Rebuild Thread
http://www.thesamba.com/vw/forum/viewtopic.php?t=459009 |
|
| Back to top |
|
|
|


