| Author |
Message |
DukeBradbury
Samba Member

Joined: September 27, 2009
Posts: 400
Location: Spokane WA

|
 Posted: Sun Aug 07, 2011 9:29 am Post subject: My 1965 13W Deluxe Posted: Sun Aug 07, 2011 9:29 am Post subject: My 1965 13W Deluxe |
 |
|
Sorry if there are some duplicate photos, or photos that are out of order. I initially started this thread using Photobucket as a third party host. They removed my photos from the site and I had to edit my posts.
Just wanted to start a thread on the progress of my bus. Any comments or suggestions are greatly appreciated, as this is my first attempt at body work.
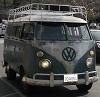
Here it is right after yarding it out of the field.
At home
Left rear corner repair. This is my very 1st attempt at body work, and welding sheet metal! After turning off the "autoset" feature on my Millermatic 180 and dialing in the welder manually I was able to get the hang of it.
Had some rust right above the drivers window. Some creature had made it his home.
Now for the nose....
Here is the before pics.
Last edited by DukeBradbury on Sun Sep 24, 2017 9:53 am; edited 1 time in total |
|
| Back to top |
|
 |
TinCanFab
Samba Member
Joined: April 04, 2006
Posts: 2743
Location: Waterford, California
|
| Posted: Sun Aug 07, 2011 9:40 am Post subject: |
|
|
Nice work. Keep it up you'll only get better  |
|
| Back to top |
|
|
vwjedi
Samba Member
Joined: November 29, 2005
Posts: 1463
Location: G-ville, FL - hopefully on a trail.
|
| Posted: Mon Aug 08, 2011 10:45 am Post subject: |
|
|
Sweet dude, looks good. 
_________________
1987 Wolfsburg T25 still riding out. A bunch of other VW's passed on... |
|
| Back to top |
|
|
zuggbug
Samba Member

Joined: June 17, 2008
Posts: 3479
Location: Anderson SC
|
| Posted: Mon Aug 08, 2011 11:45 am Post subject: |
|
|
good job....way to dive in and start learning and progressing.
NO FEAR!!!
_________________
SOUTHERN INTEGRITY AIRCOOLERS
58 15 window
56 westy |
|
| Back to top |
|
|
RPGreg2600
Samba Member
Joined: November 07, 2010
Posts: 1657
Location: Vallejo, CA
|
| Posted: Tue Aug 09, 2011 8:54 pm Post subject: |
|
|
| Cool bus and nice work. |
|
| Back to top |
|
|
DukeBradbury
Samba Member
Joined: September 27, 2009
Posts: 400
Location: Spokane WA
|
| Posted: Wed Aug 10, 2011 12:40 pm Post subject: |
|
|
Thanks. Im having a lot of fun and learning a ton!!
Tried pulling out the dents and straightening the lower front nose skin (part behind the bumper). Wasnt happening! 
Decided to replace it. Removed only what I thought I needed to.
Last edited by DukeBradbury on Sun Sep 24, 2017 10:12 am; edited 1 time in total |
|
| Back to top |
|
|
DukeBradbury
Samba Member
Joined: September 27, 2009
Posts: 400
Location: Spokane WA
|
| Posted: Thu Aug 11, 2011 6:05 pm Post subject: |
|
|
Last edited by DukeBradbury on Sun Sep 24, 2017 10:15 am; edited 1 time in total |
|
| Back to top |
|
|
scottvw
Samba Member

Joined: November 17, 2004
Posts: 2821
Location: Centennial, CO
|
| Posted: Thu Aug 11, 2011 7:02 pm Post subject: |
|
|
| Nice work. |
|
| Back to top |
|
|
DukeBradbury
Samba Member
Joined: September 27, 2009
Posts: 400
Location: Spokane WA
|
| Posted: Mon Sep 12, 2011 1:01 pm Post subject: |
|
|
Sorry about the "double posting". I forgot I had started this progress thread. I will keep the additional updates here.
Cargo rocker replacement time.
Cargo rocker removed. Inner rocker looks great! Very relieved!!
Cargo floor lip. All bent up and rusted
Cargo floor lip straightened up and patch tacked in
Cargo floor lip welded in
Inner Rocker all cleaned up and ready for treatment
Treated and ready to install
Last edited by DukeBradbury on Mon Sep 25, 2017 2:52 pm; edited 2 times in total |
|
| Back to top |
|
|
Eric&Barb
Samba Member

Joined: September 19, 2004
Posts: 24764
Location: Olympia Wash Rinse & Repeat
|
| Posted: Tue Sep 13, 2011 7:37 pm Post subject: |
|
|
Great work!!!
Please do post the images on this website. Seen too many old posts where the photobucket images have disappeared, leaving a post that is hard to follow without images.
_________________
In Stereo, Where Available! |
|
| Back to top |
|
|
kanniff
Samba Member

Joined: October 12, 2009
Posts: 811
Location: West Coast
|
| Posted: Tue Sep 13, 2011 11:05 pm Post subject: |
|
|
Awesome job!
Very impressive! |
|
| Back to top |
|
|
durfeec
Samba Member

Joined: May 03, 2010
Posts: 1279
Location: Mio, MI
|
| Posted: Wed Sep 14, 2011 11:07 am Post subject: |
|
|
id only patch what you have to on the cargo floor. keep as much OG metal as possible. especially that outer area where the door attaches.
_________________
1960 Bus Panel/Camper |
|
| Back to top |
|
|
wertygrog
Samba Member
Joined: January 10, 2010
Posts: 64
Location: Escondido, CA
|
| Posted: Wed Sep 14, 2011 8:11 pm Post subject: |
|
|
lookin' great, I wish you lived closer to me!!  |
|
| Back to top |
|
|
Cuñado Wear
Samba Member

Joined: December 10, 2006
Posts: 1145
Location: The "O"
|
| Posted: Wed Sep 14, 2011 8:29 pm Post subject: |
|
|
Good job!
_________________
| Bulli Klinik wrote: |
| I may be a little late to the party, but what the hell is Cunado Wear? |
Looking for front kick panels for late 63' Deluxe Basalt Gray
60' Double Cab
63' 15 Window Deluxe |
|
| Back to top |
|
|
DukeBradbury
Samba Member
Joined: September 27, 2009
Posts: 400
Location: Spokane WA
|
| Posted: Sun Sep 18, 2011 5:07 pm Post subject: |
|
|
Had a couple minutes yesterday so I decided to see if I could repair my deluxe rocker spears.
Here is what I started with:
Put the trim in the vice between a couple pieces of 2x4.
This is how it came out of the vice.
Using my body hammer, I straightened out the trim and cut in the edges a bit.
Turned out pretty good. I have a bit more work to do. They will work for my ride!!
Last edited by DukeBradbury on Sun Sep 24, 2017 2:34 pm; edited 1 time in total |
|
| Back to top |
|
|
DukeBradbury
Samba Member
Joined: September 27, 2009
Posts: 400
Location: Spokane WA
|
| Posted: Wed Nov 02, 2011 7:33 pm Post subject: |
|
|
Built this jig to build my narrowed beam
Used 2" SCH 40 pipe
Today I got a chance to put it together. I test fit it in the bus. Very happy with it 
Last edited by DukeBradbury on Sun Sep 24, 2017 3:14 pm; edited 2 times in total |
|
| Back to top |
|
|
RHD Notch
Samba Member

Joined: April 06, 2007
Posts: 1412
Location: Joshua Tree, CA
|
| Posted: Wed Nov 02, 2011 8:03 pm Post subject: |
|
|
Just caught up with your thread...NICE work! Really nice to see you fabbing the whole enchilada...keep the updates coming
_________________
| Lind wrote: |
| I am at the point where I hardly want to own anything that isn't original paint. |
| campingbox wrote: |
| I have some other projects I'd like to finish first and I want to drive this bus while I'm working on those to help stay motivated. |
|
|
| Back to top |
|
|
61TXghia
Samba Member

Joined: July 17, 2009
Posts: 950
Location: El Paso, TX
|
|
| Back to top |
|
|
Split 66'
Samba Member

Joined: October 07, 2010
Posts: 1257
Location: Bay Area, California
|
| Posted: Thu Nov 03, 2011 2:30 am Post subject: |
|
|
| DukeBradbury wrote: |
Had a couple minutes yesterday so I decided to see if I could repair my deluxe rocker spears.
Here is what I started with:
Turned out pretty good. I have a bit more work to do. They will work for my ride!! |
 , I didn't know that was possible. Really amazing job on that spear, that gouge looked almost like it was a cut. , I didn't know that was possible. Really amazing job on that spear, that gouge looked almost like it was a cut.
All you used was a body hammer to accomplish that?
_________________
"OG = Original German" -- TheSamba.com dictionary |
|
| Back to top |
|
|
DukeBradbury
Samba Member
Joined: September 27, 2009
Posts: 400
Location: Spokane WA
|
| Posted: Thu Nov 03, 2011 7:09 am Post subject: |
|
|
Split, to be honest, I didn't know it was possible!! I figured the worst I could do was screw it up.
I still have a little more work I want to do to it to see if I can get it more straight. Probably sand it using a block to take out some waves. Maybe someone that has done it before has some advice?
I started by putting it into a vice between two 2x4's. That took out most of the bend. It wasn't actually "cut", but had a huge gouge. After working from the back with the body hammer and pushing some of it out, I had to grind it down. |
|
| Back to top |
|
|
|


