| Author |
Message |
jarred8715
Samba Member
Joined: May 11, 2010
Posts: 13
Location: California

|
 Posted: Thu Sep 01, 2011 8:16 pm Post subject: How to install Windshield, Windows, Window seals, Glass FAQ Posted: Thu Sep 01, 2011 8:16 pm Post subject: How to install Windshield, Windows, Window seals, Glass FAQ |
 |
|
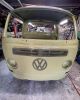
So I started a project removed several broken windows cleaned the metal underneath and repainted... I had a lot of trouble finding tricks for reinstallation of the windows but after much searching I found some tricks and would like to share them.
First I took the old windows out this is what I found.
After Cleaning it up This is what it looked like, I used a little aut etch to get rid of the last little bit of rust in the pitted area.
When it comes to reinstalling the windows place the new seal all around the window. Once the seal is in place take a small diameter rope and place it in the gap that will go over the pinch weld as shown below.
Once the step above is completed take the window and press it in place making sure the window is in as far as possible. once in place go inside and pull on the rope gently and it will pull the rubber right up over the pinchweld after the rope has been pulled and the rubber is over the pinch weld go back outside and gently push the window into place.
I hope this helps all the rookies like myself if there is any questions feel free to ask I will do the best to help. |
|
| Back to top |
|
 |
Daverham
Samba Member
Joined: August 27, 2009
Posts: 1397
Location: USA
|
| Posted: Thu Sep 01, 2011 8:40 pm Post subject: |
|
|
Great tip. Thanks for posting. You nailed it. I've done a few windows myself and would add just a couple notes from my personal experience:
- It is helpful to have a friend pushing gently from the outside
- If you use a thinner rope/string, you can wrap it around twice, which will give you an extra pass to make sure the rubber is fully over the lip. I've only needed it once, all other times, one pass was enough.
- It's nice to lubricate the string a bit. I've heard of using water and I've heard of vaseline. Not sure about the long term implications of getting that stuff trapped in there under the rubber though. I used water once. And old bike shop trick is to use hair spray when installing handle grips (it's wet at first, and evaporated quickly). Why lubricate? If you don't there is a chance to rip the rubber with the string (pull very slowly), making it slick reduces this chance. I bet Silicone lubricant is the right answer. |
|
| Back to top |
|
|
Westfabulous
Samba Member

Joined: January 07, 2007
Posts: 4207
Location: The tropic of Canada, dodging the giant flying moose of Surrey!
|
| Posted: Thu Sep 01, 2011 8:47 pm Post subject: |
|
|
Excellent. This is what the Samba is all about: learning, teaching, and as in the case of this example, tutoring. I wish there were more tutorials. Thanks for taking the time.
_________________
*****************
"I will gladly pay you Tuesday for a hamburger today." |
|
| Back to top |
|
|
jarred8715
Samba Member
Joined: May 11, 2010
Posts: 13
Location: California
|
| Posted: Thu Sep 01, 2011 8:49 pm Post subject: Thanks for the extra tips |
|
|
I like the tip for a smaller rope twice would have been nice for one of the windows I installed...
I agree a friend would have been nice.
I used a little bit of soapy water for the back window as it seemed more difficult toget in after soaping it up I slid right in |
|
| Back to top |
|
|
EZ Gruv
King of Plaid

Joined: December 10, 2002
Posts: 8544
Location: Las Vegas
|
| Posted: Thu Sep 01, 2011 8:59 pm Post subject: |
|
|
I submitted this to the FAQ sticky.
_________________
Eric
1977 Deluxe Westfalia - 2.0L FI Type IV, Completely Original
Photographer for HotVWs, VolksWorld, AirMighty, VW Camper & Commercial, Hayburner, and more.
My Photography Page. |
|
| Back to top |
|
|
Tcash
Samba Member

Joined: July 20, 2011
Posts: 12844
Location: San Jose, California, USA
|
| Posted: Thu Sep 01, 2011 10:37 pm Post subject: How to install Windshield, Windows, Window seals, Glass |
|
|
url=http://www.thesamba.com/vw/forum/viewtopic.php?p=5541791#5541791]How to install Windshield, Windows, Window seals, Glass[/url]
First off thank you for the post jarred8715!!!!
Art at my church owns a glass shop and he gave me a few tips.
Helpful Tools
Tool to install rope in groove that goes on pinch weld. I made one out of a sealant nozzle
1. Put seal on window no lube, for a professional look make a mark in bottom center of glass with a felt pen and alyn seam where they joind seal ends. On some seals this is quite apparent.
2. Lube groove rope goes in. (Silicone spray is what glass shop uses)(Soapy water)(Do not use petroleum based lube attacks rubber
3. Install rope in groove that goes over the pinch weld using the handy little tool. Starting from the bottom and ending at the bottom. Leaving about one foot tails. Tape one foot tails to glass so they do not fall down when you place window. (Thick nylon rope if you have a helper)(Thin Flat nylon rope wrapped twice if installing by yourself)
4. Lube rope and the surface of the seal that is going to be pulled threw.
5. Lube window opening on the outside of the car.
6. Place window in opening with bottom groove over pinch weld. Push window in until it is fully seated all the way around. No gaps between seal and body. It should look like it is installed.
7. Starting from the bottom pull the rope At a 90 deg. angle perpendicular to the glass if you don't you can slice the seal. Working both ropes evenly from the bottom to the top having a helper apply pressure to the area you are working in from the outside.
8. Using a curved tool pull the lip on the outside out, all the way around.
9. Using a rubber mallet or the palm of your hand strike the seal(Not the glass on the outside, all the way around. Your not hammering your using dead blows in order to vibrate the seal into place, to fully seat it.
10. Clean the glass applying the cleaner to the rag not the window. Some glass cleaners dry out the seal. Detailers trick.
11. Treat seal occasionally with Glycerin (Rite Aid) to keep it from drying out.
Edits in blue
Hope this helps Tcash
Last edited by Tcash on Thu May 26, 2016 1:35 pm; edited 2 times in total |
|
| Back to top |
|
|
secretsubmariner
Champagne Wrangler

Joined: January 08, 2011
Posts: 3104
Location: Tulsa, OK
|
|
| Back to top |
|
|
Daverham
Samba Member
Joined: August 27, 2009
Posts: 1397
Location: USA
|
| Posted: Fri Sep 02, 2011 6:36 pm Post subject: |
|
|
Here are the BEFORE, DURING and AFTER pics of my rear window seal which I did a few months ago, using the process described above. Very easy. I found some surface rust inside there. Wire-wheeled it, rust converter, primer, painted and feathered with 000 steel wool.
It has now proven itself leak-proof and my mattress is no longer getting damp. Much better!
Before:
During (same on both sides, was leaking):
After:
|
|
| Back to top |
|
|
seventyfo
Samba Member

Joined: February 13, 2007
Posts: 916
Location: Ocoee FL
|
| Posted: Fri Sep 02, 2011 6:51 pm Post subject: |
|
|
A couple years ago I paid a pro with 30+ years installing auto glass to install a bay windshield for me. He used Windex/glass cleaner, spraying liberally during installation. I've been doing the same since and haven't had any problems with any of my glass installations.
_________________
85 Vanagon GL Westy GW 2.2 (Rebuilt by YT)
"I don't know you well enough to care about your comments". Watkins Cravey |
|
| Back to top |
|
|
Tcash
Samba Member
Joined: July 20, 2011
Posts: 12844
Location: San Jose, California, USA
|
| Posted: Mon Mar 16, 2015 2:21 pm Post subject: Tip for getting the cord into the groove of the rubber seal |
|
|
| cdennisg wrote: |
Here's a tip for getting the cord into the groove of the rubber seal. Use a bic pen tube, run the cord through the tube, and slip it into the groove. You can have that cord installed in a matter of seconds. Not my original idea, but I cannot recall where I first learned it or I would give credit.
|
Link
http://www.thesamba.com/vw/forum/viewtopic.php?p=7593570#7593570 |
|
| Back to top |
|
|
MGBBob80
Samba Member

Joined: April 05, 2009
Posts: 126
Location: Bremerton, WA
|
| Posted: Mon Mar 16, 2015 9:36 pm Post subject: |
|
|
Excellent post and very timely for a project of mine. Really like the bic pen tube idea! 
_________________
Cheers,
Bob
1978 Type 2 Transporter. 2L engine (engine code GE), Fuel Injection, 4-speed manual transmission.His name is Buddy.
"I reserve the right to be better tomorrow than I am today." |
|
| Back to top |
|
|
brently88
Samba Member
Joined: October 05, 2014
Posts: 25
Location: Portland, OR
|
| Posted: Tue Mar 17, 2015 5:21 pm Post subject: That's a great idea! |
|
|
| The pen tube would have definitely saved my fingers from going raw trying to get rope in that seam. Does anyone have tips in putting a new rubber gasket on the vent windows, and putting them back in, then getting the bigger stationary window in? |
|
| Back to top |
|
|
1967250s
Samba Member
Joined: May 02, 2007
Posts: 2137
|
| Posted: Wed Mar 18, 2015 10:55 am Post subject: |
|
|
There was just a thread on the vent window rubber, don't have link, but search should get it. Definitley get the large window in before putting in the vent frame.
_________________
'72 Elm Green Deluxe |
|
| Back to top |
|
|
Tcash
Samba Member
Joined: July 20, 2011
Posts: 12844
Location: San Jose, California, USA
|
| Posted: Tue Mar 31, 2015 9:33 am Post subject: |
|
|
| Campin68 wrote: |
| All the advice on this site came in handy, especially the simple green for lubrication, the ball point pen as an installation tool for the nylon cord, and putting the rubber seals in the dryer for 10 minutes or so before trying to get them on the windows. Despite all this my fingers are aching, and it's been two days. |
|
|
| Back to top |
|
|
dirtkeeper
Samba Member

Joined: February 19, 2008
Posts: 3200
Location: Left of everywhere
|
| Posted: Tue Mar 31, 2015 5:12 pm Post subject: |
|
|
| 1967250s wrote: |
| There was just a thread on the vent window rubber, don't have link, but search should get it. Definitley get the large window in before putting in the vent frame. |
woooahh! really? not sure what your talking about but if it is the stock wing windows on the rear windows they have to go in first. unless i am totally missing something. |
|
| Back to top |
|
|
babysnakes
Samba Member
Joined: August 19, 2008
Posts: 7106
|
| Posted: Tue Mar 31, 2015 5:33 pm Post subject: |
|
|
| ^^^^^^ Yep! Vent first then big glass. |
|
| Back to top |
|
|
d-rick
Samba Member

Joined: May 14, 2006
Posts: 889
Location: Columbia,MO
|
| Posted: Tue Mar 31, 2015 6:57 pm Post subject: |
|
|
Local VW shop just got a create of 10 new bay window windshields.
I picked mine up this afternoon and had it in with the hr of getting home. Even got my pregnant wife to help push a little on it while I strung it in 
$125 for the glass
_________________
1959 mango-trailerbus
1962 single cab *1/2
1966 13 window
1967 panel/camper
1968 cig-panel *1/2
1968 passenger bus *1/2
1969 beetle
1969 dormobile
1978 sage green Westy
1990 DoKa
2002 Golf TDI |
|
| Back to top |
|
|
FlatfourFrenchy
Samba Member
Joined: March 13, 2013
Posts: 297
Location: Boonville, MO
|
| Posted: Sat Jun 13, 2015 10:36 am Post subject: |
|
|
Hey d-rick, I just got one of those windows out of Tom's crateful and my question is, where is the best place for the seam? The rest of my windows are all over thet place. I at least want one of them correct.
_________________
1971 Tin Top Westy Campmobile 70 |
|
| Back to top |
|
|
sjbartnik
Samba Member
Joined: September 01, 2011
Posts: 5993
Location: Brooklyn
|
| Posted: Sat Jun 13, 2015 2:10 pm Post subject: |
|
|
Here's how they did it back in the factory!
Jump to 2:55 in the video.
Link
_________________
1965 Volkswagen 1500 Variant S
2000 Kawasaki W650 |
|
| Back to top |
|
|
surf_erk
Samba Member
Joined: November 12, 2014
Posts: 1
Location: United States
|
| Posted: Fri Nov 18, 2016 8:04 am Post subject: Re: How to install Windshield, Windows, Window seals, Glass FAQ |
|
|
Quick question, trying to replace the seals myself. How do you take out the window?
Thanks guys! |
|
| Back to top |
|
|
|


