| Author |
Message |
flemcadiddlehopper
Samba Member

Joined: December 05, 2011
Posts: 2332
Location: Kelowna, BC. Canada.

|
 Posted: Sat Dec 24, 2011 2:29 pm Post subject: Canadian 1967 11 window restoration. Posted: Sat Dec 24, 2011 2:29 pm Post subject: Canadian 1967 11 window restoration. |
 |
|
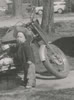
So I guess since i am just starting the restoration it would be a good time to start a thread to follow it along.
I have owned this since 1992, but it has been parked since 1996. My two year old son put his foot through the floor...so i figured I better park it.
Now the fun starts. All body pieces are here and it is heading off to my body guy. Meanwhile I will doing the engine, trans, front end and the seat upholstery.
I will try to keep this updated as thing progress.
I would like some input regarding the colour choices though. Factory original as per tag was light beige over titan red....sorry not a fan of that choice. I really like the black over beige. So I looked into car companies that offer vintage colour choices on todays cars. Ferrari does. I really like the Vinaccia (Black Cherry) over Avorio ( ivory, although it looks much like vw ceylon beige).
Let me know what you think.
Gordo.
[/url] |
|
| Back to top |
|
 |
south_island_surf
Samba Member

Joined: September 23, 2004
Posts: 149
Location: Victoria, BC, Canada
|
| Posted: Sat Dec 24, 2011 2:39 pm Post subject: |
|
|
Hey Gordo, looks like a great project. I'll be following. So your son was 2 in '96? Is he gonna help with the build?
Nice colour combo on this deluxe:
_________________
Art
My '65 single cab project:
http://www.thesamba.com/vw/forum/viewtopic.php?t=491474 |
|
| Back to top |
|
|
flemcadiddlehopper
Samba Member
Joined: December 05, 2011
Posts: 2332
Location: Kelowna, BC. Canada.
|
| Posted: Sat Dec 24, 2011 2:57 pm Post subject: |
|
|
| Yup, not only does he want to help...he just wants the whole thing. I've got four kids all with their learner's permits....This is mine. for now. |
|
| Back to top |
|
|
flemcadiddlehopper
Samba Member
Joined: December 05, 2011
Posts: 2332
Location: Kelowna, BC. Canada.
|
| Posted: Mon Dec 26, 2011 9:30 am Post subject: |
|
|
| Next question: is it a massive rule breaker to put deluxe trim on a standard Microbus? Not that it would stop me....I just like to be fore-warned that I may upset some of the "purest" folks. |
|
| Back to top |
|
|
rking6
Samba Member

Joined: June 08, 2010
Posts: 140
Location: Long Beach Ca.
|
| Posted: Mon Dec 26, 2011 10:59 am Post subject: 67,,, 11 window |
|
|
| Love the vented rear hatch.... is that original ?? Bob King 63,,EZ ,,Long Beach Ca. |
|
| Back to top |
|
|
flemcadiddlehopper
Samba Member
Joined: December 05, 2011
Posts: 2332
Location: Kelowna, BC. Canada.
|
| Posted: Mon Dec 26, 2011 1:16 pm Post subject: |
|
|
Thanks, don't think so...that's how it was when I bought it.
Future plans for it include: get rid of reduction boxes, drop spindles and disk brakes up front on a norrowed beam. 78x94 2.1L engine rebuild, empi wide fives, TMI platinum mesh interior,West Coast Classics headliner and rear carpet kit, and nice sound system.
First, the body though.
Gordo. |
|
| Back to top |
|
|
plane_ben
Samba Member
Joined: February 27, 2005
Posts: 349
Location: Tucson, AZ
|
| Posted: Mon Dec 26, 2011 2:19 pm Post subject: |
|
|
Those louvers may look cool, but you are losing 35-40% of your engine cooling air. Vw designed the air flow to pressurize the top of the engine and the engine fan to push it over the cylinders and out the bottom. You may get away with it in a cool climate like Canada, but here in AZ, you'd melt the engine in five minutes of freeway driving. Just say'in.
Looks like a nice project. Good luck, and have fun building it with your boy. |
|
| Back to top |
|
|
flemcadiddlehopper
Samba Member
Joined: December 05, 2011
Posts: 2332
Location: Kelowna, BC. Canada.
|
| Posted: Mon Dec 26, 2011 2:36 pm Post subject: |
|
|
| plane_ben wrote: |
Those louvers may look cool, but you are losing 35-40% of your engine cooling air. Vw designed the air flow to pressurize the top of the engine and the engine fan to push it over the cylinders and out the bottom. You may get away with it in a cool climate like Canada, but here in AZ, you'd melt the engine in five minutes of freeway driving. Just say'in.
Looks like a nice project. Good luck, and have fun building it with your boy. |
Yes, i am aware of the air flow issues and plan to supplement the airflow to the engine bay via high pressure air flowed from the front of the bus under the bumper back to the engine compartment.
This topic is already being discussed under the "air scoops" thread...though thanks for the concern.
gordo. |
|
| Back to top |
|
|
crukab
Samba Chef

Joined: December 13, 2002
Posts: 6116
Location: Vermont
|
| Posted: Mon Dec 26, 2011 3:06 pm Post subject: |
|
|
| flemcadiddlehopper wrote: |
| Next question: is it a massive rule breaker to put deluxe trim on a standard Microbus? Not that it would stop me....I just like to be fore-warned that I may upset some of the "purest" folks. |
Hey Flem, do what you want, it's your Bus 
I wrapped my '59 singlecab w/ Deluxe trim in the earlie '80s, and the guy that owns it today said it still looks good .... 
I'd leave it STOCK high & no chrome bumpers !
_________________
Tom
My Pops:
http://www.thesamba.com/vw/forum/viewtopic.php?t=604100&highlight=
I know you will always be with me, rest in peace with no more pain. 8/13/14.....
In the yard right now:
'51 Dodge 5 window truck
'65 Bug
'66 Singlecab
'82 Rabbit Truck Diesel from CALI 
'86 Doublecab W/T
'91 Vanagon carat/wolfsbrg.Tiico
'88 Dodge Ram pickup
'11 Jetta Wagon |
|
| Back to top |
|
|
flemcadiddlehopper
Samba Member
Joined: December 05, 2011
Posts: 2332
Location: Kelowna, BC. Canada.
|
| Posted: Thu Dec 29, 2011 7:19 pm Post subject: |
|
|
I have used the search and studied all i could from anyone who has had something to do with pop-out wind seals, and I still felt confused. So , here is what I've done. It seems the most logical, but goes against even what one of the moderators has suggested. But here it is anyways.
Here is the new window frames and the glass seal that came with it.
This is the outside edge of the old window frame. Notice how the seal is folded over from being closed. I am showing the point at which the frame joins are.
Her is the seal lifted up at the same place to expose the screw holes that are covered by the overlap of the seal.
Here is the inside edge of the old seal. Notice how the seal has no overlap to cover the screw holes.
This is the new seal, inside edge. No overlap.
this is the new seals outside edge, notice the overlap.
here is the old glass, very sad to have to remove the old stickers.
this is the new seal in the new frame, with the overlap of the seal the way it was on the original seals.
I hope this is right..it works for me , hope this clears up some confusion for others.
gordo. |
|
| Back to top |
|
|
arthurnugen
Samba Member

Joined: January 11, 2005
Posts: 3081
Location: The PNW, where "going green" means rolling with moss.
|
| Posted: Thu Dec 29, 2011 9:23 pm Post subject: |
|
|
Gordo,
Looks like a good base to start with. Have fun - and please GOD, get a new decklid. Those louvers are hideous.
Arthur
Oops, Canadian. I meant "louvres."
_________________
| cdennisg wrote: |
| Lawyers don't deserve buses. |
| zozo wrote: |
| Don't worry too much. You can always trust a lawyer. |
ALWAYS WEAR STEEL-TOE BOOTS IN THE GARAGE!
1965 Bus (Riviera camper)
1972 Bug 'vert
1967 Bug sunroof
1961 Ghia 'vert
1957 DKW 3=6: 3 cylinder 2 stroke! |
|
| Back to top |
|
|
flemcadiddlehopper
Samba Member
Joined: December 05, 2011
Posts: 2332
Location: Kelowna, BC. Canada.
|
| Posted: Thu Dec 29, 2011 9:39 pm Post subject: |
|
|
Really? I think they just scream '70s hot rod....maybe I will put matching ones up front too.
Actually I can take them or leave them, I didn't put them there, and I am most likely not going to take great lengths to get rid of them.
By the way well done on your Canadian..eh. and thanks, gordo. |
|
| Back to top |
|
|
60vwnewengland
Twin #2

Joined: June 25, 2003
Posts: 1784
Location: District of Columbia & Cape Cod
|
| Posted: Fri Dec 30, 2011 9:09 am Post subject: |
|
|
| crukab wrote: |
I wrapped my '59 singlecab w/ Deluxe trim in the earlie '80s, and the guy that owns it today said it still looks good ....
|
Oh the 80's!
_________________
77 Westy - Cape Cod Sage
LLAP |
|
| Back to top |
|
|
flemcadiddlehopper
Samba Member
Joined: December 05, 2011
Posts: 2332
Location: Kelowna, BC. Canada.
|
| Posted: Thu Jan 12, 2012 12:14 am Post subject: |
|
|
Well, these are the last few steps that I've taken before the bus heads over to my Body Guy. Joe Trotic of Okanagan Westfalia rentals is taking on the body work for me. So i've followed the lead of Art from Victoria and hopefully things will be a bit easier for Joe.
All the bits I need to work on are now out .
This should help a bit.
It is actually very well balanced. Just start it with a jack and pull down on the other side, one person job to tip.
i will try to get as many pics as Joe starts to dig in to it.
gordo. |
|
| Back to top |
|
|
flemcadiddlehopper
Samba Member
Joined: December 05, 2011
Posts: 2332
Location: Kelowna, BC. Canada.
|
| Posted: Thu Jan 12, 2012 7:15 pm Post subject: |
|
|
just had to check that my contraption could go all the way.
And the stack of part to go into it.
Gordo. |
|
| Back to top |
|
|
zuggbug
Samba Member

Joined: June 17, 2008
Posts: 3479
Location: Anderson SC
|
| Posted: Thu Jan 12, 2012 8:02 pm Post subject: |
|
|
Looking good - I want to build a rotisserie just like that, thanks for sharing
_________________
SOUTHERN INTEGRITY AIRCOOLERS
58 15 window
56 westy |
|
| Back to top |
|
|
south_island_surf
Samba Member
Joined: September 23, 2004
Posts: 149
Location: Victoria, BC, Canada
|
|
| Back to top |
|
|
flemcadiddlehopper
Samba Member
Joined: December 05, 2011
Posts: 2332
Location: Kelowna, BC. Canada.
|
| Posted: Fri Jan 27, 2012 8:10 am Post subject: |
|
|
Well, I have everything out of the bus that I need, so off to Joe (my body guy) to get put together right. Hopefully the tipper dolly will make things easier for him (and quicker). His place is only about eight blocks from my shop so it will be easy to keep an eye on it (and get pics) as things happen.
Gordo. |
|
| Back to top |
|
|
flemcadiddlehopper
Samba Member
Joined: December 05, 2011
Posts: 2332
Location: Kelowna, BC. Canada.
|
| Posted: Mon Jan 30, 2012 8:48 pm Post subject: |
|
|
Well, the bus off at Joe's for bodywork (he has already contacted me to order some more bits, and explained that the CIP 1/4s are the wrong shape), I started into my share of the resto. I opened up the trans to flip the ring over due to the RGB omit. Found a nice surprise. Makes me glad I decided to open it up at all.
The side gears and diff gears (spiders) are missing a few teeth.
At least this gives me a worthy excuse to upgrade to a Scat Super Diff.
Gordo. |
|
| Back to top |
|
|
Dougy Dee
Samba Member
Joined: August 21, 2004
Posts: 1668
Location: Niagara Region, CANADA
|
| Posted: Wed Feb 01, 2012 2:22 pm Post subject: |
|
|
| Check your diff real well for cracks. 3 of the last RGB trans I have done had cracked diffs... |
|
| Back to top |
|
|
|


