| Author |
Message |
lovethatconvertible
Samba Member
Joined: August 22, 2008
Posts: 1434
Location: Las Vegas N. V.

|
 Posted: Sat Feb 11, 2012 6:11 pm Post subject: Accelerator Spring Posted: Sat Feb 11, 2012 6:11 pm Post subject: Accelerator Spring |
 |
|
| Please excuse my ignorance, but is the accelerator spring the same as a 36hp? if so I have few laying around, you could have one. |
|
| Back to top |
|
 |
EverettB 
Administrator

Joined: April 11, 2000
Posts: 69824
Location: Phoenix Metro
|
|
| Back to top |
|
|
mdvanderploeg
Samba Member
Joined: November 06, 2011
Posts: 126
Location: Raleigh, NC
|
| Posted: Sun Feb 12, 2012 11:27 am Post subject: Accelerator return spring |
|
|
| I picked up a spring from a fellow Samba member. Thanks for all the offers. This really is a great forum! |
|
| Back to top |
|
|
HeSa
Samba Member
Joined: January 15, 2007
Posts: 466
Location: FINLAND
|
| Posted: Mon Feb 13, 2012 4:27 pm Post subject: Re: Backing plates |
|
|

Last edited by HeSa on Tue Feb 14, 2012 8:23 am; edited 1 time in total |
|
| Back to top |
|
|
johnshenry
Samba Member

Joined: September 21, 2001
Posts: 9364
Location: Northwood, NH USA
|
| Posted: Mon Feb 13, 2012 5:38 pm Post subject: |
|
|
So the cables looped around and came from the back before 6 Apr 1951.
?
_________________
John Henry
'57 Deluxe
'56 Single Cab |
|
| Back to top |
|
|
johnshenry
Samba Member
Joined: September 21, 2001
Posts: 9364
Location: Northwood, NH USA
|
| Posted: Mon Feb 13, 2012 5:40 pm Post subject: |
|
|
The August '50 manual still shows them toward the front:
What does the Sept 1950 service manual show? Mine's packed away at the moment....
_________________
John Henry
'57 Deluxe
'56 Single Cab |
|
| Back to top |
|
|
HeSa
Samba Member
Joined: January 15, 2007
Posts: 466
Location: FINLAND
|
| Posted: Tue Feb 14, 2012 8:22 am Post subject: |
|
|
| johnshenry wrote: |
So the cables looped around and came from the back before 6 Apr 1951.
? |
Sorry my mistake. After 6 Apr 51 from the back and before (with levers) from the front. |
|
| Back to top |
|
|
mdvanderploeg
Samba Member
Joined: November 06, 2011
Posts: 126
Location: Raleigh, NC
|
| Posted: Sun Feb 26, 2012 9:06 am Post subject: Passenger side bodywork update |
|
|
Some progress has been made on the passenger side bodywork. The door is pretty much done and back on the car. The rear quarter is about 70% complete. Still need to finalize the door gaps, but they looked pretty good in the first place. At this point,we're installing the latch mechanisms to ensure a flush fit with the rear quarter when the door's closed. As you can see below, the front quarter just had the initial coat of filler applied. This of course will mostly all be sanded off....still looking for any high or low spots. It's not very glamorous, but it'll all be worth it when the paint's applied. The last photo is the passenger fender, which has been stripped. After the doors and quarters are complete, the fenders will be next.
Passenger door, pretty much finished. Front quarter just getting started....
About to make the door gap perfect.....
Stripped passenger fender...awaiting final bodywork.....
|
|
| Back to top |
|
|
eurodub
Samba Member

Joined: August 05, 2007
Posts: 1321
|
| Posted: Sun Feb 26, 2012 9:13 am Post subject: |
|
|
haha! nice work 
(...and some say that Europeans use too much bondo  ) )
on a serious note, i do appreciate all the work done by owner himself rather than opening the wallet.
this is the hardest operation to do, in getting door gaps perfect.
_________________
1960 1200 model 117 deluxe ragtop
1974 T2 Westfalia Campmobile
1976 MK1 Golf |
|
| Back to top |
|
|
mdvanderploeg
Samba Member
Joined: November 06, 2011
Posts: 126
Location: Raleigh, NC
|
| Posted: Sun Feb 26, 2012 9:22 am Post subject: |
|
|
Don't worry, there will be very little bondo left by the time everything is straight and sanded down. They had just applied it to the gap area and front quarter when I went by for a visit yesterday. When all is said and done, it'll look like the rest of the door.
Just to clarify, I'm not doing the bodywork myself. I like doing bodywork a much as I like doing drywall. Not at all. |
|
| Back to top |
|
|
eurodub
Samba Member
Joined: August 05, 2007
Posts: 1321
|
| Posted: Sun Feb 26, 2012 9:51 am Post subject: |
|
|
no worries here.. 
my 52 split has filler all over, and i didn't do the work myself. applied as it should, won't ever crack.
_________________
1960 1200 model 117 deluxe ragtop
1974 T2 Westfalia Campmobile
1976 MK1 Golf |
|
| Back to top |
|
|
mdvanderploeg
Samba Member
Joined: November 06, 2011
Posts: 126
Location: Raleigh, NC
|
| Posted: Fri Mar 02, 2012 9:26 am Post subject: Passenger side bodywork on 3/2/12 |
|
|
Here's a few updated pictures of the passenger side door and rear quarter. Door fit and gaps are as good as they're going to get & I'm satisfied with them. Starting on the driver's side door now.
|
|
| Back to top |
|
|
tinman
Samba Member

Joined: September 14, 2003
Posts: 42
|
| Posted: Sun Mar 11, 2012 10:06 am Post subject: |
|
|
This car is lookin good I like to see bodywork shots, most shops
dont dare show filler pictures , its great to see owners doin there
own work , Keep up the great work.! |
|
| Back to top |
|
|
mdvanderploeg
Samba Member
Joined: November 06, 2011
Posts: 126
Location: Raleigh, NC
|
| Posted: Sun Jun 17, 2012 7:07 am Post subject: |
|
|
I haven't posted an update in a while, so here are the latest pics. Body work is nearing completion, and the main body should be in primer by next weekend. Meanwhile, I'm going to attempt starting the engine this afternoon.
Roof completed....
Drivers side door and quarter completed....
Hood underway....
|
|
| Back to top |
|
|
slow36hp
scott wimberley

Joined: August 09, 2004
Posts: 3113
Location: mukilteo washington
|
|
| Back to top |
|
|
mdvanderploeg
Samba Member
Joined: November 06, 2011
Posts: 126
Location: Raleigh, NC
|
| Posted: Sun Jun 17, 2012 12:13 pm Post subject: |
|
|
| Wish I could've taken some video of the engine springing to life, but my "rebuilt" starter failed to do the job. The solenoid pops out the gear, but the starter motor itself doesn't run. So much for starting the engine today. |
|
| Back to top |
|
|
leeezard7
Samba Member
Joined: November 13, 2011
Posts: 262
Location: oklahoma
|
| Posted: Thu Jun 21, 2012 10:06 pm Post subject: |
|
|
| nice build. good work. |
|
| Back to top |
|
|
mdvanderploeg
Samba Member
Joined: November 06, 2011
Posts: 126
Location: Raleigh, NC
|
| Posted: Fri Jun 22, 2012 2:41 pm Post subject: |
|
|
Primer went on the body yesterday, so I went by the shop today and took a few pics. I always laugh when I walk into the shop and see the old VW surrounded by a bunch of big American iron. I really want to get my hands on the '63 Split Vette that you can see in the first picture. A split Bug and a split Vette would make a nice pair.
The doors, fenders, hood, and decklid are next. Here's the driver's door getting sanded...
So, now I need to find the old Glasurit formula for Bordeaux Red. I have the sheet that specifies how many parts of Ruby and Black, but need to find the formula for the Ruby color. I'll do some hunting in the old Forum threads & post a new topic if I can't find it. |
|
| Back to top |
|
|
splitjunkie
Samba Member
Joined: April 04, 2006
Posts: 4094
|
| Posted: Sat Jun 23, 2012 5:22 am Post subject: |
|
|
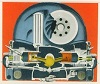
looks like your car has either had a later front clip or a '58-'59 driver's side quarter panel installed at some point.
The area where the fuse box didn't change during those years but the size of the fuse box itself did. You can see two small holes which would be correct for the small two fuse box which came after the split dash splits and ended in '60. These holes accept sheet metal screws.
It should have two widely spaced holes with cinch nuts that accept machine screws.
Also there is a hole to the left that would be used for the top of the fender turn signal on a '58-'59 car.
I can also see that the hood release tube is pulled up and not going through the floor and into the passenger compartment. That needs to be tack welded in place once it is routed correctly.
You also might have some wire tabs that need to be added.
If this a detail you care about you might want to get those addressed before it's time to paint the car.
Here are some shots that show those details that I have gotten from various web sites.
_________________
Chris
You know, a lot of these scratches will buff right out... Jerry Seinfeld |
|
| Back to top |
|
|
mdvanderploeg
Samba Member
Joined: November 06, 2011
Posts: 126
Location: Raleigh, NC
|
| Posted: Sat Jun 23, 2012 2:49 pm Post subject: |
|
|
| Chris, thanks a ton for the information and pics. I knew that the previous owner had welded in a front clip, but didn't know it was from a much later car. I had a clue once I posted pics on The Samba, since someone else pointed out that the tray behind the spare wheel has an opening for a brake fluid reservoir. Where did you find the two captive nuts that hold the fuse block? |
|
| Back to top |
|
|
|


