| Author |
Message |
offshores
Samba Member
Joined: February 08, 2012
Posts: 1085
Location: So Cal

|
 Posted: Sat Mar 10, 2012 8:49 pm Post subject: Another 65 Bug Project Posted: Sat Mar 10, 2012 8:49 pm Post subject: Another 65 Bug Project |
 |
|
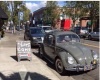
I got this about a month ago and have been slowly working on it. It's been a lot of fun so far and it's just simply cool to do. The car was lowered by way of removing springs and my first order of business was to get it back to stock and clean some things up a bit. The PO is the one who replaced the pans just before I acquired it.
Here's the car as I bought it. My idea is to turn it into a real clean, usable car again. Not show quality or anything, just nice, clean and simple. It's going to end up with the stock smoothies, white walls and I have some OG bumpers with over riders that will be going on as well.
[/img]
lft side by offshores, on Flickr
[img]
Rear by offshores, on Flickr
[/img]
pan rot by offshores, on Flickr
[img]
new pan 1 by offshores, on Flickr
[/img][url=http://www.flickr.com/photos/17956716@N05/6866481945
/][/url]
DSC_8230 by offshores, on Flickr
Before and after of the beam. It cleaned up nicely and now has the stock spring stacks to give it the stock height in front and no more tire rub.
[img]
DSC_8496 by offshores, on Flickr
[/img]
DSC_8492 by offshores, on Flickr
[img]
DSC_8555 by offshores, on Flickr
[/img]
DSC_8582 by offshores, on Flickr
Took a break today and cleaned up my speedometer and added some new celluloid to fix the turn signal and oil light.
[img]
DSC_8623 by offshores, on Flickr
[/img]
DSC_8630 by offshores, on Flickr
[img]
DSC_8641 by offshores, on Flickr[/img]
Last edited by offshores on Mon Mar 12, 2012 8:09 am; edited 2 times in total |
|
| Back to top |
|
 |
offshores
Samba Member
Joined: February 08, 2012
Posts: 1085
Location: So Cal
|
| Posted: Sat Mar 10, 2012 9:07 pm Post subject: |
|
|
A few things popped up and I couldn't resist. Got a little gingerbread to top it off.
[img]
DSC_8645 by offshores, on Flickr
[/img]
DSC_8644 by offshores, on Flickr |
|
| Back to top |
|
|
mykidsbug
Samba Member

Joined: April 07, 2011
Posts: 473
Location: SoSo Cal LA
|
| Posted: Sun Mar 11, 2012 10:16 pm Post subject: |
|
|
| Cool!! I will be checking it out, I have a 65 Im doing now also myself.. |
|
| Back to top |
|
|
silvertonguedevil
Samba Member

Joined: September 26, 2010
Posts: 1692
Location: Vale, OR
|
| Posted: Mon Mar 12, 2012 6:46 am Post subject: |
|
|
Cool project!
_________________
-Greg |
|
| Back to top |
|
|
HotRod06
Samba Member

Joined: January 02, 2011
Posts: 86
Location: Rosamond, CA
|
| Posted: Mon Mar 12, 2012 1:05 pm Post subject: |
|
|
thats some nice looking work on that 65. I'm working on now myself
Where'd you get your pans from?
_________________
1965 Sunroof Beetle
It's not always the destination, sometimes its the journey. |
|
| Back to top |
|
|
offshores
Samba Member
Joined: February 08, 2012
Posts: 1085
Location: So Cal
|
| Posted: Sun Mar 25, 2012 8:03 pm Post subject: |
|
|
| HotRod06 wrote: |
thats some nice looking work on that 65. I'm working on now myself
Where'd you get your pans from? |
Thanks!! The pans were purchased from Jbugs and the PO did that work right before I got it. |
|
| Back to top |
|
|
offshores
Samba Member
Joined: February 08, 2012
Posts: 1085
Location: So Cal
|
| Posted: Sun Mar 25, 2012 8:13 pm Post subject: |
|
|
Rebuilt the steering box and painted it.
[img]
DSC_8390 by offshores, on Flickr
[/img]
DSC_8408 by offshores, on Flickr
[img]
DSC_8463 by offshores, on Flickr[/img]
[img]
DSC_8464 by offshores, on Flickr
[/img]
DSC_8533 by offshores, on Flickr
[img]
DSC_8535 by offshores, on Flickr
[/img]
DSC_8666 by offshores, on Flickr
[img]
DSC_8734 by offshores, on Flickr
[/img]
DSC_8881 by offshores, on Flickr
[img]
DSC_8884 by offshores, on Flickr[/img] |
|
| Back to top |
|
|
offshores
Samba Member
Joined: February 08, 2012
Posts: 1085
Location: So Cal
|
| Posted: Tue Jan 22, 2013 7:12 pm Post subject: |
|
|
It's been a little while since I've worked on this Bug and just recently pulled it back into the garage. I decided to pull the body off as the PO replaced the pans and never sealed the seams or coated them properly. It was lowered in the front and after removing the body it dawned on me that it might have been lowered in the back too. I really couldn't tell so I posted on here and got setup in the right direction and started in on that. Here are some pics of what I've done so far. I did verify that it had been lowered in the rear when it all goes back together I'll set it back to stock.
Removing spring plates. Thanks VOLKSWAGNUT for answering all my question on this...
Knocking crud off
Front beam about to come off. I had previously cleaned and rebuilt this.
All set to lift the pan onto the dolly.
got the bottom pretty clean and flipped it back over and did that side too. No pic at the moment.
I want to weld a few spots, seal the seams and then I'll coat with POR 15. |
|
| Back to top |
|
|
RareAir
Samba Member

Joined: May 11, 2002
Posts: 14576
Location: 18 miles North of the border
|
|
| Back to top |
|
|
Bugugly
Samba Member

Joined: January 16, 2008
Posts: 321
Location: Carson City, Nevada
|
| Posted: Tue Jan 22, 2013 9:06 pm Post subject: |
|
|
Looking good. Nice and clean..
_________________
"When it rains...
It Pours" |
|
| Back to top |
|
|
offshores
Samba Member
Joined: February 08, 2012
Posts: 1085
Location: So Cal
|
| Posted: Thu Jan 24, 2013 3:11 pm Post subject: |
|
|
F@%$ POR 15. Just got done applying it to my meticulously prepped pans and it formed bubbles all over the place  . I called them and one of their peeps said that it cured too fast because of humidity in the air. No where on the can does it say anything about bubbles forming because of high humidity. In fact, their "Information Sheet" lists quicker drying times with higher humidity. . I called them and one of their peeps said that it cured too fast because of humidity in the air. No where on the can does it say anything about bubbles forming because of high humidity. In fact, their "Information Sheet" lists quicker drying times with higher humidity.
Here's a nice little quote from their "Application Information" PDF
"HOW LONG DOES IT TAKE POR-15 TO DRY?
That depends on the ambient humidity (surrounding area). The more
humid the area, the faster the drying time, which usually varies from 2 to
5 hours."
Again, no mention of bubbles. Their "Directions for people who dont read directions" PDF doesn't mention it either. It wasn't until after I called that I heard of bubbles and then I found something buried on another one of their many PDF Info Sheets that mentioned it. Actually can't even find it now and I'm looking for it.
What a disappointment!
|
|
| Back to top |
|
|
eagle5127
Samba Member
Joined: July 17, 2008
Posts: 620
|
| Posted: Thu Jan 24, 2013 3:23 pm Post subject: |
|
|
| Too bad you didn't do a small test area first..I would be pissed too ! |
|
| Back to top |
|
|
offshores
Samba Member
Joined: February 08, 2012
Posts: 1085
Location: So Cal
|
| Posted: Thu Jan 24, 2013 3:52 pm Post subject: |
|
|
| What would I be testing for? That's just it, there's no mention of testing for anything. Clean the area with their Marine Clean, use their Metal Prep and Ready and then brush on a coat, let dry to the touch and apply another coat. |
|
| Back to top |
|
|
drscope
Samba Member

Joined: February 19, 2007
Posts: 15273
Location: Baltimore, Maryland USA
|
| Posted: Thu Jan 24, 2013 4:03 pm Post subject: |
|
|
Did they give you any idea of what you need to do now to get a nice smooth looking surface?
Also, are you aware that POR15 requires a top coat to protect it from UV light? Just because its the bottom of the car, doesn't mean it isn't exposed to UV light. It may not get direct UV, but when parked it still gets reflected UV which is just as damaging to the POR15.
I like Rustoleum Rusty Metal Primer. I think it works better for a much longer period of time and its certainly a lot less expensive.
_________________
Mother Nature is a Mean Evil Bitch! |
|
| Back to top |
|
|
offshores
Samba Member
Joined: February 08, 2012
Posts: 1085
Location: So Cal
|
| Posted: Thu Jan 24, 2013 4:20 pm Post subject: |
|
|
They said to scuff it down and then apply another coat. That's great and all, but we have rain (high humidity=more bubbles) in the forecast for the next 5 days. It's pretty lame that one stupid product could potentially hold up a project like that. I'm aware of the top coat that's required and the UV sensitivity of this garbage. I won't be using it again after this.
When I Google "Rustoleum Rusty Metal primer" I see spray cans mostly and I'm sure you're not referring to those. So, what's the skinny on that stuff? |
|
| Back to top |
|
|
panicman
Samba Member
Joined: December 18, 2011
Posts: 2290
Location: Canby, OR
|
| Posted: Tue Jan 29, 2013 12:34 am Post subject: |
|
|
You can get it in quart cans and brush it on. It is that funky reddish brown color. I actually used it on drscopes advice on my pan. The pan on my 60 looked great except for the lowest part of the pan pressing under the tar mats, and the battery area, which I cut out and patched. I wire wheeled and scuffed it until it was clean and smooth. The local Ace has the rusty metal primer in quart cans, so I asked them to put it on the shaker, then took it home and brushed 2 coats on the pan. It came out very smooth and appears to adhere well. I then used their gloss black in 2 heavy coats. It was humid here, and there was some bubbling, but during drying it settled out very smoothly. I am happy. I would not paint my car body with it.
The rustoleum gets much maligned, but people who have used it (like the dr) report that it really holds up. And if you read the lengthy rust prevention thread, they used the rmp, and it looked to hold up just as well as all the 'premier' brands.
If my pan turns to crap because I used rustoleum, I will write a strongly worded thread!
_________________
Plate of shrimp |
|
| Back to top |
|
|
offshores
Samba Member
Joined: February 08, 2012
Posts: 1085
Location: So Cal
|
| Posted: Tue Jan 29, 2013 9:03 am Post subject: |
|
|
| Thanks panicman for the info. I actually PM'ed drscope and I got some good info back from him. In fact, I just went to HD and bought a qt of the RMP #7769 and a qt of their satin black for a top coat. What I have done since the bubble mess is 3 more coats of POR 15. Still getting bubbles between coats, but not as many and they knock down pretty easily between coats. Think I used 320 grit. I'll scuff em up and apply the satin over it and then start in on the other side using only the Rustoleum products. |
|
| Back to top |
|
|
offshores
Samba Member
Joined: February 08, 2012
Posts: 1085
Location: So Cal
|
| Posted: Wed Feb 20, 2013 3:32 pm Post subject: |
|
|
A little progress over the past 3 weeks, but the pans are finished for the most part. I ended up using Rustoleum products for the tops of the pans. 2 coats of the rusty metal primer and 2 coats of semi gloss black. So much easier than the POR 15 I used on the bottoms. I also made new rear heater cable tubes and tacked those on. The seat tracks needed some attention also. My seats wouldn't lock into place so I had to open those little prongs on the seat tracks a little with a grinder. Slowly but surely...
|
|
| Back to top |
|
|
Helfen
Samba Member
Joined: January 19, 2009
Posts: 3450
Location: Vulcania
|
| Posted: Wed Feb 20, 2013 4:10 pm Post subject: |
|
|
That looks great! While you have it all apart make sure and check all the tubes in the tunnel....now is the time to do it.
Also you said you added gingerbread...meaning the rack? With a name like offshores I would have thought you would have added some Bay Standards. I still have mine after forty five years, although these days I use the SUV to go to the beach. The beetles are too nice to get near salt mist. |
|
| Back to top |
|
|
Jon65
Samba Member

Joined: September 29, 2012
Posts: 2417
|
| Posted: Wed Feb 20, 2013 4:42 pm Post subject: |
|
|
| Man, that looks really nice. Great work. |
|
| Back to top |
|
|
|


