| Author |
Message |
Rodmullet
Samba Member

Joined: May 27, 2010
Posts: 196
Location: New Jersey

|
 Posted: Sun Jun 22, 2014 8:04 am Post subject: Posted: Sun Jun 22, 2014 8:04 am Post subject: |
 |
|
I would not have done this to a nice original bus...this had a really crappy red home done paint job with overspray everywhere, covered by a Maaco paint job that was pretty good, but not prepped well, so paint was peeling, etc....plus it is pretty hacked and has quite a bit of rust...I got sort of tired of looking at it that way, and figured I can redo all of this as I repair stuff...
More to come soon.
Rod |
|
| Back to top |
|
 |
karlonwheels
Samba Member

Joined: February 09, 2014
Posts: 128
Location: new yorkish
|
| Posted: Mon Jun 23, 2014 9:28 am Post subject: |
|
|
| Tcash wrote: |
| quote="HastaAlaska"] check out the bamboo roof rack and the hanging baskets (that I think were growing some local herb). |
That roof rack is the tits. LOVE it. |
|
| Back to top |
|
|
Rodmullet
Samba Member
Joined: May 27, 2010
Posts: 196
Location: New Jersey
|
| Posted: Fri Jul 11, 2014 4:48 pm Post subject: |
|
|
Here's a few more pics, cab is getting close, little bit more in the rear seat area...and with a new windshield, I can actually drive it.
I don't think it will really ever be "finished", but I wanted to get to a point before I went out in public....
Still more to come.
Rod |
|
| Back to top |
|
|
Rodmullet
Samba Member
Joined: May 27, 2010
Posts: 196
Location: New Jersey
|
| Posted: Wed Aug 06, 2014 8:34 am Post subject: |
|
|
Another minor update: "New" curtains...all of my old, don't quite fit right, worn out Hawaiian type shirts have been recycled by my wife, the expert with the Singer...an excellent addition to the Tacky Tiki Bus...attached by the already existing "bungy and hook" method...
More to come soon, I know everybody is thrilled.
Rod |
|
| Back to top |
|
|
Rodmullet
Samba Member
Joined: May 27, 2010
Posts: 196
Location: New Jersey
|
| Posted: Mon Aug 11, 2014 5:06 pm Post subject: |
|
|
Okay, a few more pics.
My wife's uncle gave us this wood look '70's feel vinyl, seemed to fit with what we are doing with the bus, and looks much better than the ripped, stained, dried up headliner. Had some water proof glue around, so cost was $0.00....
Still need to come up with something for the rear seat that is cheap and fits the theme...the blankets are left over from the "new interior" that was in the bus when I bought it. Hoping to find some used Westy or other hinges to make a bed...
Finally, the Tacky Tiki Bus on the road...
This park is just across Barnegat Bay from where Sandy breached through Mantoloking, NJ Park area circled in black.
More stuff to come.
Rod |
|
| Back to top |
|
|
secretsubmariner
Champagne Wrangler

Joined: January 08, 2011
Posts: 3104
Location: Tulsa, OK
|
|
| Back to top |
|
|
Rodmullet
Samba Member
Joined: May 27, 2010
Posts: 196
Location: New Jersey
|
| Posted: Thu Aug 14, 2014 5:46 pm Post subject: |
|
|
A few more pics of recent improvements...
More bad pinstriping...
Tiki light lit up!!!!
|
|
| Back to top |
|
|
NCdad
Samba Member

Joined: August 28, 2008
Posts: 1525
Location: South Carolina
|
|
| Back to top |
|
|
Rodmullet
Samba Member
Joined: May 27, 2010
Posts: 196
Location: New Jersey
|
| Posted: Tue Sep 09, 2014 8:01 pm Post subject: |
|
|
Couple of quick updates:
The "fabric" on the beach mats used as the headliner is disintegrating....here is the fix (the cloth and the mat was sewn together)
I made some panels for the seat base sides. Just hardboard covered in remnant vinyl...
Last, a redecorating of the jump seat....not quite finished, but you get the idea.
Drove the bus the other day...a guy was taking pics on his phone at a stoplight....and I saw a reflection of the bus in store windows...and laughed. |
|
| Back to top |
|
|
Rodmullet
Samba Member
Joined: May 27, 2010
Posts: 196
Location: New Jersey
|
| Posted: Tue Jan 20, 2015 6:53 pm Post subject: Tacky Tiki Bus |
|
|
Well, it got cold around here and hasn't been warm since, so no updates....but found this cool tiki compatible vinyl at A.C.Moore. Two pieces, 2 yards apiece, $6.00 for both. Have been trying to figure out what to do with the backseat....we'll make some kind of cover. Looks great in the bus, couldn't find a better match if I tried.
More to come....if Spring ever comes! |
|
| Back to top |
|
|
Rodmullet
Samba Member
Joined: May 27, 2010
Posts: 196
Location: New Jersey
|
| Posted: Sat Apr 25, 2015 5:53 pm Post subject: |
|
|
Finally warm enough to work on the Tacky Tiki Bus!!!!
Top half of backseat covered with a $3.00 vinyl remnant from AC Moore....very heavy duty vinyl. We just wrapped and stapled the vinyl to the hardboard on the back of the seat. Looks great, especially compared to the old ripped bottom.
Here is how we decided to attach the vinyl to the seat bottom....we are going to screw some scrap plywood underlayment ($3.65 from Home Despot) to the seat frame and wrap and staple....Total cost for the whole rear seat will be under $10....Hope to finish next weekend.
And since I was up on the ladder anyway, thought this was a good angle for a picture of the bus.
More to come!!!!
Rod |
|
| Back to top |
|
|
Rodmullet
Samba Member
Joined: May 27, 2010
Posts: 196
Location: New Jersey
|
| Posted: Sat May 02, 2015 6:25 pm Post subject: |
|
|
Here's the rear seat finished, looks pretty good considering it isn't really reupholstered....total cost around $10, a couple of afternoons work. Fits right in with the theme.
More to come soon, I know you can't wait....  |
|
| Back to top |
|
|
Rodmullet
Samba Member
Joined: May 27, 2010
Posts: 196
Location: New Jersey
|
| Posted: Fri Jun 26, 2015 7:00 pm Post subject: Tacky Tiki Bus Projects |
|
|
A quick little project update....I made a couple of quick junk boxes for under the rear seat to replace the old, moldy cardboard boxes I've had under there for 15 years. Culled pine boards from one of the home center places and some pallet wood....maybe cost a couple of bucks apiece. We will decorate them somehow, have a couple of ideas. Have enough wood to make some small boxes for the spaces left.
More to come!
Rod |
|
| Back to top |
|
|
Rodmullet
Samba Member
Joined: May 27, 2010
Posts: 196
Location: New Jersey
|
| Posted: Mon Jul 13, 2015 6:47 pm Post subject: |
|
|
Before and after of rear side window....After 42 years, the original window seals were toast.....
This was a bear to get in...I purchased this seal from Bus Depot years ago, and it was very tight....had to buy a couple of big suction cups and a large rubber mallet in order to pull, pound, and finally tap to get the window close enough to the lip to pull the seal over.
The decorated "junk" boxes....made of junk wood to hold...stuff. Going to make a couple more to fit the small areas left on each side.
More fun to come....
Rpd |
|
| Back to top |
|
|
Rodmullet
Samba Member
Joined: May 27, 2010
Posts: 196
Location: New Jersey
|
| Posted: Wed Jul 22, 2015 7:08 pm Post subject: Tacky Tiki Bus |
|
|
A couple of quick updates....this is what the brake vacuum hose looks like after 42+ years....and I may never be able use my arms again...fun trying to get this off....guess I am getting old.
Made a couple more junk boxes for the small outside under the backseat area.
I think this looks pretty cool, fits with the theme, and spent maybe two or three dollars at most, just junk boards from HD and cut up pallets.
More to come.
Rod |
|
| Back to top |
|
|
oscarsnapkin
Samba Member
Joined: October 22, 2013
Posts: 558
Location: Bucks County, PA
|
| Posted: Fri Jul 24, 2015 5:20 am Post subject: |
|
|
Wow. I wasn't sold at first, but your Bus is the bomb. Keep up the nice work, the 'tackier' the better.
_________________
- 1977 CEI Sunroof Bus 2.0L F.I. Hydraulic Lifters
- 1973 Thing
"Its so easy to laugh, its so easy to hate, it takes strength to be gentle and kind." |
|
| Back to top |
|
|
Tcash
Samba Member

Joined: July 20, 2011
Posts: 12844
Location: San Jose, California, USA
|
| Posted: Fri Jul 24, 2015 11:28 am Post subject: |
|
|
The two additional junk box's finished it off nicely.
Looking good
Tcash |
|
| Back to top |
|
|
Rodmullet
Samba Member
Joined: May 27, 2010
Posts: 196
Location: New Jersey
|
| Posted: Fri Jul 24, 2015 5:59 pm Post subject: Tacky Tiki Bus |
|
|
Thanks, guys, it has been interesting that I haven't gotten more slack for doing this....but I think it is going pretty well, thanks for the support.
Probably going to make some more boxes for the cargo area, plus whatever else I can come up with.
Rod |
|
| Back to top |
|
|
Rodmullet
Samba Member
Joined: May 27, 2010
Posts: 196
Location: New Jersey
|
| Posted: Sat Aug 29, 2015 5:53 pm Post subject: Tacky Tiki Bus |
|
|
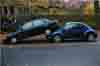
After finally getting the TTB to idle somewhat normally, we went on a small test run....
Parked across from a local surf shop. Picked up a couple of cool stickers that will eventually find a home on the TTB.
We tend to work on the TTB more than we use it.....it struck me today how narrow/small/antique the vehicle actually is....
More to come.....
Rod |
|
| Back to top |
|
|
Rodmullet
Samba Member
Joined: May 27, 2010
Posts: 196
Location: New Jersey
|
| Posted: Sat Sep 05, 2015 6:23 pm Post subject: Tacky Tiki Bus Projects |
|
|
Worked on some small projects today, touched up some interior paint, cleaned up a couple of things, and......
Fake metal flake for the front side reflectors!!!!!....Got the cool glitter paint on clearance at Wally World, had the clear sitting around.
The Glitterblast is notoriously difficult to use, according to various craft/jalopy forums I read....it kept on spaying after I released the tip....
Three coats of clear, but the texture is still sort of rough, but I have learned that there is a limit to the number of coats of spray can clear you can use before it gets to the point that it just won't dry, or that it just stays sort of soft.
A couple of pics that hopefully show the cool "glitteryness".....I am thinking of maybe a license plate frame using this technique....
Remember,
"Tacky is timeless"
More to come,
Rod |
|
| Back to top |
|
|
|


