| Author |
Message |
Kahma
Samba Member
Joined: September 14, 2012
Posts: 59
Location: Methuen, MA

|
 Posted: Wed Oct 31, 2012 6:32 pm Post subject: Posted: Wed Oct 31, 2012 6:32 pm Post subject: |
 |
|
This car is BEAUTIFUL! Sorry, I'm stealing your color  I've been toying with Aviator Grey from Audi (always loved the color, and it's at least from the same family) but this is more authentic and period. Please tell me what color this is! We're on opposite sides of the pond so it's ok! I've been toying with Aviator Grey from Audi (always loved the color, and it's at least from the same family) but this is more authentic and period. Please tell me what color this is! We're on opposite sides of the pond so it's ok! |
|
| Back to top |
|
 |
carl4x4
Samba Member
Joined: March 20, 2012
Posts: 679
Location: United Kingdom
|
| Posted: Thu Nov 01, 2012 4:18 am Post subject: |
|
|
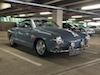
Thanks, the paint is an original VW colour L469 Anthracite Grey. However it has a habit of looking like a different colour in different lights. If you look on Google images for the colour you'll see what I mean with lots of pictures of beetles in the colour. I also think the fact that mine was painted with water-based paint then had two coats of clear laquer means that it looks slightly different. (ie; more shiny!)
Last edited by carl4x4 on Tue Nov 06, 2012 3:26 pm; edited 1 time in total |
|
| Back to top |
|
|
RoCo
Samba Member
Joined: October 06, 2007
Posts: 131
Location: Calgary
|
| Posted: Thu Nov 01, 2012 12:20 pm Post subject: |
|
|
oooh I like this build! Very nice, that metal worker has fantastic skills.
RC |
|
| Back to top |
|
|
popoule
Samba Member
Joined: December 01, 2010
Posts: 127
|
| Posted: Fri Nov 02, 2012 2:36 pm Post subject: |
|
|
| love the color love the work ! |
|
| Back to top |
|
|
Kahma
Samba Member
Joined: September 14, 2012
Posts: 59
Location: Methuen, MA
|
| Posted: Sat Nov 03, 2012 4:04 pm Post subject: |
|
|
| carl4x4 wrote: |
| Thanks, the paint is an original VW colour L469 Anthracite Grey. However it has a habit of looking like a different colour in different lights. If you look on Google images for the colour you'll see what I mean with lots of pictures of beetles in the colour. I also think the fact that mine was painted with water-based paint then had two coats of clear laquer means that it looks slightly different. |
Your car looks much more like L595 Fontana Grey...? |
|
| Back to top |
|
|
welderkev
Samba Member
Joined: November 05, 2012
Posts: 3
Location: United Kingdom
|
| Posted: Mon Nov 05, 2012 5:34 pm Post subject: |
|
|
| Fontana grey is a much lighter 'yellow' grey, which looks nearly white next to this car. Carls ghia is Anthracite grey, I should know, I painted it. |
|
| Back to top |
|
|
welderkev
Samba Member
Joined: November 05, 2012
Posts: 3
Location: United Kingdom
|
| Posted: Mon Nov 05, 2012 6:17 pm Post subject: |
|
|
| If you look back to the picture where the front screen has just gone in, I think that's the nearest to what the colour looks like in real life. The camera does weird things to this colour, in the shot of it outside with my bug in the background it looks blue!!?, and my car is not peppermint green, If you saw it you would say it was blue. |
|
| Back to top |
|
|
carl4x4
Samba Member
Joined: March 20, 2012
Posts: 679
Location: United Kingdom
|
| Posted: Tue Nov 06, 2012 1:47 am Post subject: |
|
|
| welderkev wrote: |
| Fontana grey is a much lighter 'yellow' grey, which looks nearly white next to this car. Carls ghia is Anthracite grey, I should know, I painted it. |
Morning Kevin
You're being modest mate, you did the welding as well  |
|
| Back to top |
|
|
matt.white
Samba Member
Joined: October 02, 2009
Posts: 36
Location: London, England
|
| Posted: Tue Nov 06, 2012 8:28 am Post subject: |
|
|
Carl, so any photos of the work you've been completing?
Oh, and welderkev is the guy you passed on details to me previously - great! as i need some work done and I couldn't his contact details anywhere!! Damm KGOC UK threads!
I'll pm Kevin.
But back to your car - photos or it didn't happen!  |
|
| Back to top |
|
|
carl4x4
Samba Member
Joined: March 20, 2012
Posts: 679
Location: United Kingdom
|
| Posted: Tue Nov 06, 2012 9:02 am Post subject: |
|
|
PM'd contact details. Didn't get the photos done due to lack of light but I will try and get some in the next few days. I did however spend three hours trying to fit the ruddy front bumper from a box of bits. did you know there are nine pieces to the bumper assembly? and the blooming things all have to line up perfectly. My n/s bumper mount was slightly out of line which was the reason I couldn't finish it!
I am determined it won't beat me though... 
By the way, I don't suppose anyone has a photo of the route the number plate light wiring takes on the inside of the engine lid & hinges ?
Thanks,
Carl.
Last edited by carl4x4 on Tue Nov 06, 2012 1:29 pm; edited 1 time in total |
|
| Back to top |
|
|
Basketcase
Samba Member

Joined: August 10, 2011
Posts: 636
Location: Ohio
|
| Posted: Tue Nov 06, 2012 11:01 am Post subject: |
|
|
fantastic job! love the color
_________________
'72 Karmann Ghia Coupe (the Boss's) |
|
| Back to top |
|
|
carl4x4
Samba Member
Joined: March 20, 2012
Posts: 679
Location: United Kingdom
|
| Posted: Sun Nov 11, 2012 2:11 pm Post subject: |
|
|
Lots to update, got time to take some pictures today;
Finished off the Red9design installation with a new steering universal joint section, it's a replacement section that Red9 have just started producing, I wasn't happy with the old design but very happy with the new one You can see the cross brace across the back of the unit that strengthens it between each side.
This photo shows the subframe from below;
On the bottom, it's mounted on the old beam mounting points:
It then bolts to the front body mounts
Then to the two body mounting points at the bottom of the footwell. You can also see the relocated brake flexi-pipe mount to the left of the wishbone. (you have to fabricate this yourself)
Other updates, fitted the front bumper & indicators, the bumper is a stainless replacement and took a lot of messing around as I found that one of the bumper mounting points was out of alignment and all the bumper brackets had got bent in storage 
Been busy with the wiring, got the main front to back loom fitted, fusebox, rebuilt the wipers & fitted those. The front lights, rear lights, number plate lights & indicators are all wired in now.
Decided to bite the bullet with the wheels and go for a Porsche 5-stud pattern, so new disks & drums, spot the difference!
Very pleased with the look:
The ET43 offset works well on the front, I've gone with 175/65/15 tyres (normally found on mini's) There's still about 1.5" range up and and about 2.5" down, but it seems to sit pretty nicely for now.
And just managed to squeeze fitting the rear bumper in this evening, you can see the dew had settled on the car by the time I finished!
|
|
| Back to top |
|
|
welderkev
Samba Member
Joined: November 05, 2012
Posts: 3
Location: United Kingdom
|
| Posted: Sun Nov 11, 2012 2:53 pm Post subject: |
|
|
| Love it when the chrome goes on. The last two photos prove my earlier point about the colour perfectly. Photograph it in sunlight and it looks blue, Whereas the last photo of its rear is its real colour. |
|
| Back to top |
|
|
ghi66
Samba Member
Joined: October 21, 2010
Posts: 69
Location: Caldey Island
|
| Posted: Tue Nov 13, 2012 1:58 pm Post subject: |
|
|
hey Carl, looking the biz now, where did you get your SS bumpers? I've sent a couple of emails to PTT in vietnam and are coming back with a tidy price. I'm bare metalling the body at mo and it's taking forever, got a thread going on Vzi but not a great deal of progress really 
You must be well pleased, your not far off the end by the look of things  |
|
| Back to top |
|
|
carl4x4
Samba Member
Joined: March 20, 2012
Posts: 679
Location: United Kingdom
|
| Posted: Tue Nov 13, 2012 4:33 pm Post subject: |
|
|
| ghi66 wrote: |
hey Carl, looking the biz now, where did you get your SS bumpers? I've sent a couple of emails to PTT in vietnam and are coming back with a tidy price. I'm bare metalling the body at mo and it's taking forever, got a thread going on Vzi but not a great deal of progress really
You must be well pleased, your not far off the end by the look of things |
Hi, yes they were from ptt in Vietnam, they were a good price and the quality seems very good (although I never had the originals to compare to) The problems I had with the front bumper were due to my bumper irons and one of the mounts being out of shape when I started. To prove this point it only took an hour and a half to fit the rear bumper as everything was straight !
Do you have a link to your vzi thread? |
|
| Back to top |
|
|
bunkington
Samba Member
Joined: February 03, 2009
Posts: 285
Location: Bethesda, MD
|
| Posted: Wed Nov 14, 2012 6:03 am Post subject: |
|
|
| How did you get the Fuchs center cap over the rear axle nut? I am trying to figure that out now. |
|
| Back to top |
|
|
ghi66
Samba Member
Joined: October 21, 2010
Posts: 69
Location: Caldey Island
|
| Posted: Wed Nov 14, 2012 1:18 pm Post subject: |
|
|
| The guy from ptt is very persistant.. given me more confidence as you have got them. I've got quite a few piccys to sort but here's the link http://volkszone.com/VZi/showthread.php?t=792140 lol |
|
| Back to top |
|
|
carl4x4
Samba Member
Joined: March 20, 2012
Posts: 679
Location: United Kingdom
|
| Posted: Wed Nov 14, 2012 3:35 pm Post subject: |
|
|
Hi sorry, didn't make the connection between ghi66 and rogueleader sorry 
Good to see yours progressing, the ptt bumpers came really quickly once ordered (in the same week) well packaged with fitting bolts etc. The only things you'll need are the bumper irons, some new over-rider trim rubbers to stop them scratching the bumper (about £9 for a set of 8 from VWheritage), plus the strange sort of 3 inch square brackets that are on the back of the over-riders. My biggest tip for fitting was to replace the over-rider long bolts with studded rods which you can cut to length and pre-fit to the over-riders. |
|
| Back to top |
|
|
ghi66
Samba Member
Joined: October 21, 2010
Posts: 69
Location: Caldey Island
|
| Posted: Wed Nov 14, 2012 7:37 pm Post subject: |
|
|
| carl4x4 wrote: |
| Hi sorry, didn't make the connection between ghi66 and rogueleader sorry |
haha yeah it's me , i'll get them ordered, thanks for the tips that will really help. Just bought a Vintage Speed exhaust, 17" American Eagle chrome 5 spokes to try and boost my enthusiasm...bumpers next haha. Those fuchs look , glad you went for those over the Empis as they look way better. |
|
| Back to top |
|
|
carl4x4
Samba Member
Joined: March 20, 2012
Posts: 679
Location: United Kingdom
|
| Posted: Thu Nov 15, 2012 2:40 am Post subject: |
|
|
| ghi66 wrote: |
| haha yeah it's me , i'll get them ordered, thanks for the tips that will really help. Just bought a Vintage Speed exhaust, 17" American Eagle chrome 5 spokes to try and boost my enthusiasm...bumpers next haha. Those fuchs look , glad you went for those over the Empis as they look way better. |
Crikey buying that lot in one go must have made a dent in the budget ! Interested to see the 17" wheels on the car
(One last tip on the bumpers is to add a small washer on the nut side of the captive bolts that hold the bumper sections together so they nip up tight enough.) |
|
| Back to top |
|
|
|


