| Author |
Message |
zuggbug
Samba Member

Joined: June 17, 2008
Posts: 3479
Location: Anderson SC

|
 Posted: Tue Jul 09, 2013 7:21 pm Post subject: Posted: Tue Jul 09, 2013 7:21 pm Post subject: |
 |
|
U are doing a great job. Keep up the good work
_________________
SOUTHERN INTEGRITY AIRCOOLERS
58 15 window
56 westy |
|
| Back to top |
|
 |
volkswouter
Samba Member

Joined: March 25, 2003
Posts: 450
Location: The Netherlands
|
| Posted: Sun Jul 14, 2013 1:26 pm Post subject: |
|
|
So i had some problems with the lamp sockets of my NOS headlights.
I decided to rebuilt them with the sealed beam parts of my American headlight so i could use 12Volt H4 lamps.
I bought Skoda 105 headlight, put them in then oven and removed the glas.
My Euro taillights are now equipped with double lamp sockets which i bought from a Mercedes E type W124.
I wanted to mount the lamp in a straight way behind the reflector. I also wanted to get rid of all the stray in the engine bay. |
|
| Back to top |
|
|
mandraks
Samba Member

Joined: November 28, 2004
Posts: 7050
Location: Lawrenceville, Ga
|
| Posted: Sun Jul 14, 2013 1:39 pm Post subject: |
|
|
very cool. I do look like 2013 technology where it counts. better lights, better brakes, better fuel economy, makes sense to me.
still got semaphores, sliding windows, steel bumpers, looks the part, what is not to like
_________________
regards
Uli
----------------------------------------
'53 3-Fold Oval, L35 Metallic Blue, looking for a narrow hatch panel |
|
| Back to top |
|
|
volkswouter
Samba Member
Joined: March 25, 2003
Posts: 450
Location: The Netherlands
|
| Posted: Thu Jul 18, 2013 12:03 am Post subject: |
|
|
Glowing nails is the nickname for these taillights here in Holland.. 
They light up real nice and no stray in the engine bay.. |
|
| Back to top |
|
|
DONGKG
The Araneta Boys
Joined: August 28, 2006
Posts: 5475
Location: Cainta, Rizal, Philippines, "A Certified Type 3 and Karmann Ghia Maniac"
|
|
| Back to top |
|
|
volkswouter
Samba Member
Joined: March 25, 2003
Posts: 450
Location: The Netherlands
|
| Posted: Mon Aug 05, 2013 12:55 pm Post subject: |
|
|
And another day gone by... 
Had problems with my SWR light switch.
Did a lot of measuring and checking.
I was 100% sure that i connected the wire's correct.
The only way to make the lights work was to make a positive bridge in the switch.
Link
I placed my original indicator switch and everything worked like it should.
I took the SWR switch apart and noticed grease underneath the contact plate.
I removed it and will try it next time.
|
|
| Back to top |
|
|
volkswouter
Samba Member
Joined: March 25, 2003
Posts: 450
Location: The Netherlands
|
| Posted: Thu Sep 05, 2013 2:00 pm Post subject: |
|
|
A lot happened in the past few weeks.
Santa Claus came early this year!
Erwin gave me a set bumper brackets for the rear.
He bought a 65 deluxe which had the bracktes on the rear. I traded them for a set of the correct ones.. 
My home built ones will be junked.
I made a mistake and connected the center brake light with the rear left taillight. This aint possible while the center light will blink when i use my indicators.
23 Juli: I bought a cable set for trailers and pulled this along the original cable thru the chassis. I need extra cables for the center brake light, the RPM gauge and the temperature gauge.
I also bought a warning light switch and a modern indicator relays.
The KlassikFab front floor fits, now it's time for Erwin to drill lots of holes and welt that piece into place.
Cleaning the chassis and using Por on rusted surface.
14 Augustus: New Sheet metal in place. Wanted to go and word on the bus but my little girl is ill and had to pass.
Luckily Erwin could move on, he did much more but wanted to tease.
16 Augustus: Orderded a lot of new stuff!
Brake parts, rubbers, steering parts, etc..
The welding has a lot of progress also!
The front and side are almost done, to do are: Doglegs, battery tray and front floor.
I went further with my engine. Cleaned all the parts, sanded them a little and sprayed them black.
Will move on next Tuesday
17 Augustus: Erwin working on saturday... 
20 Augustus: More engine stuff done, had to trade some orderded parts. Bought the wrong clutch..
27 Augustus: Engine almost done..
The battery tray is finished and the reassemble can begin..
31 Augustus:
MOT welding is done..
KF Front floor.
Have to use professional glue for the cargo door. Doglegs are done, too bad there's a nasty dent in the passengers front door..
cheerio
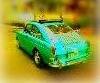
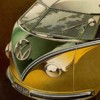
4 September: Finally got the bus near my home.
Dusty bus?
Another shot..
|
|
| Back to top |
|
|
volkswouter
Samba Member
Joined: March 25, 2003
Posts: 450
Location: The Netherlands
|
| Posted: Fri Sep 13, 2013 11:45 am Post subject: |
|
|
Just when i wanted to go the bus and wrench on it, the mailman posted this letter from Wolfsbrug. It looks like i own a Microbus with barndoors right..
Steering is back in place and adjusted correct. The horn also works again and the pedals are back in place.
|
|
| Back to top |
|
|
MrPolak
Samba Member

Joined: June 20, 2004
Posts: 1337
Location: AG ,atnaltA
|
| Posted: Fri Sep 13, 2013 3:23 pm Post subject: |
|
|
| volkswouter wrote: |
So i had some problems with the lamp sockets of my NOS headlights.
I decided to rebuilt them with the sealed beam parts of my American headlight so i could use 12Volt H4 lamps.
I bought Skoda 105 headlight, put them in then oven and removed the glas.
|
Great minds think alike! I bought some NOS Kinby headlights for a FIAT for $6 on eBay and did the same thing. I'm using mine to convert the US-spec headlights to Euro "fluted" lenses. |
|
| Back to top |
|
|
volkswouter
Samba Member
Joined: March 25, 2003
Posts: 450
Location: The Netherlands
|
| Posted: Sat Oct 19, 2013 1:33 pm Post subject: |
|
|
Did a lot of things over the past weeks.
Replaced all the engine bay rubbers and gasoline hose.
The engine is back in and i repaired all the electrical wires in the engine bay.
I'm busy with sorting out the side windows and the front doors glass and rubbers.
My door frames are really bad so i bought two replacements.
I'm still searching for a decent right door.
This one is worn, bent and gun fired from the inside. |
|
| Back to top |
|
|
volkswouter
Samba Member
Joined: March 25, 2003
Posts: 450
Location: The Netherlands
|
| Posted: Wed Oct 30, 2013 10:50 am Post subject: |
|
|
I'm a happy man!
Found all the parts to convert my 1493cc H engine to the looks of a 30HP engine.
Also found the correct door handle's and very very happy with the license plate light lens used from 12-1953 till 03-1958.
The one is used, but at least i got one...
|
|
| Back to top |
|
|
Braukuche
Samba Member
Joined: September 03, 2004
Posts: 11005
|
| Posted: Wed Oct 30, 2013 11:41 am Post subject: |
|
|
| volkswouter wrote: |
I'm a happy man!
Found all the parts to convert my 1493cc H engine to the looks of a 30HP engine.
Also found the correct door handle's and very very happy with the license plate light lens used from 12-1953 till 03-1958.
The one is used, but at least i got one...
|
Doubt that shroud will fit right on your H case, its wider than a 36hp. Plus the generator stand is a dead give away. Why not just run a 36hp? They make all sorts of stuff now days to bump up the power on those little engines.
_________________
Go Reds! Smash state!
Retirement is here!
1956 Ghia
1959 SO-23 Westfalia
1960 double cab
1960 Baja Bug
1963 stretched double cab
1962 Golde sunroof Ghia
1963 356 B coupe
1963 Notchback
1967 21 window less rusty now |
|
| Back to top |
|
|
Braukuche
Samba Member
Joined: September 03, 2004
Posts: 11005
|
| Posted: Wed Oct 30, 2013 11:41 am Post subject: |
|
|
Just noticed it looks to be a stake air 40hp shroud...
_________________
Go Reds! Smash state!
Retirement is here!
1956 Ghia
1959 SO-23 Westfalia
1960 double cab
1960 Baja Bug
1963 stretched double cab
1962 Golde sunroof Ghia
1963 356 B coupe
1963 Notchback
1967 21 window less rusty now |
|
| Back to top |
|
|
volkswouter
Samba Member
Joined: March 25, 2003
Posts: 450
Location: The Netherlands
|
|
| Back to top |
|
|
sleepykid
Samba Member

Joined: August 25, 2006
Posts: 71
Location: Cardiff By The Sea
|
| Posted: Wed Jan 08, 2014 1:35 pm Post subject: |
|
|
| awesome progress. cant wait to see it finished. |
|
| Back to top |
|
|
dawerks
Samba Member

Joined: September 15, 2010
Posts: 2349
|
| Posted: Wed Jan 08, 2014 1:46 pm Post subject: |
|
|
She has come a loong way!! What is the plan for the primer area? Blend it?
_________________
"There is only one sin; disconnection from self." |
|
| Back to top |
|
|
volkswouter
Samba Member
Joined: March 25, 2003
Posts: 450
Location: The Netherlands
|
| Posted: Wed Jan 08, 2014 1:54 pm Post subject: |
|
|
| dawerks wrote: |
| She has come a loong way!! What is the plan for the primer area? Blend it? |
Yes absolutely!
I looking to buy 1 liter PG and 1 liter SG and will do both doors, window frames and the front.
Palm Green Sand Green Por Grey (PGSGPG) by Wouter Duijndam, on Flickr |
|
| Back to top |
|
|
Z
Samba Member
Joined: June 15, 2003
Posts: 2517
Location: galveston, tx
|
| Posted: Wed Jan 08, 2014 2:47 pm Post subject: |
|
|
| MrPolak wrote: |
| volkswouter wrote: |
So i had some problems with the lamp sockets of my NOS headlights.
I decided to rebuilt them with the sealed beam parts of my American headlight so i could use 12Volt H4 lamps.
I bought Skoda 105 headlight, put them in then oven and removed the glas.
|
Great minds think alike! I bought some NOS Kinby headlights for a FIAT for $6 on eBay and did the same thing. I'm using mine to convert the US-spec headlights to Euro "fluted" lenses. |
Nice progress on this bus...either of you have more info on how to do the headlight glass removal thing? Have been thinking of doing this for some time, but hadn't thought of heating the parts. I assume this is to melt the glue holding the lens to the bucket? |
|
| Back to top |
|
|
volkswouter
Samba Member
Joined: March 25, 2003
Posts: 450
Location: The Netherlands
|
| Posted: Wed Jan 08, 2014 2:53 pm Post subject: |
|
|
| Z wrote: |
Nice progress on this bus...either of you have more info on how to do the headlight glass removal thing? Have been thinking of doing this for some time, but hadn't thought of heating the parts. I assume this is to melt the glue holding the lens to the bucket? |
I put the lights in the oven at 150 degrees Celcius for 15 minutes and used two sharp potato cutters to cut thru the warmed glue. |
|
| Back to top |
|
|
volkswouter
Samba Member
Joined: March 25, 2003
Posts: 450
Location: The Netherlands
|
| Posted: Sun Feb 16, 2014 5:51 am Post subject: |
|
|
My temporary creation
The final taillight houses made from aluminum AL6082
Also started to change the interior.
Bought this sheet metal piece years ago.
Next step is the paint and i will get the test sprays of Palm green and Sand green next tuesday. |
|
| Back to top |
|
|
|


