| Author |
Message |
smileyman3000
Samba Member

Joined: November 07, 2010
Posts: 238
Location: Yeppoon, Australia

|
 Posted: Sun Aug 24, 2014 8:24 am Post subject: Posted: Sun Aug 24, 2014 8:24 am Post subject: |
 |
|
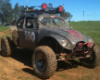
Got some done on the rack conversion.
First step was to make these little brackets. They match the diameter of the beam and the outside of the rack and are the right size to hold my rack in the right place for no bumpsteer, as far as I have worked out at least.
They got tacked in place on the top beam tube, perpendicular to the front edge of the tubes.
You can see I have a bit of trimming to get the rack in there.
Cut some holes and moved some metal out of the way. Once I got the rack fitting in under there I centred it and set the angle of the input shaft then tacked it into place on the brackets.
Seemed to be all going well until a major setback. Turns out the angle of the racks ends won't allow them to angle back far enough to go in the steering arms for some of the steering angle. It's ok when turned away from the side cause the angle decreases. But turn towards a side and it binds up just past centre. I took a few more measurements and worked out that I had to move that rack back about 10mm to stop the binding, so I made the decision to more it back 15mm just to be sure.
It was at this point I was thinking the bumpsteer would end up being horrible now and that the rack conversion wasn't going to be the success that I had hoped for. I remade the little brackets 15mm longer and tacked everything back into place again. Moving the rack back made half of the holes that I had cut and clearanced into the framehead redundant but that's how it goes I guess.
This time the tie rods fit and the rack ends weren't binding. I could cycle the suspension up and down and full lock on the steering left to right. Then I tried to measure the bumpsteer and came to an unusual conclusion, there wasn't any!
This can't be right I thought to myself. The rack is 15mm from where it is supposed to be, I should have some discernible bumpsteer. I decided that I was trying to measure on too fine a scale on the spindles. So I dug the front discs and bearings out and fitted them up. And then fitted the front wheels. Did a rough wheel alignment and cycled the front suspension up and down and took more measurements.
I ended up with about 2mm of toe variation at the outer edge of the wheel in 12 inches of travel, except right at full droop it goes a bit funny right in the last half inch and gets about 6mm toe out. But I don't foresee this as a problem cause the stops will limit travel before this point.
I couldn't believe it and obviously was very happy with this result!!
Full droop to full bump is around 300mm (12") of travel. It will probably be limited to around 250mm (10") once I set the stops up. Ground clearance will be awesome once again, it will still easily clear a milk crate at ride height. It clears one and a half at full droop!!
I can't wait to take her for a drive and see how she steers!!
Thanks for reading.
Smiley 
Last edited by smileyman3000 on Sun Aug 24, 2014 6:24 pm; edited 1 time in total |
|
| Back to top |
|
 |
smileyman3000
Samba Member
Joined: November 07, 2010
Posts: 238
Location: Yeppoon, Australia
|
| Posted: Sun Aug 24, 2014 8:31 am Post subject: |
|
|
I have a bit of a tech query for any Mk I Golf (Rabbit in America?) experts out there.
That rack I am fitting to the Baja is out of a Mk I Golf and I am wondering if there is meant to be anything else holding the rack ends onto the shaft. It's a fine thread and does up tight. Is this all that is done to fit them on or is there a narrow lock nut that goes on the end?
If anyone that has an early Golf knows can you let me know?
Smiley |
|
| Back to top |
|
|
ORANGECRUSHer
Samba Member

Joined: June 09, 2006
Posts: 2663
Location: West Coast (Michigan's)
|
|
| Back to top |
|
|
smileyman3000
Samba Member
Joined: November 07, 2010
Posts: 238
Location: Yeppoon, Australia
|
| Posted: Sun Sep 07, 2014 2:34 am Post subject: |
|
|
Look what I picked up this week. I had always planned to bag the back of the car later done the track. But these came up at a great price so I couldn't pas them up. And I figure that it'll be easier to fit and plumb them now anyway with the rest of the build.
Full droop.
Full bump.
Will keep you posted 
Smiley |
|
| Back to top |
|
|
KrAzY-BaJa
Samba Member
Joined: May 22, 2008
Posts: 1409
Location: Sacramento CA.
|
|
| Back to top |
|
|
winchin73blazinbaja
Samba Member

Joined: June 26, 2014
Posts: 648
Location: Michigan
|
| Posted: Sun Sep 28, 2014 2:01 pm Post subject: |
|
|
| How is Alyce? |
|
| Back to top |
|
|
Vanapplebomb
Samba Member

Joined: November 03, 2010
Posts: 5411
Location: Holland, MI
|
|
| Back to top |
|
|
Brian
Samba Moderator

Joined: May 28, 2012
Posts: 8340
Location: Oceanside
|
|
| Back to top |
|
|
Vanapplebomb
Samba Member
Joined: November 03, 2010
Posts: 5411
Location: Holland, MI
|
|
| Back to top |
|
|
smileyman3000
Samba Member
Joined: November 07, 2010
Posts: 238
Location: Yeppoon, Australia
|
| Posted: Sat Oct 18, 2014 9:31 pm Post subject: |
|
|
All fixed.
Smiley |
|
| Back to top |
|
|
Brian
Samba Moderator
Joined: May 28, 2012
Posts: 8340
Location: Oceanside
|
|
| Back to top |
|
|
smileyman3000
Samba Member
Joined: November 07, 2010
Posts: 238
Location: Yeppoon, Australia
|
| Posted: Mon Jun 22, 2015 3:15 am Post subject: |
|
|
It has been a while. Time for an update, even if it is a small one.
I purchased a dual handle cutting brake. I'm planning to mount the cylinders behind the handbrake and the pivots for the handles directly in front of the handbrake. Then I have to extend the rods only a small amount and they should fit either side of the stock handbrake mount.
Next up I did some work making rack mounts on top of my framehead. I made two clamps that go over the thinnest section of the rack. And then added some flat on the outer sides which extends out to the larger sections to stop the rack sliding side to side in the mount. Then I joined both the sides with a piece of flat across the top.
I also had to make some locknuts for the rack ends by buying the correct thread size of nut and then cutting a piece off.
Then I made another strap to go around one of the stock mounts over the 'gearbox' on the rack.
When I had the body on I measured up and worked out what size of gusset I needed to add to the shock towers. I ended up cooking the bearings while welding things out. But that's ok because I bought new ones. I just slide hammered the old ones out with a cut down washer.
Next port of call was to flip the pan and cut the bottom off the tunnel. I removed the clutch tube as I am going hydraulic. I also ended up removing the accelerator cable tube too as I will replace it.
Ok. Time for something more constructive. Time to fit the lift kit to the pan!
I also drilled the holes in the rear of the lift kit. This is where my aircon hoses and oil cooler lines will come out the back.
Pan all prepped ready for the lift kit.
I took the lift kit and had it sandblasted. Way quicker than trying the clean it up with a grinder. Then I painted it all up with weld through primer.
Fitted it in place. Made sure it was all centred and the welded it out.
Smiley |
|
| Back to top |
|
|
smileyman3000
Samba Member
Joined: November 07, 2010
Posts: 238
Location: Yeppoon, Australia
|
| Posted: Mon Jun 22, 2015 3:57 am Post subject: |
|
|
Next up was seats and seat belt mounts.
I am fitting retracting seatbelts to the car. Where I have put the mounts they tuck inside the C of the lift kit out of the way.
And then onto seat frames. I built square frames with crush tubes for the mount bolts and then welded the mounting nuts to the underside.
And then I built a jig frame to mount the seats at the correct height and angle I wanted. Cause I have an 80mm lift I needed to raise the seats by at least the same amount. I raised the front a little more than the rear too, to get a little more angle back in the seat. Helps stop you sliding off the front in steed hill decents.
These are the outer mounting plates welded into place on the lift kit. The nuts on the back are also welded to aid in assembly.
And there are the ones on the tunnel. The plates have a thread tapped into them But it's only 6mm thick, so I will weld nuts on the inside of the tunnel too, next time it is turned over.
Then you just have to sit the seat frame in place, measure a million things to work out where you want it. And then make 4 legs to mate it to the mounting plates.
Then your seats mount up like so! Of course One had to sit in it and make brrmm brrmmm noises. I also fitted up a gearstick to see what it is like (Bus one)
I am very happy with how they have turned out. Plenty of room underneath. I'm planning to fit sliding drawers underneath to store parts/tools/gear in. They are actually high enough to fit a 20L jerry can under! Not that I plan on carrying additional fuel in such a manner, but it is cool anyway
Alright! Next up is mounting the 5 speed and airbags.
First was the front gearbox mount. I got some longer case bolts and stainless crush tube and started fabbing.
Front mount done! Might be a few more strengthening plates to add but it fits and works well.
Rear mounts were made using some of my old stuff and some new stuff. I have still got to add a bit of angle to make them double shear. Notice I am using the same mount all the way around. That way I only have to carry one spare. I am also going to fit them either side on my engine cradle too. And the 5 speed fits where it was never meant to go!
Bags next. I made clamps to fit them to the trailing arms.
One little snag I ran into was where to run my handbrake cables. Previously I had them run over the top of the trailing arm unlike stock where they are run under. I found that at full droop the trailing arm was pulling on the cable and jagging the brakes a little bit. But I can't run them over the top now cause the bag mount is in the way. How's that old bear hunt saying go? Can't go over them, can't go under them, will have to go through them!! So I drilled a few holes and ran some stout 3mm wall crush tubing through the trailing arms as a new home for the handbrake cables.
Time to throw the body on and make the upper airbag frame.
Also through a wheel on and checked out full compression. As the pan is sitting now is where I plan to have ride height. She's going to be big! Also, plenty of room for 33s now 
That's all for now people. But I will try and keep the progress moving.
Thanks for reading.
Smiley |
|
| Back to top |
|
|
Bashr52
Samba Member

Joined: July 16, 2006
Posts: 5666
Location: On an island in VA
|
| Posted: Mon Jun 22, 2015 5:07 am Post subject: |
|
|
| Looking good! What are your plans for closing off the bottom of the tunnel again? |
|
| Back to top |
|
|
smileyman3000
Samba Member
Joined: November 07, 2010
Posts: 238
Location: Yeppoon, Australia
|
| Posted: Mon Jun 22, 2015 5:09 am Post subject: |
|
|
| Bashr52 wrote: |
| Looking good! What are your plans for closing off the bottom of the tunnel again? |
Weld some checkerplate over it
Smiley |
|
| Back to top |
|
|
HERC
Samba Member
Joined: July 30, 2007
Posts: 1003
Location: Menifee
|
| Posted: Mon Jun 22, 2015 7:38 am Post subject: |
|
|
I don't even know what to say.
It's gonna be fucking bitchin when it's finished. 
_________________
Herc |
|
| Back to top |
|
|
TDCTDI
Samba Advocatus Diaboli

Joined: August 31, 2013
Posts: 12855
Location: North Carolina
|
| Posted: Mon Jun 22, 2015 8:52 am Post subject: |
|
|
| Awesome build, I am totally stealing the rabbit steering rack idea for my build, I have one laying on the floor because it was for an automatic & doesn't have the mounting points for the shift linkage. |
|
| Back to top |
|
|
ORANGECRUSHer
Samba Member
Joined: June 09, 2006
Posts: 2663
Location: West Coast (Michigan's)
|
|
| Back to top |
|
|
dustymojave
Samba Member

Joined: January 07, 2007
Posts: 5802
Location: Lake LA, Mojave Desert, SoCal
|
| Posted: Mon Jun 22, 2015 6:02 pm Post subject: |
|
|
Using an end-load steering rack will produce serious bump steer much worse than stock bug. For hard offroad use, it is also quite weak.
If you insist on using a wrecking yard rack, use a center load rack such as the one for a Chevy Beretta/Corsica. I don't know what equivalent racks are available to the Australian market.
Smileyman has done some nice fab work here, but I can't agree with his choice of rack.
_________________
Richard
Offroading VW based cars since 1965
Tech Inspection 1963 - 2012 SCCA/SCORE/HDRA/MORE/MDR +
Retired from building Bajas, Fiberglass Buggies and Rails in the Mojave Desert. Also Sprints & Midgets, Dry Lakes, Road Race cars. All types New and Vintage
SoCalBajas Member
Kicked Cancer's A$$...1st and 2nd round...Fight ain't over yet. |
|
| Back to top |
|
|
smileyman3000
Samba Member
Joined: November 07, 2010
Posts: 238
Location: Yeppoon, Australia
|
| Posted: Mon Jun 22, 2015 6:21 pm Post subject: |
|
|
I only have 2mm of bumpsteer at the edges of the front tyres in the usable travel range.
I can tell you my stock bug steering had more than that.
All it comes down to is getting that rack in the correct spot.
If I end up breaking it I will just change to something stronger, it's no big deal.
The main reason for the end load though is because space is at a bit of a premium under the front tank. Even with a bodylift I have to find space for the hydraulic clutch M/C, oil cooler, aircon condenser and aircon dryer. Plus fuel lines, oil lines and aircon lines too!
Smiley |
|
| Back to top |
|
|
|


