| Author |
Message |
Rome
Samba Member
Joined: June 02, 2004
Posts: 9640
Location: Pearl River, NY

|
 Posted: Sat Nov 09, 2013 4:12 pm Post subject: Posted: Sat Nov 09, 2013 4:12 pm Post subject: |
 |
|
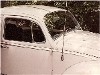
Congratulations! Hey, you should be grinning ear to ear in that first photo!  |
|
| Back to top |
|
 |
EA812
Samba Member
Joined: December 07, 2008
Posts: 1223
Location: North central, CT

|
| Posted: Sun Nov 10, 2013 12:14 pm Post subject: |
|
|
| Rome wrote: |
| Congratulations! Hey, you should be grinning ear to ear in that first photo! |
that's my concentration on driving an old car and taking a photo face:)
found this in the A pillar today. Its probably been there since the late 80s
|
|
| Back to top |
|
|
EA812
Samba Member
Joined: December 07, 2008
Posts: 1223
Location: North central, CT
|
| Posted: Sun Jan 05, 2014 3:34 pm Post subject: |
|
|
I took advantage of todays warm temps of around 20 to 30 degrees and did some work on this. Started making more forward progress on turning this into a daily driver. I installed the replacement trailing arms complete with new German ball joints that I received from latenight aircooled http://www.thesamba.com/vw/classifieds/detail.php?id=650937
|
|
| Back to top |
|
|
EA812
Samba Member
Joined: December 07, 2008
Posts: 1223
Location: North central, CT
|
| Posted: Mon Jan 06, 2014 10:14 am Post subject: |
|
|
Both sides are done now. Due to budget restraints I had to reuse the shocks and sway bar clamps for now. The rubber bushings weren't even cracked. Now the clamps are slathered in anti seize so when I do replace them in the future it will be no problem undoing them.
|
|
| Back to top |
|
|
sportin-wood
Samba Member

Joined: September 12, 2010
Posts: 2006
Location: Texas
|
| Posted: Mon Jan 06, 2014 5:13 pm Post subject: |
|
|
Looking good - thanks for the great pics! They'll come in handy when I do mine!
_________________
.
Paused 66 project bug
.
"Relax, all right? My old man is a television repairman. He's got this ultimate set of tools. I can fix it." --- Jeff Spicoli |
|
| Back to top |
|
|
EA812
Samba Member
Joined: December 07, 2008
Posts: 1223
Location: North central, CT
|
| Posted: Tue Jan 14, 2014 6:42 pm Post subject: |
|
|
Tks, sportin-wood
I should of taken some shots of that red strap at work that you see on the floor. When I first read how to do the trailing arm/ torsion arm replacement in the Bentley I was kind of put off when I saw that special tool they used to separate the arms. (It kind of looks like a jack). I decided to try that red tie down strap by jacking up the lower arm and attaching it to the upper and the shock tower. On one side just letting up on the jack released enough pressure on the camber adjuster. The other side took a little tapping but it came out fine. I originally tore it all apart last summer because when I got the car somebody replaced the passenger side lower ball joint and didnt quit press it in. It wasnt aligned right either so I pressed it out and managed to get it all the way back in. Needless to say getting everything apart this time was a lot less of a job.
|
|
| Back to top |
|
|
EA812
Samba Member
Joined: December 07, 2008
Posts: 1223
Location: North central, CT
|
| Posted: Thu Jan 16, 2014 11:57 am Post subject: |
|
|
Homemade carpeting from material I received with a bumper I bought last year from WW. It came in such a nice bag I had to use it for something!
still fitting it yet.
I'm gonna figure a way to add this into it somehow.
|
|
| Back to top |
|
|
EA812
Samba Member
Joined: December 07, 2008
Posts: 1223
Location: North central, CT
|
| Posted: Thu Jan 16, 2014 12:04 pm Post subject: |
|
|
I took the speed o apart a few months back fixed the burnt out homemade gels it had by swapping in a set from a 68 and later speed O I had. Also reset it to 0 at the time. I put 380 miles on it now
|
|
| Back to top |
|
|
EA812
Samba Member
Joined: December 07, 2008
Posts: 1223
Location: North central, CT
|
| Posted: Fri Feb 21, 2014 10:32 am Post subject: |
|
|
I finally installed some rear seat belts and a better exhaust complete with preheat boxes.
before with my half ass setup burning on the exhaust pipe
after
|
|
| Back to top |
|
|
Beetlebaum
Samba Member
Joined: December 04, 2008
Posts: 2181
Location: Virginia Beach, VA
|
|
| Back to top |
|
|
EA812
Samba Member
Joined: December 07, 2008
Posts: 1223
Location: North central, CT
|
| Posted: Wed Feb 26, 2014 7:54 am Post subject: |
|
|
tks,
I recently upgraded the headlights.
I put in a set of Empi s that I got from Jbugs. They are nice but one had a blown low beam right out of the box. I had a set of old bulb replacements on the shelf so they are working now. |
|
| Back to top |
|
|
EA812
Samba Member
Joined: December 07, 2008
Posts: 1223
Location: North central, CT
|
| Posted: Wed Mar 26, 2014 9:04 am Post subject: |
|
|
Mile 666 on the odometer spelt doom! I started hearing a bearing going from what sounds like the right rear. The bearing noise has probably been there all along but has gotten louder lately and is easer to hear with the new tires. When I had the transaxle out over a year ago I checked them and thought they were good but maybe not or popping them off and back on the axle finished them. I originally took the axle tubes off 2 pull them so I didn't use that home made tool that destroys them on the way out. I was planning on pulling the engine again to retorque the heads and do some wiring so I planned to pull the trans again cause one of the axle tube plates was leaking.
So altogether I took the engine out. Tore it down to a long block. Took the heads off and lapped the cylinders and heads. Cleaned it all up. Reassembled the engine. Torqued the heads, came back and torqued the heads again. Pulled the trans, took the axle tubes off. Replaced the axle bearings. Remember the axle bearings making noise? Replaced the axle seals and resealed the axle tubes to the trans. Rerouted the generator ground wire. Put the trans back in. Fought with the accelerator cable. It got stuck just before coming out. Then reinstalled the engine. I also may have fixed a problem with the carb. The float seemed like it was getting stuck on the gasket that seals the top. I trimmed it and now doesn't seem to have the bad fuel consumption problem.
Then we put 110 miles on the car after just having it all apart the week before.
|
|
| Back to top |
|
|
Rome
Samba Member
Joined: June 02, 2004
Posts: 9640
Location: Pearl River, NY
|
| Posted: Wed Mar 26, 2014 9:29 am Post subject: |
|
|
So it appears as though your bearing replacement and trans work was successful? Great. In your photo of the CVA event, the last 3 Beetles on the right on the other side of the parking lot are all from my good friends in the CT VW scene.
Hope your Beetle works well from now on, so you can drive it to many other meets and outings. |
|
| Back to top |
|
|
EA812
Samba Member
Joined: December 07, 2008
Posts: 1223
Location: North central, CT
|
| Posted: Wed Mar 26, 2014 11:56 am Post subject: |
|
|
Time will tell on the noise from the trans but I think something was up with the rear bearings. there was way more play in the back wheels then now and it was kind of clunking on bumps back there. Other that that the trans shifts nice stays in gear and isn't sloppy between gears. It could still be an issue with the diff or bearings in it but now I really have to listen to hear it. The engine isn't blowing out oil from the heads and cylinders now so I think the retorque idea was the ticket.
Yeah Steve, Bill and Greg are real decent people. Bill helped me out with mounting some tires on wide five rims on the last project, Greg offered some hub caps for A-Bomb and Steve sent me one of his license plate badges. I'm willing to bet money You and I have already met at one of the shows. |
|
| Back to top |
|
|
EA812
Samba Member
Joined: December 07, 2008
Posts: 1223
Location: North central, CT
|
| Posted: Wed Apr 16, 2014 2:45 pm Post subject: |
|
|
Just past 1200 miles since bringing it back to life. If all goes well I'm hoping to turn it into my daily driver by mid summer.
I made some homemade seat covers. Me and the sewing machine had words but they turned out OK.
I fixed the passenger side vent window latch. The piece that held it on was kind of worn so I picked up some slightly bigger pins from Tractor Supply and drilled the lever to fit them and did both sides. Now they are both better.
I also finally trimmed the vent window rubber behind the swoosh. I made a cutting wheel for the dremle and was able to get in there better to grind it down. |
|
| Back to top |
|
|
EA812
Samba Member
Joined: December 07, 2008
Posts: 1223
Location: North central, CT
|
| Posted: Sat Apr 19, 2014 1:18 pm Post subject: |
|
|
| now that we finally got some decent temps I finished the home made carpeting. Just needs a little more trimming on the heater vents. |
|
| Back to top |
|
|
EA812
Samba Member
Joined: December 07, 2008
Posts: 1223
Location: North central, CT
|
| Posted: Mon Apr 28, 2014 6:22 am Post subject: |
|
|
first official show.
|
|
| Back to top |
|
|
EA812
Samba Member
Joined: December 07, 2008
Posts: 1223
Location: North central, CT
|
| Posted: Fri May 09, 2014 8:43 pm Post subject: |
|
|
I put it off long enough and finally rebuilt the carb.
now I need to do some test driving it to see it if helped out. |
|
| Back to top |
|
|
EA812
Samba Member
Joined: December 07, 2008
Posts: 1223
Location: North central, CT
|
| Posted: Mon Jun 16, 2014 9:23 am Post subject: |
|
|
finally finished up the front suspension. After all the work the biggest difference was new shocks.
|
|
| Back to top |
|
|
EA812
Samba Member
Joined: December 07, 2008
Posts: 1223
Location: North central, CT
|
| Posted: Fri Jul 04, 2014 12:30 pm Post subject: |
|
|
When I got the car on the road last year I lost the signal flasher almost immediately. I rigged it so I had to switch the signal on and off then when I got home I put in an old thermal flasher I had. I finally got a new one in from Wolfsburg West that looks like an old 6V but is new solid state 12V electronics. A few fuses later and it now works right. something was wrong with the light in the hazard switch that would blow the fuses. I was running out of fuses so I rigged up some connectors with wire to use modern flat 15Amp fuses so I could figure out the problem. The thermal flasher is still there for a back up if I can remember how to hook it up:)
|
|
| Back to top |
|
|
|


