| Author |
Message |
Dennis_
Samba Member
Joined: November 02, 2009
Posts: 68
Location: The Netherlands

|
 Posted: Tue Dec 25, 2012 5:35 am Post subject: '55 Texas Brown Ragtop "Stronzo" Posted: Tue Dec 25, 2012 5:35 am Post subject: '55 Texas Brown Ragtop "Stronzo" |
 |
|
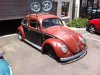
After owning and building several slammed bugs, a '60 and a '57, and a slammed '64 Ghia I decided to step it up a little and finally get the ultimate bug, in my eyes, a 3-fold oval. After a big search across Europe I ended up in Austria, just under Vienna to pick up this '55:
It's original Texas Brown, owned by one family before me, as noted in the original papers of the car, with a photo of it when it was new:
Unfortunately it has been repainted once on the outside. During this repaint it was also updated to newer lights... but nothing I can't fix.
Naturally my friends tried to persuade me to slam it:
But the plans are a little different this time.. I want a stocker with some 36hp oldspeed. The speed part needs to wait, the bug needs a lot of attention.
Started taking it apart with a little help:
Body went of easy, no broken bolts or anything:
The chassis didn't require to much work, I removed the jack up points and got it ready for blasting and epoxy primer:
Got it back in white:
I also send all the small bits to the blaster with the chassis:
First real job was to fix the holes I've made by removing the jack up points:
And weld the jack up points back on.. by doing so eliminating any chances of going really low in the future, a little protection against myself  Jack up points were sand blasted and painted with weld-able primer before fitting them back on: Jack up points were sand blasted and painted with weld-able primer before fitting them back on:
Primed it again, sanded it down and got a pro to paint the chassis black:
And the finished product for now:
More updates to come. If you see anything that isn't correct for a '55 please let me know, I will try to fix it.
_________________
http://www.facebook.com/BugpeopleNL
'55 Texas Brown ragtop
'59 Diamond Grey ragtop |
|
| Back to top |
|
 |
Jon65
Samba Member

Joined: September 29, 2012
Posts: 2417
|
| Posted: Tue Dec 25, 2012 7:21 am Post subject: |
|
|
Awesome. Good job. 
Can't wait to see more of the build. |
|
| Back to top |
|
|
ovalshark
Samba Member

Joined: December 26, 2001
Posts: 265
Location: Caldwell, Idaho
|
| Posted: Tue Dec 25, 2012 7:25 am Post subject: texas brown |
|
|
| This one is going to be nice! Super nice car, super nice work. |
|
| Back to top |
|
|
Laplander
Samba Member
Joined: June 06, 2002
Posts: 13
|
| Posted: Tue Dec 25, 2012 10:55 am Post subject: |
|
|
| This is going to look killer when done!! |
|
| Back to top |
|
|
OvalinAz
Samba Mini Tech
Joined: June 09, 2009
Posts: 1076
Location: AZ
|
|
| Back to top |
|
|
stale air
Samba Member

Joined: August 23, 2007
Posts: 5148
Location: Senoia Ga, formally NorCal
|
| Posted: Tue Dec 25, 2012 1:40 pm Post subject: |
|
|
Wow, great start! Nice to see your gunna keep it bone stock.
I look forward to seeing the rest of the build. 
_________________
WANTED: Henry Veale Santa Rosa plate frames
WANTED: Brittsan Motors Fresno plate frames
WANTED: Any Georgia plate frames
|
|
| Back to top |
|
|
D-train
Samba Member

Joined: January 08, 2007
Posts: 1455
|
| Posted: Tue Dec 25, 2012 4:59 pm Post subject: |
|
|
It's awesome, respray or keep it ratty?
_________________
shiny paint doesnt make it worth any more |
|
| Back to top |
|
|
Emiel
Samba Member

Joined: June 12, 2004
Posts: 120
Location: the netherlands
|
|
| Back to top |
|
|
Dennis_
Samba Member
Joined: November 02, 2009
Posts: 68
Location: The Netherlands
|
| Posted: Wed Dec 26, 2012 3:52 am Post subject: |
|
|
Thanks guys
| OvalinAz wrote: |
Im all for slamming oval's, but it's good to see one that's not
looking forward to updates on this one! i love the oldspeed type builds! |
Been there, my '57:
| D-train wrote: |
| It's awesome, respray or keep it ratty? |
The car has some rust issues , I will need to repaint it completely.. I did start with removing some paint with a chemical paint stripper to remove as much as possible before sending it for blasting. On the rear quarters I went back to original paint, on the roof it went back to original primer..
The shell requires some welding because it was stored in a barn that wasn't completely watertight, so water went past the wind seals and rotted the doors, the A-pillars and one of the heater channels behind the running board. Horror pic:
I've send the doors of to a restorer, together with some very nice lower pieces from Virtanen:
I have all-ready got the doors back, after these photo's the doors have been blasted, primed and sanded. But I haven't got any photo's of them finished at the moment.
_________________
http://www.facebook.com/BugpeopleNL
'55 Texas Brown ragtop
'59 Diamond Grey ragtop |
|
| Back to top |
|
|
Emiel
Samba Member
Joined: June 12, 2004
Posts: 120
Location: the netherlands
|
|
| Back to top |
|
|
Keith
Samba Member

Joined: August 15, 2005
Posts: 3634
Location: Brodheadsville, PA
|
| Posted: Wed Dec 26, 2012 10:21 am Post subject: |
|
|
| Emiel wrote: |
Are you leaving the outside doorskin welds like that ??
It is hard but best way is weld it all tight ,front to back . |
Reread the last paragraph of his last post and you will find the answer to your question.
_________________
Formerly known in the forums as "OVALTEEN"
"I firmly believe that some villagers from Botswana could probably build a better road than PennDot."- Splitty
"If you do anything to your car someone will hate on you for it. People absolutely love to complain and find fault with others. Don't let it bother you. Just live and have fun."- Lind |
|
| Back to top |
|
|
left_coast*9
Samba Member

Joined: March 02, 2009
Posts: 740
Location: Puyallup, WA
|
|
| Back to top |
|
|
Rich's 50
Samba Member
Joined: February 18, 2004
Posts: 10781
Location: San Diego, CA
|
| Posted: Wed Dec 26, 2012 8:45 pm Post subject: |
|
|
Looking forward to this one and im glad your keeping this one stock  |
|
| Back to top |
|
|
Dennis_
Samba Member
Joined: November 02, 2009
Posts: 68
Location: The Netherlands
|
| Posted: Thu Dec 27, 2012 6:45 am Post subject: |
|
|
| left_coast*9 wrote: |
| Incredible work man! You obviously have some friends with experience, or you are an experienced body man yourself! So how long between your purchase of the car to the progress you show above?? |
Got the car in September, but progress is slow. I will try to catch up a little here, because more work has already been done. I've already started work on the gearbox, cleaned it, checked the gears and put some new bearings in:
Nice to see everything is date correct:
I'm now waiting for my bolts and nuts to return from plating, to remount the axle tubes.
Meanwhile I've put the engine on the test stand, attached a temporary exhaust to it for testing.
Does it make sense that my big nut engine doesn't have a clip for the oil filler? Also it doesn't have the strap over air filter, but a later style, with 2 stickers.
But the dating is correct 
Same goes for the og paint deck lid, with a small spring, but according to progressive refinements I should have a big spring deck lid... My chassis code is 1-08776564.. any thought on that one?
_________________
http://www.facebook.com/BugpeopleNL
'55 Texas Brown ragtop
'59 Diamond Grey ragtop |
|
| Back to top |
|
|
Dennis_
Samba Member
Joined: November 02, 2009
Posts: 68
Location: The Netherlands
|
| Posted: Thu May 16, 2013 4:52 am Post subject: |
|
|
Finally some news, after finishing my new daily '59(http://tinyurl.com/bamboobimbo) it is time to get back to the oval. Supply of correct Funky green heater channels is slow to Europe, but I finally managed to get a set, not 100% correct, but switching the heater outlet shouldn't be much of a problem.
Looks perfect!
Slight difference between stock, the green stuff and Hooky's closing plates:
Time to get moving again and make them fit
_________________
http://www.facebook.com/BugpeopleNL
'55 Texas Brown ragtop
'59 Diamond Grey ragtop |
|
| Back to top |
|
|
aa390392
Samba Member
Joined: March 28, 2007
Posts: 3602
Location: So.Cal
|
| Posted: Sun Aug 25, 2013 9:37 am Post subject: |
|
|
I wonder what happened to this project?
_________________
.
getting grumpy & less tolerant!
55 ragtop
56 delux sedan
56 Kabriolet |
|
| Back to top |
|
|
Dennis_
Samba Member
Joined: November 02, 2009
Posts: 68
Location: The Netherlands
|
| Posted: Tue Jul 22, 2014 2:37 am Post subject: |
|
|
Very little progress over the last year, but pulled it out of storage and dropped it of at the welders place, I will let the pictures do the talking:
Front hood repair:
Blasted and epoxy coated:
Tank support, no massive issues on first sight:
Other side:
Sheet metal behind the tank, so kindly removed by the previous owner:
Repairing the rear apron:
Ready for blasting:
Getting ready to be joined with the new heater channels:
_________________
http://www.facebook.com/BugpeopleNL
'55 Texas Brown ragtop
'59 Diamond Grey ragtop |
|
| Back to top |
|
|
54ovsemi
Samba Member

Joined: April 15, 2008
Posts: 1818
|
| Posted: Tue Jul 22, 2014 3:52 pm Post subject: |
|
|
sweetness
_________________
2013 Jetta
2009 Rabbit
2006 GLI
1955 Semaphore Oval |
|
| Back to top |
|
|
63Ragtop NZ
Samba Member
Joined: December 04, 2007
Posts: 895
Location: West Auckland
|
| Posted: Tue Jul 22, 2014 7:45 pm Post subject: |
|
|
green-ness!
_________________
If you can't join them, beat them! |
|
| Back to top |
|
|
Dennis_
Samba Member
Joined: November 02, 2009
Posts: 68
Location: The Netherlands
|
| Posted: Mon Nov 03, 2014 2:34 am Post subject: |
|
|
More metalwork done:
Fitting the body on the heater channels:
New heater channel to dash hoses:
Making sure that the new NOS doors fit:
Almost like the old days:
Nice rear quarter from Mika
Attached the A pillar
Front quarter welded in:
Fixed an old repair, back to original:
Repaired front firewall back in:
Also got the other part of the firewall back in, welding done! So back to the garage:
Next, building the pan..
_________________
http://www.facebook.com/BugpeopleNL
'55 Texas Brown ragtop
'59 Diamond Grey ragtop |
|
| Back to top |
|
|
|


