| Author |
Message |
JeffL
Samba Member

Joined: September 04, 2004
Posts: 1370

|
 Posted: Sun Jun 15, 2014 6:50 pm Post subject: Posted: Sun Jun 15, 2014 6:50 pm Post subject: |
 |
|
Great photos!
These are from the grand daughter of George Lippincott at NicLSilver. She went through some of her moms items and had gues what..... pictures of my Alken that I am restoring. The Red paint looked quite nice. These are the first color photos I have seen of the car.
Those are Alken Fiberglass seats. They were long gone when I got the car. It looks like some volt and ammeter gauges under the dash. These are all from the same photo.
I am just amazed at how much information is still out there some 56 years later.
_________________
http://karmannghias.org/
https://karmannghias.org/GAlken/index.html |
|
| Back to top |
|
 |
0nebadbug
Samba Member

Joined: October 01, 2009
Posts: 1087
Location: Rockford, Illinois
|
|
| Back to top |
|
|
Jacks
Samba Member
Joined: July 15, 2006
Posts: 2348
Location: San Clemente, Ca.
|
| Posted: Sun Jun 15, 2014 11:48 pm Post subject: |
|
|
Nice photos  I guess the empty hole in the dash is where the un-needed fuel gauge would have been I guess the empty hole in the dash is where the un-needed fuel gauge would have been
_________________
Jack Staggs
Actual name |
|
| Back to top |
|
|
JeffL
Samba Member
Joined: September 04, 2004
Posts: 1370
|
| Posted: Mon Jun 16, 2014 3:52 am Post subject: |
|
|
| Jacks wrote: |
| Nice photos I guess the empty hole in the dash is where the un-needed fuel gauge would have been |
I would think so. In this picture of the dash from the other Alken test mule it had some type of large volt meter. Maybe it failed or they liked the square meters better. The hole in my dash was larger than a standard VDO gauge, I had to close it up, so might might have started out with this larger round volt meter too.
The hand brake was cool. Just two big pieces of copper bus. When you opened it the electrical circuit from the batteries was cut, must have drawn a good arc.
_________________
http://karmannghias.org/
https://karmannghias.org/GAlken/index.html |
|
| Back to top |
|
|
JeffL
Samba Member
Joined: September 04, 2004
Posts: 1370
|
| Posted: Thu Jun 19, 2014 5:35 pm Post subject: 1958 Alken first Road Test and Video |
|
|
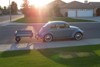
Had some fun this evening. This is the first time I have had the Alken on an official road under power. We will be approaching the 2 year mark when I got the car in September of 2012.
It ran great. The front tire rubbed some so I will have to raise the avis adjusters a little to clear. Other than that the three passes down the test track went well.
Sorry about the shots of my grass in the video, we didn't communicate well with the film crew.
Link
Link
_________________
http://karmannghias.org/
https://karmannghias.org/GAlken/index.html |
|
| Back to top |
|
|
0nebadbug
Samba Member
Joined: October 01, 2009
Posts: 1087
Location: Rockford, Illinois
|
|
| Back to top |
|
|
luvtheeluvbug
Samba Member

Joined: January 06, 2013
Posts: 288
Location: Sonora, Ca
|
| Posted: Fri Jun 20, 2014 9:34 pm Post subject: |
|
|
| 0nebadbug wrote: |
The first road test is always fun..  |
And nerve racking!
_________________
Fahrvergnugen/ far-fair-gnu-ghen/ Description of a pleasurable sensation experienced when a car and it's driver are in mutual harmony; A unique driving experience; Pleasure; Satisfaction; A feeling experienced by Volkswagen drivers. |
|
| Back to top |
|
|
JeffL
Samba Member
Joined: September 04, 2004
Posts: 1370
|
| Posted: Sat Jun 28, 2014 12:55 pm Post subject: |
|
|
Made it down to the paint store today to drop off my steering wheel to get it color matched. I will do all of the interior metal in that color.
Before pulling the body again I adjusted the right height once more. On the maiden voyage the front tires could rub on the fender arch. I took the avis adjusters up two clicks and it looks very balanced to the back. Even when I put the spare, tank, gas and me in it the clearance should be fine. The top of the door was level in this stance.
Picked up some more primer and now I will take everything off the body and start working on the exterior.
_________________
http://karmannghias.org/
https://karmannghias.org/GAlken/index.html |
|
| Back to top |
|
|
luvtheeluvbug
Samba Member
Joined: January 06, 2013
Posts: 288
Location: Sonora, Ca
|
| Posted: Sat Jun 28, 2014 9:12 pm Post subject: |
|
|
Can't wait to see the finished product! Color?
_________________
Fahrvergnugen/ far-fair-gnu-ghen/ Description of a pleasurable sensation experienced when a car and it's driver are in mutual harmony; A unique driving experience; Pleasure; Satisfaction; A feeling experienced by Volkswagen drivers. |
|
| Back to top |
|
|
JeffL
Samba Member
Joined: September 04, 2004
Posts: 1370
|
| Posted: Mon Jun 30, 2014 3:40 pm Post subject: |
|
|
Still thinking Azure Blue.
Went to tear down the Alken and realized that I did not finish out the luggage area or back seat. Made a trip to Lowe's and picked up some lumber and plexiglass.
I needed the plexiglass to cover the opening that accesses the bolts for the hinges. You can see this panel behind the driver seat in the side wall and the clear plexiglass piece is installed. It is pretty strong and flexible and worked fine. Need some smaller screws for the final installed.
The rear area will be a padded bottom, simple in design but it will include and arch behind each seat. Cutting it off flush and straight looked a little too bland. I hope I left enough room for the fabric and carpet since I need to remove this to get at the battery. In the photos the seat is the whole way back.
July 1, I stained the back area in case any shows through after upholstery.
This level of the rear luggage aread will be a good transition from carpet to vinyl or leather.
_________________
http://karmannghias.org/
https://karmannghias.org/GAlken/index.html
Last edited by JeffL on Tue Jul 01, 2014 1:31 pm; edited 1 time in total |
|
| Back to top |
|
|
Suboval
Samba Member
Joined: September 15, 2003
Posts: 794
|
| Posted: Tue Jul 01, 2014 7:59 am Post subject: |
|
|
Looking good!
_________________
It all works on paper.
There's two things we learn from history:
1.) History repeats itself.
2.) We don't learn from history. |
|
| Back to top |
|
|
JeffL
Samba Member
Joined: September 04, 2004
Posts: 1370
|
| Posted: Tue Jul 01, 2014 1:29 pm Post subject: |
|
|
More work today, I took off this week.
Got the rear luggage area stained, put the photo above.
More items. I did buy a front hinge but want to mount part of it with screws. I found at Ace some hardware that is a screw with a nut that is a barrel and the screw can come through it. It looks like a rivet on the nut side.
This will work but I believe I will still need rivets for the top part of the hood. Tonight I will glass in the front part of the hood where some of the old bonding/filler came loose.
_________________
http://karmannghias.org/
https://karmannghias.org/GAlken/index.html |
|
| Back to top |
|
|
Jacks
Samba Member
Joined: July 15, 2006
Posts: 2348
Location: San Clemente, Ca.
|
| Posted: Tue Jul 01, 2014 3:54 pm Post subject: |
|
|
Looks good! Since your car has nearly all 356 drivetrain, have you considered 356 gauges, set up speedster style?
_________________
Jack Staggs
Actual name |
|
| Back to top |
|
|
JeffL
Samba Member
Joined: September 04, 2004
Posts: 1370
|
| Posted: Tue Jul 01, 2014 5:12 pm Post subject: |
|
|
| Jacks wrote: |
| Looks good! Since your car has nearly all 356 drivetrain, have you considered 356 gauges, set up speedster style? |
Well, yes, but..... When I first got the car I had a 58 Ghia Speedo. They are unique with a white needle and chrome hub. I sent it out to be reconditioned and had matching VDO gauges made with chrome hubs and the same font. I couldn't resist because how much I liked early Ghias. When I got the 356 drive line the guages were alread completed.
I do like the 356 ignition the guy kept with his drums, trans and engine from his rusted out 356 in the 70s.
I will paint the column, knobs, shift and ebrake the same color as the steering wheel.
_________________
http://karmannghias.org/
https://karmannghias.org/GAlken/index.html |
|
| Back to top |
|
|
luvtheeluvbug
Samba Member
Joined: January 06, 2013
Posts: 288
Location: Sonora, Ca
|
| Posted: Tue Jul 01, 2014 9:18 pm Post subject: |
|
|
Did I mention I love cream interiors? Color of seats?
_________________
Fahrvergnugen/ far-fair-gnu-ghen/ Description of a pleasurable sensation experienced when a car and it's driver are in mutual harmony; A unique driving experience; Pleasure; Satisfaction; A feeling experienced by Volkswagen drivers. |
|
| Back to top |
|
|
JeffL
Samba Member
Joined: September 04, 2004
Posts: 1370
|
| Posted: Wed Jul 02, 2014 4:56 am Post subject: |
|
|
[quote="luvtheeluvbug"]Did I mention I love cream interiors? Color of seats?[/quote
The color of the cover was a cream so I am looking at that or a tan. The origianl door cards were a light color like the canvas cover.
_________________
http://karmannghias.org/
https://karmannghias.org/GAlken/index.html |
|
| Back to top |
|
|
JeffL
Samba Member
Joined: September 04, 2004
Posts: 1370
|
| Posted: Wed Jul 02, 2014 5:13 am Post subject: |
|
|
Finally picked up a front Ghia sway bar so I don't have to bore all those searching for early Ghia parts anymore. It was not what I expected in comparison to s Beetle bar.
In this photo the early Ghia bar is positioned on top of an early 60s Beetle bar. They extend forward the same distance. I expected the Ghia to be tucked in closer to the beam. Here the hoops on the Ghia sway bar are to allow you to still get at the bolts on the beam since the Ghia bar tucks up into the body more. I guess this way you would not see if from looking underneath as easy as a Beetle. The bar does seem to be a smaller diameter but the batteries are out in my calipers.
In early Alken write ups they talk about switching the gas tank opening to the center, lowering the rear, lowering the steering column and using a Ghia drop arm, and installing a Ghia sway bar. Check, Check, Check and Check.
My son's friend did a nice power coat job. I went with white to match the white shocks.
_________________
http://karmannghias.org/
https://karmannghias.org/GAlken/index.html
Last edited by JeffL on Tue Jul 08, 2014 5:15 pm; edited 1 time in total |
|
| Back to top |
|
|
JeffL
Samba Member
Joined: September 04, 2004
Posts: 1370
|
| Posted: Tue Jul 08, 2014 5:08 pm Post subject: |
|
|
Small gains are important.
Got the hinge mounted. I did not want to use rivets to put it on the hood but in the end that was the best approach. I needed to do it now to assure all of the placment and sanding was the best. This will require me to mask it off during final paint.
There is an original hood prop that came with the car made of brass but I just used a dowel rod today. Next I worked on carving out some of the spider cracks and filling with the same epoxy used to build the panels. This will take some time.
The hood closed great on the gas tank with modified center filler. This was the first time I could actually open and close the hood!
I shortened the dolly that holds the body about 6 inches to made sanding easier. It was much easier too for me to step over the rocker and enter the cockpit space.
_________________
http://karmannghias.org/
https://karmannghias.org/GAlken/index.html |
|
| Back to top |
|
|
JeffL
Samba Member
Joined: September 04, 2004
Posts: 1370
|
| Posted: Wed Jul 09, 2014 6:36 pm Post subject: |
|
|
Have you ever had your hood cable break?
To help avoid this I decided to install a dome light. There was a NOS 56 Ghia dome light that I had so I used it. My goal was to install it under the dash aligned with the front hood latch. This way if, if the cable ever broke or got out of alignment I could easily access the opening behind the dome light and open the hood. I'd hate to be at a show or need gas and have no way into the front hood. Just planning ahead. In the second photo you can see the light spot below the latch.
I'll have to make an Alken manual and list that as an emergency access.
The latch is actuall a 356 Porsche latch. The used one on the front and rear because the are pretty easy to mount. I got the hood to close and latch and I worked on the alignment which was quite good for fiberglass (57 years old).
_________________
http://karmannghias.org/
https://karmannghias.org/GAlken/index.html |
|
| Back to top |
|
|
luvtheeluvbug
Samba Member
Joined: January 06, 2013
Posts: 288
Location: Sonora, Ca
|
| Posted: Mon Sep 01, 2014 8:24 pm Post subject: |
|
|
Any progress?
_________________
Fahrvergnugen/ far-fair-gnu-ghen/ Description of a pleasurable sensation experienced when a car and it's driver are in mutual harmony; A unique driving experience; Pleasure; Satisfaction; A feeling experienced by Volkswagen drivers. |
|
| Back to top |
|
|
|


.JPG "Image may have been reduced in size. Click image to view fullscreen.")


