| Author |
Message |
NewTechnicIan
Samba Member

Joined: May 28, 2013
Posts: 367
Location: Burlington, VT

|
 Posted: Wed Jul 27, 2016 8:38 am Post subject: Re: 73 Rolling Creamsicle Posted: Wed Jul 27, 2016 8:38 am Post subject: Re: 73 Rolling Creamsicle |
 |
|
As Carol was working on installing the interior, we were also working on wet sanding the paint. I had a guy paint the car last year and unfortunately, he really didn't do a great job, especially in leaving me enough clear coat to sand out the orange peel. So before we got too far, I fixed some of the more major issues with the car, like some burn through on the roof and on the rear quarter panels. I had a buddy's gun which is really just a Home Depot jobby, so it did OK, but not great on the repairs. So I just ran 6 coats of clear on everything so I know I can sand out my issues! 
And I guess I've learned my lesson, I tried to get a deal and I got one but now I have to go back and fix it all the time. I was bummed when the thing got painted that I won't be able to say I've done everything on this car, but I guess now I can still say it!
_________________
My 73 Standard build - It's painted! It drives under its own power! Time to get it wired and upholstered!
My 1679 Engine build. |
|
| Back to top |
|
 |
NewTechnicIan
Samba Member
Joined: May 28, 2013
Posts: 367
Location: Burlington, VT
|
| Posted: Wed Jul 27, 2016 8:50 am Post subject: Re: 73 Rolling Creamsicle |
|
|
I've been working on wiring the car while we've been working on the interior too. I'm almost done at this point though I'm waiting on one piece of the steering wheel harness that I must have thrown away years ago 
Should be here tomorrow though and then I'll go through and check everything 2-3 more times before attaching it to the battery and seeing if my switched and relays still work. The car came to me as a basket case so I never tried out the electrical system. I really should have but of course I was in a hurry back then, just like now
A few adjustments that I made while I was wiring - I know I have an internally regulated alternator that I'm installing so I needed to change the connections below the rear seat, which a lot of people do. Here was the most helpful diagram I found for making the changes I needed:
You can see it talks about a 3-way splice for the battery +, the alternator feedback B+, and the power to the dash. My wiring harness had 1 ring connector and 2 spade connectors so I made a splice out of some copper piping that would bring them all together:
Feel free to criticize, I think this will work OK. I did cover it in electrical tape to make sure it didn't contact anything back there.
A few other things - my 73 wiring harness was made for 73 taillights, but I like the 68-72 taillights better so I got those and hooked them up. It looks like the older harness had a screw-in ground (shown in pictures) but since mine was a spade connector I snipped a spade connector out of the piece and made my own ground. Again, I'm opening up myself to criticism and this is just what I did. No need to follow, and if it was real dumb, someone please chime in.
One last thing, while I was cleaning up my engine bay for welding repairs way back when, the wire wheel ended up destroying the double ground connection on the passenger side that the license light and tail light plug into. I had some spade connectors laying around that I attached with sheet metal screws and I'm hoping that works pretty well as an ad hoc ground. You can see the added ground in the engine bay photo here:
_________________
My 73 Standard build - It's painted! It drives under its own power! Time to get it wired and upholstered!
My 1679 Engine build. |
|
| Back to top |
|
|
NewTechnicIan
Samba Member
Joined: May 28, 2013
Posts: 367
Location: Burlington, VT
|
| Posted: Wed Jul 27, 2016 9:16 am Post subject: Re: 73 Rolling Creamsicle |
|
|
So our Interior Kit came from SewFine! Carol was super excited about working on it so we took a break from the car for a day to put a seat together.
There's a lot of tutorials about redoing the seats and it's actually pretty self explanatory as you're doing it, we got the pre made foam inserts for the seats as well, looking to make our lives easier. Talking to the people from Sew Fine they said to use a dry cleaner bag when we install the seat back and we did that. It definitely helped although we didn't try it without one first.
Anyway, here's some pics! Tearing stuff down!
And a bit of cool history, these seats still had their tags from the german factory. We left them on for fun:
Pictures of the final product with a lovely lady:
One thing we discovered on the driver seat was that some springs were broken:
Looking into this, we found that welding wouldn't work because this stuff was spring tempered steel which just gets brittle when welded, so we used crimpers for fencing to reattach the springs and keep moving:
_________________
My 73 Standard build - It's painted! It drives under its own power! Time to get it wired and upholstered!
My 1679 Engine build. |
|
| Back to top |
|
|
57BLITZ
Samba Member

Joined: June 12, 2012
Posts: 2385
Location: DEEK - U.S.A.
|
| Posted: Wed Jul 27, 2016 11:16 am Post subject: Re: 73 Rolling Creamsicle |
|
|
| NewTechnicIan wrote: |
. . . we used crimpers for fencing to reattach the springs . . .
|
I like that . . . excellent idea! 
_________________
Jesucristo es mi Señor y Salvador! |
|
| Back to top |
|
|
Chochobeef
Samba Member
Joined: May 01, 2013
Posts: 811
Location: Ft. Worth, Texas
|
| Posted: Wed Jul 27, 2016 12:14 pm Post subject: Re: 73 Rolling Creamsicle |
|
|
If your going to do your wiring right, do it right.
That isn't right. You should go buy another 2 dollar, 2 to 1 spade connector with sheathing like VW used. I see you used them in the back with the taillights. Use one for your alt/batt/fuse connection. Will be safer, and easy to work with and not mess with nasty electrical tape. (also, I would put on a new connector on the battery connection. That nasty, rusty one doesn't deserve to be there on your build)
Just my 2 cents with all the work you've done, I would hate to see you half ass a cheap part. Keep up the good work, your progress and perseverance will be rewarded in the end. |
|
| Back to top |
|
|
plotch
Samba Member

Joined: December 22, 2004
Posts: 540
Location: jeffersonville, vermont
|
| Posted: Wed Jul 27, 2016 6:10 pm Post subject: Re: 73 Rolling Creamsicle |
|
|
| That sucks about the paint. The seat covers clash with the exterior colors. Just kidding. See you at Wolfsgart. |
|
| Back to top |
|
|
NewTechnicIan
Samba Member
Joined: May 28, 2013
Posts: 367
Location: Burlington, VT
|
| Posted: Thu Jul 28, 2016 7:05 am Post subject: Re: 73 Rolling Creamsicle |
|
|
chochobeef,
Fair enough. I'm going out to the local parts yard tomorrow to scour for a bunch of small stuff anyway. I'll look for the right connection. Is it actually bigger than the normal 4-way busses? because the terminal ends on these wires are so big that they're bigger than the normal spade connections. That was part of my reason for making my own splice.
Plotch, Here's hoping! We're hard at work on the thing and I'm losing sleep every night thinking about how much more there is to do, so I'd say we're right on schedule! 
_________________
My 73 Standard build - It's painted! It drives under its own power! Time to get it wired and upholstered!
My 1679 Engine build. |
|
| Back to top |
|
|
TX-73
Samba Member

Joined: January 04, 2013
Posts: 1133
Location: Texas
|
| Posted: Thu Jul 28, 2016 8:03 am Post subject: Re: 73 Rolling Creamsicle |
|
|
NT, also taking you to task about the wiring  Dump the electrical tape mess - you can easily install a proper single post connector for the 3 wires. Change the spade connectors to ring terminals if needed and IMO solder terminal ends to the wiring. I understand the factory did the crimp ends but I'm not a factory and I want to ensure a secure wiring connection. Dump the electrical tape mess - you can easily install a proper single post connector for the 3 wires. Change the spade connectors to ring terminals if needed and IMO solder terminal ends to the wiring. I understand the factory did the crimp ends but I'm not a factory and I want to ensure a secure wiring connection.
In the case of your connector, I used a circuit breaker instead that provided not only the basic connectivity, but also gave a means for protecting the downstream wiring/circuit.
Wiring from the battery is also through a main circuit breaker, I also added a starter relay (usually called a hard start relay).
BTW that color combo you've got is outstanding.
_________________
My 1973 Standard Beetle Build SOLD
Click to view image
Last edited by TX-73 on Thu Jul 28, 2016 11:32 am; edited 1 time in total |
|
| Back to top |
|
|
Chochobeef
Samba Member
Joined: May 01, 2013
Posts: 811
Location: Ft. Worth, Texas
|
| Posted: Thu Jul 28, 2016 9:13 am Post subject: Re: 73 Rolling Creamsicle |
|
|
| NewTechnicIan wrote: |
chochobeef,
Fair enough. I'm going out to the local parts yard tomorrow to scour for a bunch of small stuff anyway. I'll look for the right connection. Is it actually bigger than the normal 4-way busses? because the terminal ends on these wires are so big that they're bigger than the normal spade connections. That was part of my reason for making my own splice. |
You can always replace the ends if they are not the right size. Again the one from the battery is nasty and should be replaced. This way you can get to good wire, solder the connection and heatshrink it.
TX-73 has a nice wiring layout as well. His thread has tons of great information and pictures ( a great help to my project as well).
I feel, if your going to do your project up nice, don't skimp on the little things even if no one will ever see it once complete. I hope my post didn't come across rude, as I merely wanted to encourage you to make everything you touch look good and work properly without looking half-a$$ed. I don't want to see your effort wasted or have something go wrong because of a simple item. |
|
| Back to top |
|
|
NewTechnicIan
Samba Member
Joined: May 28, 2013
Posts: 367
Location: Burlington, VT
|
|
| Back to top |
|
|
Beetlebaum
Samba Member
Joined: December 04, 2008
Posts: 2181
Location: Virginia Beach, VA
|
|
| Back to top |
|
|
NewTechnicIan
Samba Member
Joined: May 28, 2013
Posts: 367
Location: Burlington, VT
|
|
| Back to top |
|
|
evillrdnikon
Samba Member
Joined: February 26, 2014
Posts: 180
Location: Las Vegas
|
| Posted: Fri May 12, 2017 10:44 am Post subject: Re: 73 Rolling Creamsicle |
|
|
| Hey nice build! I have a 1973 Standard beetle I JUST got back from paint. I am doing my sound proofing right now and soon to have the interior worked on. Keep it up! Whats the progress at now? I have a bunch of pictures and video I have been taking, but i have not started my build thread yet. I will though maybe this weekend after I upload my photos to the samba! |
|
| Back to top |
|
|
Buggeee
Samba Member

Joined: December 22, 2016
Posts: 4419
Location: Stuck in Ohio
|
| Posted: Fri May 12, 2017 11:34 am Post subject: Re: 73 Rolling Creamsicle |
|
|
| NewTechnicIan wrote: |
However, no Death Foam! And I'm looking pretty solid on the luggage tray |
Ian, I have read your thread for the first time and it is UNREAL!!! How in the world??? Why in the world??? No Way!.....WAY.....No Way....WAY! Why didn't anyone stop you from doing this? PHENOM.
"However, no Death Foam" and the luggage tray is pretty solid!!! I am literally laughing out loud right now wondering how I am going to play this off to the co-workers.... Gotta go.
Beyond perfect color!!
EDIT: OUTRAGEOUSLY SUCCESSFUL BUILD BEYOND ANY IMAGINED REALM OF POSSIBILITY FROM THE DIMENSION OF THE UNIVERSE I AM LIVING IN OVER HERE. I have to ask, how many moons are there in your part of the Galaxy?
_________________
1966 Sportsmobile Camper https://www.thesamba.com/vw/forum/viewtopic.php?t=...mp;start=0
72 Super Duper http://www.thesamba.com/vw/forum/viewtopic.php?t=672387
(adopted out) 61 Turkis Pile https://www.thesamba.com/vw/forum/viewtopic.php?t=728764
| SnowDaySyncro wrote: |
| Every setback is an opportunity to learn stuff and to buy new tools. |
|
|
| Back to top |
|
|
Asleep@thewheel
Samba Member
Joined: December 13, 2015
Posts: 68
Location: Ridin' with Bob
|
| Posted: Sun Jun 18, 2017 12:07 pm Post subject: Re: 73 Rolling Creamsicle |
|
|
| where is this now? complete yet? |
|
| Back to top |
|
|
NewTechnicIan
Samba Member
Joined: May 28, 2013
Posts: 367
Location: Burlington, VT
|
| Posted: Mon Jun 19, 2017 6:41 am Post subject: Re: 73 Rolling Creamsicle |
|
|
Hi all,
evillrdnikon, I gotta check out your build, sounds like you're where i was last year around this time. It goes fast after that, it's crazy what you can get done when you're putting parts on the car instead of just welding and sanding all day!
Buggeee, wow thanks so much for your compliments. I have to laugh thinking about this project pretty much daily because if I had known what I was getting into, I would have run away from the car on day 1 but it was the project I wanted in the end. It gave me an education that I can't be happier for and now when I'm broken down on the side of the road, I know every bolt on the thing so I can generally bet on what's wrong.
But seriously, I got chills reading your compliments. I still have a ton to learn and it may not be perfect but I'm proud of the build as it's finally coming together.
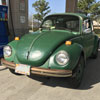
Asleep@thewheel, I need to update this so bad! I've made a ton of progress and I'm driving the thing! I have so many pictures I need to dig back through and put up some updates on, it's just so hard when I can just go out and drive it instead 
_________________
My 73 Standard build - It's painted! It drives under its own power! Time to get it wired and upholstered!
My 1679 Engine build. |
|
| Back to top |
|
|
alfascott
Samba Member
Joined: July 04, 2017
Posts: 2
Location: Georgia
|
| Posted: Wed Jul 05, 2017 7:49 am Post subject: Re: 73 Rolling Creamsicle |
|
|
I appreciate the responses. I have done some research into welding magnesium and it is similar to welding aluminum as long as you use the correct filler rod (and be wary that magnesium can burn). I am going to try welding up the corrosion and see how it turns out.
Thanks,
Scott |
|
| Back to top |
|
|
NewTechnicIan
Samba Member
Joined: May 28, 2013
Posts: 367
Location: Burlington, VT
|
| Posted: Wed Jul 05, 2017 8:03 am Post subject: Re: 73 Rolling Creamsicle |
|
|
Hi Scott, did you respond to the correct thread here? Just making sure.
But! Yeah I didn't have enough experience welding, certainly not aluminum or magnesium, to try fixing my engine case with anything except the JBweld I used - so I'll see how that holds up over time. The engine has about 400 miles on it now and seems to be running well and minimal leaking, mostly through the oil sump studs.
Another thing I've heard about welding magnesium from the engines forum is that you'll want to get the engine case real hot ahead of time so that you're closer to the welding temp you'll be working with - it's supposed to make it easier for the welded metal to stick and make a complete weld. Hope that helps direct your research!
_________________
My 73 Standard build - It's painted! It drives under its own power! Time to get it wired and upholstered!
My 1679 Engine build. |
|
| Back to top |
|
|
plotch
Samba Member
Joined: December 22, 2004
Posts: 540
Location: jeffersonville, vermont
|
| Posted: Sat Jul 08, 2017 4:05 pm Post subject: Re: 73 Rolling Creamsicle |
|
|
| Ian, see you at wolfsgart! It looks really good. Blinky. |
|
| Back to top |
|
|
NewTechnicIan
Samba Member
Joined: May 28, 2013
Posts: 367
Location: Burlington, VT
|
| Posted: Thu Jul 13, 2017 5:22 am Post subject: Re: 73 Rolling Creamsicle |
|
|
OK, so I'm gonna do some big photo dumps to get you caught up to last summer
Headliner Padding:
That gray padding was all included in the Sewfine kit.
We added some extra padding above the doors to make it a bit more plush there, shown in greenish/blue - It worked well although it's harder to find screw holes for the grab handles and sunvisors
We used Lowe's carpet padding, the same stuff we'd eventually go on to pad the floor with.
_________________
My 73 Standard build - It's painted! It drives under its own power! Time to get it wired and upholstered!
My 1679 Engine build. |
|
| Back to top |
|
|
|


