| Author |
Message |
megalania
Samba Member
Joined: July 23, 2009
Posts: 52
Location: Melbourne

|
 Posted: Thu Aug 01, 2013 4:24 am Post subject: Aussie 56 -actually 57 -more pics 08-02-2013 Posted: Thu Aug 01, 2013 4:24 am Post subject: Aussie 56 -actually 57 -more pics 08-02-2013 |
 |
|
Howdy gents,
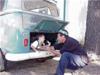
after a post on a local forum I decided to bite the bullet and splash the cash on the oval posted for sale on Ebay. Well it arrived today while I was in the countryside for work. I got home and snapped a couple of pics.
The first thing I noticed was the photo in the ad showed it as a bluey turqiose colour but when I got home its a little different (sorry for the crappy pics)
So pumped to finally have an oval. there is a little more rust than the seller said there was but it looks pretty solid.
The interior is pretty good, I think I will have to look into period correct parts as I dont think the steering wheel is correct.
Here is your usual manufacture plate photo
Last registered a while ago
The seller chucked in an engine. said it was a 36hp. Doesn't turn but I am going to take a fellow forum members advice and buy a bottle of wd40 and pour it in and see if I can free it up. When I first looked at the engine I thought "something is wrong with this picture" ....
So tomorrow i have a day off work and will clean the garage so I can get this baby in there and start looking at freeing up the engine.
Last edited by megalania on Fri Aug 02, 2013 2:49 am; edited 2 times in total |
|
| Back to top |
|
 |
Schwing
Samba Member

Joined: May 10, 2009
Posts: 2506
Location: Centreville, MD
|
| Posted: Thu Aug 01, 2013 11:18 am Post subject: |
|
|
A see a lot of cool stuff on that oval. Original blue seats, Dehne fuel gauge, dual visors, dash grab handle, door pulls, etc.
Definitely a 36er and that accessory bolted to the generator is an odd one! I wonder if that's some type of ac compressor that worked off the fan belt? It almost looks like you can't even get to the oil fill but the pic must be playing tricks on my eyes. That fan shroud screams later 36hp due to the square stamp which might make it a 58 or later motor.
To get that motor running you are definitely missing some things at first glance - coil, regulator, fan belt, fuel lines, pre-heat missing on intake, etc. Doesn't look like a runner to me and I'm not sure I'd chance it if she really sat for 20 years. Hey man you never know right.
Good luck, great car!
_________________
Shadetree Westy
http://www.thesamba.com/vw/forum/viewtopic.php?t=657279&highlight=
Single Cab - BBXXVII Long Distance Winner
https://www.thesamba.com/vw/forum/viewtopic.php?t=...mp;start=0 |
|
| Back to top |
|
|
vwsonmybrain
Samba Member

Joined: March 21, 2007
Posts: 702
Location: Oregon
|
| Posted: Thu Aug 01, 2013 11:50 am Post subject: |
|
|
I bet the "engine accessory" is an added alternator to either "fix" a failed original generator or to "upgrade" it to 12 volt.
Very cool car, though. Congrats! |
|
| Back to top |
|
|
Kjell Roar
Samba Member

Joined: December 08, 2008
Posts: 1326
Location: Norway
|
| Posted: Thu Aug 01, 2013 3:26 pm Post subject: |
|
|
Looks like a nice car 
Do the car got the original floorpan? The heater outlets are for a 57 or later.
_________________
I got a historic car, every scratch got a history...
My car, Aug. 4th, 1955 / an early 56: http://www.thesamba.com/vw/forum/album_page.php?pic_id=610438 |
|
| Back to top |
|
|
megalania
Samba Member
Joined: July 23, 2009
Posts: 52
Location: Melbourne
|
| Posted: Fri Aug 02, 2013 2:31 am Post subject: |
|
|
Ok, more pics of the car but first I am a little confused by the chassis number. The way I read it it corresponds to Jan 1957 not 56 but I could be wrong. The number below the back seat on the tunnel is 1431356. Perhaps someone could school me on the way to read these numbers. (i referred to the samba list)
Ok pics. First few are of the interior. All the door cars are there except for the drivers side, but the winder is present but on the floor loose.
The headliner is mint, and not original I am guessing. Don't know where it was stored but there are moth cocoons everywhere.
The carpet kit doesn't seem to be right but will do for a while
A photo of the passenger door pull for people who were wondering about it
Photo of the inside of the drivers side door. Pretty chewed out but more than salvagable
The accessory VDO gauge cluster. Don't think VWs came with toyota radios either haha
Original glovebox liner as well
I was worried when I saw the trunk liner as in the past it has hidden butt loads of rust
However this time ...its all mickey mouse
The tank looks solid as but there is some rust under the hood seal and in the spare wheel well
Now the rusty areas. The drivers side jacking point and back end of the heater channel are screwed. However the front of it was pretty solid
The battery tray (drivers side) and passenger foot well are toast and will have to be changed in time. The second pic the carpet is rolled up
I havent checked the passenger side yet but it isn't as bad
I found this in the drivers side door
I also noticed some cool stickers and bits on the car so here they are
So plans now are to collect bits, clean the garage, pull the engine out and get her on the road |
|
| Back to top |
|
|
Kjell Roar
Samba Member
Joined: December 08, 2008
Posts: 1326
Location: Norway
|
| Posted: Fri Aug 02, 2013 2:36 am Post subject: |
|
|
| megalania wrote: |
Ok, more pics of the car but first I am a little confused by the chassis number. The way I read it it corresponds to Jan 1957 not 56 but I could be wrong. The number below the back seat on the tunnel is 1431356. Perhaps someone could school me on the way to read these numbers. (i referred to the samba list)
|
It is a february 57 chassis number
The numbers in the list, is the last produced each month.
_________________
I got a historic car, every scratch got a history...
My car, Aug. 4th, 1955 / an early 56: http://www.thesamba.com/vw/forum/album_page.php?pic_id=610438 |
|
| Back to top |
|
|
Thomas Pedigo
Samba Member

Joined: July 03, 2010
Posts: 1052
Location: Nine Mile Falls/Sunset Bay,WA
|
| Posted: Fri Aug 02, 2013 5:24 am Post subject: |
|
|
What's the "MKA" on your body stamp#?
Very cool accessories on the oval... (especially the guage cluster).
Perhaps the steering wheel is a '60 only?
Those initialed knobs are cool too.
_________________
Defying conventional wisdom since 1970 |
|
| Back to top |
|
|
henry roberts
Samba Member

Joined: February 24, 2003
Posts: 1276
Location: australia
|
| Posted: Fri Aug 02, 2013 6:47 am Post subject: |
|
|
it is a CKD kit assembled by martin and king in melbourne. they used the body numbers MKA ******
I like it a lot. the colour is heaps better than those awful pics in the add. |
|
| Back to top |
|
|
Blue Baron
VW Aficionado

Joined: June 16, 2006
Posts: 24131
Location: Southeast USA
|
| Posted: Sat Aug 03, 2013 6:13 pm Post subject: |
|
|
| Thomas Pedigo wrote: |
| Those initialed knobs are cool too. |
I agree. I haven't seen those before.
|
|
| Back to top |
|
|
megalania
Samba Member
Joined: July 23, 2009
Posts: 52
Location: Melbourne
|
| Posted: Sun Aug 04, 2013 6:00 am Post subject: |
|
|
Ok, so after catching up with some fellow dubbers for coffee, I went home and got fired up to rip the engine out.
Before anything I had to remove the alternator as it was going to catch on the rear apron no matter what I did. So it came off and the engine was removed. Here she is just after she was taken out. The engine number puts it as an April/May 1960 36hp.
As you can see there are quite a few bits missing. The next pic shows that the alternator bracket was actually welded to the generator!
28 PICT will be replaced with a 28PCI when I find one as I want to be able to use the manual choke
Fuel pump all greased up, although a little degraded
Here is the donk with most of the add on items off and so far only one broken bolt. FYI the jetski jack is a godsend compared to a trolley jack. THis photo was taken just after I took off the 3 & 4 cover and a huge huntsman crawled out. Screamed like a girl
First side - covered in dead beatles, dirt, fluff, mud and wasps nests
The other side pretty much the same
Next I took off the rocker covers and this is what I found. Better than I thought and the good thing I found was the engine had heaps of oil in it so atleast she wasn't seized
The other side. both are 36hp heads
The moment of truth. 27mm socket on the fan pulley and.......she turns and has compression. Granted they didnt move super smooth as there was water in the heads but its better than having a seized block
At a better height to work on
New clutch and flywheel are in order as some of the teeth are chewed pretty bad
The engine bay is super tidy so I am happy with that
Lastly I had a close look at the guards. something seems wrong
Thats all for now. next the fuel tank and the brakes |
|
| Back to top |
|
|
56 VDUB
Samba Member

Joined: May 28, 2013
Posts: 121
Location: Sydney, Australia.
|
| Posted: Sun Aug 04, 2013 9:27 pm Post subject: |
|
|
Hey, I remember seeing that on eBay Australia about 5 or 6 months ago right? I saw about 3 questions on there of people asking if the seller would sell the VDO motor meter separate LOL! 
_________________
.
My 1956 RHD Aussie Beetle ll (o\!/o) ll
Sydney, Australia |
|
| Back to top |
|
|
gt1953
Samba Member
Joined: May 08, 2002
Posts: 13848
Location: White Mountains Arizona
|
| Posted: Mon Aug 05, 2013 7:16 pm Post subject: |
|
|
Good Golly that engine appears as if it was outside and wet. Lot of rustosis syndrome. Best of luck with it!
_________________
Volkswagen: We tune what we drive.
Numbers Matching VW's are getting harder to find. Source out the most Stock vehicle and keep that way. You will be glad you did.
72 type 1
72 Squareback
({59 Euro bug, 62, 63, 67, 68, 69, 73 type ones 68 & 69 type two, 68 Ghia all sold}) |
|
| Back to top |
|
|
kuta
Samba Member

Joined: June 08, 2012
Posts: 95
Location: Melbourne, Australia
|
| Posted: Tue Apr 22, 2014 2:28 am Post subject: |
|
|
| Any more progress? I think that colour is Summer Blue. Awesome. |
|
| Back to top |
|
|
Aussie63
Samba Member
Joined: January 11, 2012
Posts: 51
Location: UK
|
|
| Back to top |
|
|
megalania
Samba Member
Joined: July 23, 2009
Posts: 52
Location: Melbourne
|
| Posted: Thu Apr 24, 2014 3:26 pm Post subject: |
|
|
So I havent posted for a while so here is a long post to show what progress I have made, which is unfortunately not alot 
I decided to pull the engine that I received with the car apart to see if it was salvageable. I have never torn an engine apart and it was a good experience.
I started pulling the heads off and found that they werent coming as easy as i thought. Some of the head bolts (I think they are called that) stayed in the case and others came out with the nut so that was my first concern.
Now I watched a few youtube vids on how to remove the head and did as they said and jiggled, wiggled, shook and pulled and the head would budge even though all the nuts were removed. It still wouldn't budge so I started gently tapping the head with a mallet, and i mean gentle. Next thing I see are the fins are just breaking off with the slightest touch. after a number of broken fins I had enough and went hard at it and ended up having to hackshaw of the head as one of the bolts had rusted so bad that it had expanded and closed the whole off.
The pistons look pretty crappy you can see the expanded and rusted bolt (second one o the top)
I then started on the other side. Same shit different smell with the same result
I then removed the sump cover and was confronted with two things - a completely clogged filter and a nice large pool of old oil and lots of water. lots and lots of water. I looked inside the case and its all corroded.
So looks like its a throw away unfortunately. But it was a freebie so atleast it didnt cost me anything.
Next, I decided to do a little work on the bug. Got the flywheel off and started to split the case. It came apart pretty easy which was good.
Now I have basically shit all understanding about cases and internal components so I don't know if this is the piece de resistance or the piece of shit
The other half
There seems to be some corrosion? on the inner top of the case. It was hard to remove. Basically had to scratch it off. Is this caused by the water being in the case?
The internals. No idea if any of this is any good
If you guys could guide me on the usability of the parts that would be greatly appreciated.
Next i started wire brushing the underside of the body (by hand as I blew up my power drill ). The results were encouraging with not much rust being found. There is a couple small holes in the bumper support. Looks like the PO cared about keeping it solid as there is still a nice thick layer of black mastic protecting the body.
The passenger side heater outlet has a bit of work needed and so does the heater channel. The good thing is the rusted channel doesn't spread to the front. Its not the best photo but the second one shows a small rusted section underneath where the body seal goes.
Havent brushed the rear apron yet but doesn't seem to be too bad. I think the lip needs to be pushed in a bit though.
THe underside of the luggage bay seems nice and solid
And lastly one of the guards I need to fix. It doesn't need to be perfect so I think its hammer and dolly time
So slowly slowly getting there. I need to decide whether to source someone to weld some stuff for me or just buy a welder and give it a crack myself. Also decided to replace the wiring with a new harness. Keep it 6 volt or convert to 12?
so I unwrapped the tarp off the pan and found some water sitting on the pan. Not too happy with that so I decided to take off the beam and gear box to help reduce the weight and make it easier to move around.
The beam took a bit of work to get free as the four bolts holding it to the frame head were so rusted, however a bit of penetrene and some serious muscle I got them off.
Quite a bit of grease but not too bad. Next was the rear end. That was much easier to get loose and detached. FIngers crossed the gearbox is useable.
So finally I turned the pan on its side. As you can see there is a bit of rust (as stated earlier) so will have to sort it out
sorry for the blurry phone pic
and as always another paper wasp nest
Next step is to fix the rust and work on the beam. clean it up and add some new disc brakes. Will keep you peeps updated |
|
| Back to top |
|
|
megalania
Samba Member
Joined: July 23, 2009
Posts: 52
Location: Melbourne
|
| Posted: Sat Apr 26, 2014 1:01 am Post subject: |
|
|
So decided to strip the front end. It came apart pretty easy except for a tough bolt on the steering box.
As you can see it had the standard amount of grease and crap on it
I decided to use a bit of degreaser and a wire wheel on the grinder. The beam came up trumps
Gave it a spray with rattle can primer to protect it until I decide what to do with it.
Next was the pan. So a new wire wheel was purchased and I went to town on it.
Pretty solid up the front but swiss cheese down the back, but this was expected. Next was the drivers side rear. Hmm much worse.
Once again rattle can primer was applied to stop the surface rust. Next is to finish the drivers side and see what I will need to buy in regards to replacement panels
|
|
| Back to top |
|
|
D-train
Samba Member

Joined: January 08, 2007
Posts: 1455
|
| Posted: Sat Apr 26, 2014 2:03 am Post subject: |
|
|
i may have the correct missing door trim for u.
_________________
shiny paint doesnt make it worth any more |
|
| Back to top |
|
|
Last Triumph
Samba Member

Joined: October 10, 2006
Posts: 914
Location: Wirral, United Kingdom
|
| Posted: Sat Apr 26, 2014 10:04 am Post subject: |
|
|
Personally, I'd be replacing both those pans with Gerson items.
Good luck with the build. |
|
| Back to top |
|
|
megalania
Samba Member
Joined: July 23, 2009
Posts: 52
Location: Melbourne
|
| Posted: Sat Apr 26, 2014 2:29 pm Post subject: |
|
|
| I'm going to clean them up first and see how much rust there is. I will then get what I need and I think I will only need a half pan on the passenger side and probable a full one on the drivers side. I just want to keep as much original steel as possible |
|
| Back to top |
|
|
Foxy
Samba Member
Joined: June 10, 2003
Posts: 379
Location: Birmingham , UK
|
|
| Back to top |
|
|
|


