| Author |
Message |
andymccauley
Samba Member
Joined: August 17, 2013
Posts: 41
Location: Portland OR

|
 Posted: Sun Feb 09, 2014 11:48 am Post subject: Posted: Sun Feb 09, 2014 11:48 am Post subject: |
 |
|
| driverlost wrote: |
 Nice score & work progress. Sorry about the vert. Nice score & work progress. Sorry about the vert.
My son & I put this together and he took it to SoWo in 2012 before he went active duty Marines. Has the CIS with a 2.0 16V
Hope to do an ABA on my Vanagon soon but I'm doing an ABA lower JH head upper for my Corrado now tying up the shop. |
i want to find some 8" wide wheels at some point was actually going to go look at some 7x15s the day that axle broke but after that i couldnt afford them.
Some day I want to build a turbo ready ABA with a 2.0 16v head and adapt everything to ODBII, Ive read a couple write ups on it but it needs to be built from the ground up. Alot of work for that project. some day though. |
|
| Back to top |
|
 |
andymccauley
Samba Member
Joined: August 17, 2013
Posts: 41
Location: Portland OR
|
| Posted: Tue Mar 18, 2014 8:14 pm Post subject: |
|
|
360 degree LEDs from superbrightleds, Just for runners in the headlight housings. Also installed some NEW corner/signal housing I ordered off eBay, quality of them wasnt to bad.
|
|
| Back to top |
|
|
andymccauley
Samba Member
Joined: August 17, 2013
Posts: 41
Location: Portland OR
|
| Posted: Sun Jun 15, 2014 9:10 pm Post subject: |
|
|
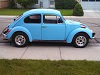
Lil German love 
I have been having this weird issue with fuel pushing its way up the filler neck after sitting for a few minutes either after short drives or just randomly. It doesnt happen all the time but its just very odd. Im guessing fuel accumulator, but thats just a guess. |
|
| Back to top |
|
|
ps2375
Samba Member
Joined: April 24, 2014
Posts: 2471
Location: Meridian,ID
|
| Posted: Sun Jun 15, 2014 9:20 pm Post subject: |
|
|
| Accumulator is not big enough to to push that much volume up the filler. I'd look else where for the cause. |
|
| Back to top |
|
|
andymccauley
Samba Member
Joined: August 17, 2013
Posts: 41
Location: Portland OR
|
| Posted: Sun Aug 31, 2014 8:35 pm Post subject: |
|
|
Ive had some other replies on different forums that it could either be the gas cap or the gravity valve, but those are impossible to find new.
Fresh wash n wax today. 
And hanging at 2 Skanks Garage a few weeks ago with the homies up in Battleground WA.
|
|
| Back to top |
|
|
andymccauley
Samba Member
Joined: August 17, 2013
Posts: 41
Location: Portland OR
|
| Posted: Fri Sep 26, 2014 11:26 am Post subject: |
|
|
Sooooooo I picked up some Corrado rear seats the other day for $50 that are pretty clean and will match my interior very well. After not doing any research before I bought them and then searching for a few hours for write ups all I have found is posts describing how it is too hard and not worth it... I may be the first to make a right up on this.
After finding some pictures and articles of these seats being mounted in mk2s, a few ideas came to me. I set the seats in the car for a mock up and after I take some measurements I think this will be pretty straight forward. |
|
| Back to top |
|
|
andymccauley
Samba Member
Joined: August 17, 2013
Posts: 41
Location: Portland OR
|
| Posted: Sat Sep 27, 2014 3:31 pm Post subject: |
|
|
Alright here we go..
First off I used the rear parcel shelf bracket to hold the seat backs together for now so I could take some measurements and get an idea or what I was gunna need.
Set everthing in for some more measuring made a little sketch of what i needed and hit the hardware store. Got a bolt that was too short and they didnt have some of the stuff i needed so Im headed to another bigger store in a lil bit. 
Also the each side has a pretty large gap compared to the Original seats.
Now my plan is to make a bracket that bolts to the seatbelt receiver bolts in the center of car that then bolts to the seat backs. I haven't figured out what i want to do with the seat bottoms yet but I might build a frame that wraps around the outside of the seat bottoms to hold them in place. I may end up trimming some foam off the bottom of the seats or pull the carpet up off the rear bench and glue it to the foam. |
|
| Back to top |
|
|
andymccauley
Samba Member
Joined: August 17, 2013
Posts: 41
Location: Portland OR
|
| Posted: Sun Oct 05, 2014 7:06 pm Post subject: |
|
|
So I extended the top seat anchors. Using a metal cutting utensil AKA Hacksaw and my Trusty foot for a vice on the curb since I have pretty much nowhere to fabricate things up here in Portland at my Apt. I drive to Astoria for major modifications Needless to say my Cuts werent very straight but will work for what I need them to do, actually they fit somewhat better and clear the plastic shelves.
Outside view
The bracket I made with my D!ck and my Teeth, AKA a drill and my hands. I fashioned out of a 1/8" steel flat bar that is 4X14" I shouldve got like 14 1/2" but made it work. Found some bolts that worked at Vancouver Bolt, they gave me the wrong size the first time I went there and didnt feel like going back in that day even though I was just outside of the store when I checked them lol. And some random 3x2" 90 Brackets that I bent fit. I want to Build some other extensions to mount the outer bottom Posts of the seat back but Im not worried about it now.
Made 2 small incisions on each side of the bench to cover the seat bottom foam. Kinda ghetto and I used some "Industrial Strength" Velcro to adhere the seat bottoms to the bench but it either didnt stick to the foam and or the bench but will work for now til I figure something else out.
|
|
| Back to top |
|
|
|


