| Author |
Message |
Donnie strickland
Samba Member
Joined: December 21, 2009
Posts: 2403
Location: Moody, AL

|
 Posted: Mon Apr 14, 2014 7:29 am Post subject: Posted: Mon Apr 14, 2014 7:29 am Post subject: |
 |
|
Coil and oil pressure light wiring would be the same. The generator/regulator wiring is going to be different, since the 66 Bug harness will be set up for a regulator on top of the generator, and likely won't have wiring for reverse lights since those weren't standard on 66 Bugs.
Check the wiring diagrams for a 66 Bug and a 71 Squareback (the 72 diagrams aren't as easy to read, and the 71 diagram will be the same for your purposes). You won't need the wiring for the electric choke or the electromagnetic fuel shut-off valve, since you're running dual carbs.
Actually, a 67 Bug harness might have been better, because the regulator was not mounted on the generator like on a 66. Can you change your order? If not it's no big deal; you'll just have to figure out a place to mount a regulator.
_________________
71 Elm Green FI A/T Squareback |
|
| Back to top |
|
 |
grandpa pete
Samba Member

Joined: July 06, 2008
Posts: 6426
Location: St. Petersburg, FL
|
| Posted: Mon Apr 14, 2014 7:43 am Post subject: |
|
|
While we are on the subject of wiring..........
Should I be leaning towards an alternator conversion ? I have been reading posts on expensive 3 cylinder GEO alternators and / or smashing engine tins to fit other styles ...... Is the original generator that bad ?..........Where are you guys on this subject ?????
NOTE : With Bobnotch's help I found a ful flo plug on the bottom of the block so oil cooler and filter are options to decide on .
_________________
63 two fold rag
66 sedan delivery Type 6
http://www.thesamba.com/vw/forum/viewtopic.php?t=569619&highlight=sedan+delivery |
|
| Back to top |
|
|
Donnie strickland
Samba Member
Joined: December 21, 2009
Posts: 2403
Location: Moody, AL
|
| Posted: Mon Apr 14, 2014 10:06 am Post subject: |
|
|
There's nothing wrong with Type 3 generators; internally they're the same as a Bug generator. The guys on the Type 3 forum who are doing alternator conversions, are needing more amps because of aftermarket add-ons like stereos, amps, etc.
(By the way, I noticed in your engine pictures that your generator is not lined up correctly. There should be a line on the generator body, and a dot on the hold-down strap. These should be lined up. The Type 3 generator has a hole in the side, which gets air from the fan housing to cool the generator. This is different from the brush holes. This hole should be sitting right on top of the housing. When lined up correctly, your generator connections will be over to the left.)
_________________
71 Elm Green FI A/T Squareback |
|
| Back to top |
|
|
grandpa pete
Samba Member
Joined: July 06, 2008
Posts: 6426
Location: St. Petersburg, FL
|
| Posted: Thu Apr 17, 2014 5:37 pm Post subject: |
|
|
...Thanks Donnie for the heads up on the generator position.....
Took off the split bus louvers yesterday.... 
.Cut and fit Type 3 engine hatch cover to fit my application..it was 1 1/2 inches too long
Went to a shop with a metal shear/brake and cut and bent peices of sheetmetal to finish securing Type 3 engine deck into back of "bus" and other pieces to complete interior sheeting .....progress 
_________________
63 two fold rag
66 sedan delivery Type 6
http://www.thesamba.com/vw/forum/viewtopic.php?t=569619&highlight=sedan+delivery
Last edited by grandpa pete on Thu Apr 17, 2014 9:24 pm; edited 1 time in total |
|
| Back to top |
|
|
johnnypan
Samba Member

Joined: October 24, 2007
Posts: 7431
Location: sackamenna
|
| Posted: Thu Apr 17, 2014 5:49 pm Post subject: |
|
|
| The reason automotive manufacturers went from the generator to the alternator is the alternators smooth current and voltage stability,all of your electrical components,from bulbs to switches to horns will last longer,point/coil ignitions will perform better,and your battery life will be extended from running an alternator....why honor such a project with a generator? |
|
| Back to top |
|
|
Donnie strickland
Samba Member
Joined: December 21, 2009
Posts: 2403
Location: Moody, AL
|
| Posted: Thu Apr 17, 2014 7:15 pm Post subject: |
|
|
| grandpa pete wrote: |
| Cut and fit Type 3 engine hatch cover to fit my application..it was1 1/2 inches too long |
Better too long than too short!
Any pics?
_________________
71 Elm Green FI A/T Squareback |
|
| Back to top |
|
|
grandpa pete
Samba Member
Joined: July 06, 2008
Posts: 6426
Location: St. Petersburg, FL
|
| Posted: Thu Apr 17, 2014 9:14 pm Post subject: |
|
|
johnnypan : great info ; thanks...My " budget $$$ " says ; If the generator is working when I get the engine installed/running then I will use it.....If the generator is no good then helpful info like yours will convince me to go to an alternator..
Donnie ; Pictures when it's finished with the removeable rear panel 
Maby 
_________________
63 two fold rag
66 sedan delivery Type 6
http://www.thesamba.com/vw/forum/viewtopic.php?t=569619&highlight=sedan+delivery |
|
| Back to top |
|
|
Bobnotch
Samba Member

Joined: July 06, 2003
Posts: 22428
Location: Kimball, Mi
|
| Posted: Fri Apr 18, 2014 6:32 am Post subject: |
|
|
| grandpa pete wrote: |
...Thanks Donnie for the heads up on the generator position.....
Took off the split bus louvers yesterday....
.Cut and fit Type 3 engine hatch cover to fit my application..it was 1 1/2 inches too long
Went to a shop with a metal shear/brake and cut and bent peices of sheetmetal to finish securing Type 3 engine deck into back of "bus" and other pieces to complete interior sheeting .....progress |
Sounds like you're finding a little time to get the rear floor in place. That'll help you work on getting everything to fit like you want. I wouldn't weld anything in solid, until I've test fitted eveything a couple of times. I only say that, as it's easier to cut tack welds than full welds.
_________________
Bob 65 Notch S with Sunroof
71 Notch ...aka Krunchy; build pics here;
http://www.thesamba.com/vw/forum/viewtopic.php?t=249390 -been busy working
64 T-34 Ghia...aka Wolfie, under construction... http://www.thesamba.com/vw/forum/viewtopic.php?t=412120
| Tram wrote: |
| "Friends are God's way of apologizing for relatives." |
| Tram wrote: |
| People keep confusing "restored" and "restroyed". |
|
|
| Back to top |
|
|
grandpa pete
Samba Member
Joined: July 06, 2008
Posts: 6426
Location: St. Petersburg, FL
|
| Posted: Fri Apr 18, 2014 4:49 pm Post subject: |
|
|
| Donnie strickland wrote: |
[quote=
Any pics? |
I thought about this for a while and decided some people might not know how to make their own panels.................
sssssooooooo here you are ( blame Donnie This was his idea )
Last photos were of an engine with no deck over it....
I ended up cuttig the Type3 deck into 3 pieces to get it in the back
Then I cut 1 1/2 inches out of the deck hatch to get the back door to close
Now comes the tricky stuff....Joining the Tpe3 engine deck to the " bus " section of the vehicle with 20 guage hand made pieces
ALWAYS WEAR SAFETY SHIELD OR SAFETY GOGGLES WHEN WORKING WITH TOOLS
First photo of the gaps in the rear passenger corner where the pieces don't meet...[.Silver paint on type3 parts ]...{ hole in outside panel where I removed Split Bus vents }
In order to get a piece of metal to fit I am Going to make a paper patern first
Then tape the pattern onto a "pre bent " "pre cut" piece of 20 guage . I measured all the pieces I needed and took them to a shop that has a metal cutter and bender . I ended up cutting and bending 16 pieces
Cut out the piece you need...I use a 4 1/2 inch dewalt metal grinder with a cut off blade for most of my cutting ( something I learned watching Orange County Choppers on TV )
The finished patch has welding tabs on the ends and a lip on the side to plug weld to the outer bus panel
NOW..the pattern can be flipped over and adjusted for the other side
The large flat side panels are more of a measure and mark ; on the metal You can see how I got the wheel arch by measuring down from the shelf level every inch....once I got the wheel arch it was transferred to the other side AND to the front half of the interior side pieces
This will give you an idea of what the final welded in pieces will look like
Remember these panels will be covered with a Fat Mat sound deadener and carpet , They don't have to be perfect
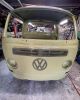
It takes A LOT of tools to do this type project.....A dry garage keeps moisture off the virgin metal[URL=http://s1202.photobucket.com/user/peterdandrews/media/IMG_0483_zps287002a0.jpg.html]
I also made several structural support pieces to join the body sections together under the deck...Aditional pieces were made to join the Type3 deck to the bug floor "under the rear seat " area...
Tomorrow I start welding  .......AND welding ...........And welding .......AND welding ...........And welding
_________________
63 two fold rag
66 sedan delivery Type 6
http://www.thesamba.com/vw/forum/viewtopic.php?t=569619&highlight=sedan+delivery
Last edited by grandpa pete on Sun Apr 20, 2014 9:08 pm; edited 11 times in total |
|
| Back to top |
|
|
babysnakes
Samba Member
Joined: August 19, 2008
Posts: 7107
|
| Posted: Fri Apr 18, 2014 5:24 pm Post subject: |
|
|
| Pete, your patience is admirable. I am truly digging this build! |
|
| Back to top |
|
|
johnnypan
Samba Member
Joined: October 24, 2007
Posts: 7431
Location: sackamenna
|
| Posted: Fri Apr 18, 2014 5:40 pm Post subject: |
|
|
two t's in pattern,you should know how to spell it..damn shame the two of you didn't figure this out till now,it works on the exterior as well..in fact if you made by pattern and cut gussets for your subframe you'd be golden..gussets provide strength to a welded joint..
the red pieces are called gussets,they spread the load.. |
|
| Back to top |
|
|
Donnie strickland
Samba Member
Joined: December 21, 2009
Posts: 2403
Location: Moody, AL
|
|
| Back to top |
|
|
grandpa pete
Samba Member
Joined: July 06, 2008
Posts: 6426
Location: St. Petersburg, FL
|
|
| Back to top |
|
|
Bobnotch
Samba Member
Joined: July 06, 2003
Posts: 22428
Location: Kimball, Mi
|
| Posted: Sun Apr 20, 2014 8:20 pm Post subject: |
|
|
| grandpa pete wrote: |
I ended up cutting the Type3 deck into 3 pieces to get it in the back
Then I cut 1 1/2 inches out of the deck hatch to get the back door to close
This will give you an idea of what the final welded in pieces will look like
I also made several structural support pieces to join the body sections together under the deck...Aditional pieces were made to join the Type3 deck to the bug floor "under the rear seat " area...
Tomorrow I start welding .......AND welding ...........And welding |
That looks great. I see you split the floor in half to make it easier to get it inside. Hopefully it won't be too hard to weld back up. I probably would've pulled the passenger door off and loaded it in sideways, but that's me, as I hate grinding. At first I didn't understand why you cut the hatch down, but now that I'm looking at everything I see why you did (not enough sedan delivery for the floor piece). I still think you could have left the bus vents in place, since you're already part way there to building the top of the new ductwork. All you'd need to do then, would've been to fab the bottom half from that other part you have, and then set it up with the lower door assembly with the cooling boot in the middle. You could have even made that section removable with a handful of screws, then it would even make pulling the engine easier. You're definitely gaining on it.
As for cutting tools, my main #1 tool is a 4 1/2 inch Dewalt grinder with a 6 inch .040 thick Metabo metal cutting blade on it. Cuts thru most everything nice and quick. I actually like it better than my sawzall, but then I use it more often for "precision cutting". After it and my sawzall, comes my mini 90* angle grinder (air powered). Those are almost a must for doing any kind of fab work.  Keep up the good work, I'll drop in and see how things are going from time to time. Keep up the good work, I'll drop in and see how things are going from time to time.
_________________
Bob 65 Notch S with Sunroof
71 Notch ...aka Krunchy; build pics here;
http://www.thesamba.com/vw/forum/viewtopic.php?t=249390 -been busy working
64 T-34 Ghia...aka Wolfie, under construction... http://www.thesamba.com/vw/forum/viewtopic.php?t=412120
| Tram wrote: |
| "Friends are God's way of apologizing for relatives." |
| Tram wrote: |
| People keep confusing "restored" and "restroyed". |
|
|
| Back to top |
|
|
Bobnotch
Samba Member
Joined: July 06, 2003
Posts: 22428
Location: Kimball, Mi
|
| Posted: Sun Apr 20, 2014 8:37 pm Post subject: |
|
|
| johnnypan wrote: |
two t's in pattern,you should know how to spell it..damn shame the two of you didn't figure this out till now,it works on the exterior as well..in fact if you made by pattern and cut gussets for your subframe you'd be golden..gussets provide strength to a welded joint..
the red pieces are called gussets,they spread the load.. |
WOW the spelling police came in to write a ticket. Never mind the fanstatic do it yourself fab work going on. Damn shame you ain't got nuthin better to do than bust his balls.  Hell, I hope I'm still that active with doing fabrication work when I'm 70. And yes, I'm getting there, but it's still a long way off for me. Hell, I hope I'm still that active with doing fabrication work when I'm 70. And yes, I'm getting there, but it's still a long way off for me.
You California people are really something. Most of you guys would rather scrap a car with a hole about the size of a silver dollar (a real old silver dollar, not this slightly larger than a quarter crap), rather than try and fix it. I've seen it enough times over the years I've been on the Samba. You should see what us "salt belt" guys do to fix stuff. What grandpa pete is doing only gets you into the front door of some of the rusty stuff I've worked on in the last 20 years.
Go crawl back into your bottle and find something else to do rather than give the guy a hard time. It's HIS car afterall, and he CAN do anything he wants with it. He probably knows what he's getting into, and maybe he's trying to help some of the younger guys here who have never even thought of trying to weld 2 pieces of metal together before. That's more than what I've seen you do over the years.
Sorry grandpa for the rant/slight hijack, but some people's comments just piss me off sometimes.
_________________
Bob 65 Notch S with Sunroof
71 Notch ...aka Krunchy; build pics here;
http://www.thesamba.com/vw/forum/viewtopic.php?t=249390 -been busy working
64 T-34 Ghia...aka Wolfie, under construction... http://www.thesamba.com/vw/forum/viewtopic.php?t=412120
| Tram wrote: |
| "Friends are God's way of apologizing for relatives." |
| Tram wrote: |
| People keep confusing "restored" and "restroyed". |
|
|
| Back to top |
|
|
grandpa pete
Samba Member
Joined: July 06, 2008
Posts: 6426
Location: St. Petersburg, FL
|
| Posted: Sun Apr 20, 2014 9:27 pm Post subject: |
|
|
Hey bobnotch ; how do you get a 62 inch piece of Type 3 deck into a 43 inch door opening ..............  It's already welded back together. It's already welded back together.
If I had this to do over
I would wait until I could find bus parts that were in better shape
I would keep the early bay vents
I would put the Type three deck on BEFORE I put the bus pieces on
I would cut the bus pieces 8 inches longer which would make the vehicle long enough to fit the Type3 venting that was tied into the original bus vents ; The extra length would get the WHOLE engine deck and uncut hatch inside with the oil dipstick cap....
.........................Fitting the oil dipstick cap is going to be another challenge 
_________________
63 two fold rag
66 sedan delivery Type 6
http://www.thesamba.com/vw/forum/viewtopic.php?t=569619&highlight=sedan+delivery |
|
| Back to top |
|
|
Bobnotch
Samba Member
Joined: July 06, 2003
Posts: 22428
Location: Kimball, Mi
|
| Posted: Mon Apr 21, 2014 7:26 am Post subject: |
|
|
| grandpa pete wrote: |
Hey bobnotch ; how do you get a 62 inch piece of Type 3 deck into a 43 inch door opening .............. It's already welded back together.
If I had this to do over
I would wait until I could find bus parts that were in better shape
I would keep the early bay vents
I would put the Type three deck on BEFORE I put the bus pieces on
I would cut the bus pieces 8 inches longer which would make the vehicle long enough to fit the Type3 venting that was tied into the original bus vents ; The extra length would get the WHOLE engine deck and uncut hatch inside with the oil dipstick cap....
.........................Fitting the oil dipstick cap is going to be another challenge |
Good point. I wasn't sure on the space you had to work with. But, I still might have tried. In the end though, I probably would have split it too.
You don't know how many times I've said that 1 line to myself after I've gotten too deep into a project. Once you realise stuff like that, you're too far along to turn back. At least NOW you know what to do IF you ever decide to build a second one.
I bet that IF you had planned on using the type 3 engine at the beginning, and had the type 3 floor already there and trimmed out, you would have added the extra 8 inches of bus metal you would have needed right from the beginning, and everything would have worked out. But you were building it on the fly, and gathering bits and pieces as you went. That does alter your plans on things will fit together. It now becomes more of a challenge, with lots of thought added to the process. It's good to keep the mind active.
What you'll probably have to do is recess a spot in that new rear wall-bus wall connector strip, and set the oil filler tube up there. You'll probably have to make a "relief" in the narrowed bus gate to, so they don't hit each other and rattle (maybe). The other option would be to convert to a t-1 to t-3 aftermarket dip stick, and convert the breather box to use a bug breather, so you can add oil. The 2nd one is what I've done on several t-1 engines I've used in a type 3s. It's not a hard mod, but it does require a few things like a 1 inch internal plumbing wrench to get the nut out of the breather, and a cut and re-weld of the road draft tube, so it angles downward in the correct spot. The drawback is that you have to lift the hatch panel to check or add oil.
Those are just a couple of ideas, and you can use them, or go your own way on them. Either will work though, as nothing is written in stone. Keep up the good work, you're gaining on it.
_________________
Bob 65 Notch S with Sunroof
71 Notch ...aka Krunchy; build pics here;
http://www.thesamba.com/vw/forum/viewtopic.php?t=249390 -been busy working
64 T-34 Ghia...aka Wolfie, under construction... http://www.thesamba.com/vw/forum/viewtopic.php?t=412120
| Tram wrote: |
| "Friends are God's way of apologizing for relatives." |
| Tram wrote: |
| People keep confusing "restored" and "restroyed". |
|
|
| Back to top |
|
|
mkriglet
Samba Member
Joined: September 20, 2011
Posts: 294
Location: wv
|
| Posted: Mon Apr 21, 2014 12:14 pm Post subject: |
|
|
| looks like some great progress. |
|
| Back to top |
|
|
Chuey
Samba Member
Joined: October 18, 2010
Posts: 858
Location: Oceanside, California
|
| Posted: Mon Apr 21, 2014 9:38 pm Post subject: |
|
|
| grandpa pete wrote: |
If I had this to do over
|
I made a cafe racer out of a BMW r100S and it came out really well. Thing is, almost every part I made, I had to do it three times before getting it the way I wanted it. Most people don't realize the process when they see the project in progress. Those who do things do appreciate what you're sharing with us. Further, it looks as if it will be a really cool vehicle!
Chuey |
|
| Back to top |
|
|
grandpa pete
Samba Member
Joined: July 06, 2008
Posts: 6426
Location: St. Petersburg, FL
|
| Posted: Mon Apr 21, 2014 10:06 pm Post subject: |
|
|
Thanks Chuey ; I needed that !...someone else GETS it
Bobnotch ; Great idea on indenting the rear vertical plate to allow for oil dipstick....THKS
Crazy as this sounds I'm looking downhill on this project......I was driving all day today checking out rearbumpers on cars...Once I get the air ducting and the dipstick figured out it's all just bug stuff after that..wiring; lights; interior ; bodywork ; paint
I'll have to start looking for a new project
_________________
63 two fold rag
66 sedan delivery Type 6
http://www.thesamba.com/vw/forum/viewtopic.php?t=569619&highlight=sedan+delivery |
|
| Back to top |
|
|
|


