| Author |
Message |
Hecubus
Samba Member

Joined: March 28, 2005
Posts: 206
Location: Calgary Alberta

|
 Posted: Thu Sep 12, 2013 1:23 pm Post subject: Hecubus's Calgary Rascal Build Posted: Thu Sep 12, 2013 1:23 pm Post subject: Hecubus's Calgary Rascal Build |
 |
|
I started on this project in the fall of 2009 and as life is busy and my garage in Calgary is unheated progress has not always been as fast as I was hoping it would be. At the start I had essentially no metal working experience so everything I have had to do has had a huge learning curve.
Here is what the buggy looked like when I brought it home. It looks to be a direct copy of a Manx but I have no info on where it might have come from
The pan is a 1965
My intentions are to make a completely street buggy. I have flip flopped several times on if I should keep it looking classic or more modern and if I should put a full cage in it or just a roll bar.
I shortened the pans using 1x2 1/8" as frame rails and a 16 gauge flat floor. Getting the whole thing square and level was much harder and more tedious then I had expected. I assume there are some good trick to help that I just didn't know about at the time.
Before welding the floor on I need to figure out how I was going to mount the body to the pan and at this point I was not sure if I was going to go for a full cage or not but I wanted it to be an option. What I ended up doing is using 3/4" diameter round bar and drilled a holes through 1" long sections of it and then taping the holes to accept a 10mm bolt making 1" long threaded inserts.
Then I drilled 3/4" diameter holes through the 1x2 frame rails so that I could weld the threaded insert top and bottom. This way once I welded the 16 gauge steel floors onto the underside of the frame rails the bolt holes would be completely hidden.
Before I welded in the floors I decided to sand blast the tunnel and frame rails to get them good and clean. There is a place here in Calgary that has stations for you to do sand blasting your own projects. It took about 25 minutes to get it all blasted and so far I think that was the best 45 dollars I have spent on the buggy. It would have taken me a long time with a wire wheel to get it half as clean.
Before
After
Since I am fairly new to metal working the tools I have available are very limited. What I ended up doing for the floors is I cut out a cardboard template and traced it onto the 16 gauge steel. Then I used a jig saw to cut them out. I had expected it to take a very long time but with steel this thin it worked really well. I then drilled 1/2" holes around the outside edge to plug weld to the frame rails and used stitch welds to attach the floors to the tunnel
At that point I used Chassis Saver silver to paint the complete sand blasted pan I knew I would still be doing a bit of welding on the pan before it would be complete but since the metal was super clean I wanted to seal it up and prevent future rust problems as much as possible.
I was then able to re-install the beam and transmission. The beam needs a lot of cleaning up yet but I would like to see everything assembled with the full weight on the suspension before I tackle that project. I am planing on putting adjusters in it and and might remove some of the torsion leaves but I will not know exactly until it is all together.
Last edited by Hecubus on Mon Oct 14, 2013 8:21 pm; edited 1 time in total |
|
| Back to top |
|
 |
Mike_CNYBuggy
Samba Member

Joined: November 29, 2010
Posts: 628
Location: Syracuse, NY
|
|
| Back to top |
|
|
Wetstuff
Samba Member
Joined: September 23, 2010
Posts: 700
Location: Maryland
|
| Posted: Fri Sep 13, 2013 6:17 am Post subject: |
|
|
Wow... Reminds me of the evolution graphic; going from a pile of scrap, and no prior experience to off and running. On top of it, surrounded by snow machines, not even close to 'Buggyland'.
I have this project, "Cold Fusion", I like you to work on..
Jim
_________________
Manx #2614 |
|
| Back to top |
|
|
don't_bug_me
Samba Member

Joined: July 29, 2013
Posts: 852
Location: Ohio
|
| Posted: Fri Sep 13, 2013 7:12 am Post subject: |
|
|
Now I don't feels so bad starting with my body...
yours
mine
|
|
| Back to top |
|
|
Hecubus
Samba Member
Joined: March 28, 2005
Posts: 206
Location: Calgary Alberta
|
| Posted: Fri Sep 13, 2013 10:19 am Post subject: |
|
|
Thanks for the complements. If my speed on this project is any indication I should have cold fusion figured out in about 10,000 years.
Yeah the body is pretty rough I am sure with enough cases of sand paper it can be repaired but as an easy way out I have been looking for a body in better shape to speed things along. It is quite unlikely I will find one considering where I live. Glasser (aka Brent) has offered to help me with tube bending for a cage and there are only a couple things I need to get done yet before that will be possible. At that point I will be committed to Fixing what I have.
Thanks
Kent |
|
| Back to top |
|
|
Hecubus
Samba Member
Joined: March 28, 2005
Posts: 206
Location: Calgary Alberta
|
| Posted: Fri Oct 11, 2013 10:37 pm Post subject: |
|
|
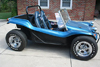
Since the body I have is in such rough shape I have been keeping my eyes open for something better to work with. Earlier this week I was given the phone number for an older gentleman who had a buggy body for sale in Edmonton (3 hours away). He did not use the internet or a smart phone so all I knew about the body when I went on a road trip to check it out is that he bought it brand new and had never used it. It has been sitting in his back yard for who knows how many years with out having even one hole drilled in it. I left very curious of what I was going to find.
When I got there it turns out he had what looks to be an early Sears Rascal in blue metal flake. There are definitely signs of age, small spider web cracks in the finish and some random scratches. It had a pretty good layer of dust and dirt on it so until I get a chance to wash it off I will not know exactly what I have to work with. My first impression is that I will be able to clear coat it and and leave the body original at least for now.
If anyone knows anything more about the particulars of the body or top I would love to here it. I have seen a similar top before but I do not know if they were specific to Rascals. |
|
| Back to top |
|
|
bruces
Samba Member
Joined: October 12, 2009
Posts: 221
Location: sudbury ontario
|
| Posted: Fri Oct 11, 2013 11:32 pm Post subject: |
|
|
| the old body would probably look better if you took a pressure washer and got rid of the white paint .Your new body looks great ,but cleaning up the old one might get you a few extra bucks when you want to get rid of it . |
|
| Back to top |
|
|
slalombuggy
Samba Member

Joined: July 17, 2010
Posts: 9147
Location: Canada
|
| Posted: Sat Oct 12, 2013 5:48 am Post subject: |
|
|
Nice score!!!! This will definitely speed up your build with much less body work to do.
brad |
|
| Back to top |
|
|
Rome
Samba Member
Joined: June 02, 2004
Posts: 9654
Location: Pearl River, NY
|
| Posted: Sat Oct 12, 2013 6:10 pm Post subject: |
|
|
Impressive work on the chassis, Hecubus!
Your first body looks just like mine. Does it have reinforcement channels glassed into the underside of the front fenders, going outward? Mine does. I sent away to the Manx Club with many photos, for authentication since I was convinced mine was a Manx even though it did not have telltale holes above the tunnel/rear seat face for the B.F. Meyers ID tag. I was disappointed when they responded that it was not consistent with the Manx build. This was mainly due to the shape differences of the wiring tubes along the top underside of the fender sides.
Will you concentrate on the Rascal body, or stay with the original body? |
|
| Back to top |
|
|
Azsilverbug
Samba Member

Joined: August 08, 2007
Posts: 301
Location: Tucson, AZ
|
| Posted: Sat Oct 12, 2013 11:41 pm Post subject: |
|
|
that was a great find.
_________________
65 Drag Bug
62 Bug
68 Bug
65 Dune Buggy
You can tune a piano but you can't tune a fish |
|
| Back to top |
|
|
Hecubus
Samba Member
Joined: March 28, 2005
Posts: 206
Location: Calgary Alberta
|
| Posted: Sun Oct 13, 2013 10:54 am Post subject: |
|
|
| I am going to be cleaning up the yellow body and trying to sell it. It is definitely not a real Manx as it has a sticker where the Manx ID badge should have been saying it was made in Ontario. I like that the Rascal will not need any body work and it is original gel coat. The roof was a bonus and I have not decided if I will use it or not yet. |
|
| Back to top |
|
|
Hecubus
Samba Member
Joined: March 28, 2005
Posts: 206
Location: Calgary Alberta
|
| Posted: Mon Oct 14, 2013 8:58 pm Post subject: |
|
|
I have now cleaned 40-50 years worth of dust and dirt off of my new Rascal body. It cleaned up really well I am definitely going to look into getting it clear coated in the next couple of weeks.
Here it is wet after washing it sparkled really well.
It is by no means perfect there are spider web cracks on random places and there is one spot that got damaged beside the one headlight mount.
It also came with bumpers and a windshield frame. I am not sure if I am going to use the bumpers or not yet. I will have to mock them up and see what they look like installed. I will not be using the windshield frame as it is just to square besides I do not know how it is even meant to be installed. It must be missing some pieces there are bolts sticking out the sides near what I assume is the bottom but no arms or brackets to attach it to the hood or top.
|
|
| Back to top |
|
|
bruces
Samba Member
Joined: October 12, 2009
Posts: 221
Location: sudbury ontario
|
| Posted: Mon Oct 14, 2013 9:30 pm Post subject: |
|
|
| the body might be an Irwin Manx ,they were made in Scarborough Ontario by Irwin boats .Can you read anything else on the tag ? |
|
| Back to top |
|
|
Hecubus
Samba Member
Joined: March 28, 2005
Posts: 206
Location: Calgary Alberta
|
| Posted: Mon Oct 14, 2013 9:57 pm Post subject: |
|
|
There are no tags that I can see and I have never heard of an Irwin Manx. Does it have the hood ridge and small tail box? Those are the two things that pointed me towards the Rascal. With how much these things were copied who knows where it might have come from. Do the roof, bumpers and windshield frame look familiar to anyone?
Does anyone have any experience clear coating an old gel coat body to bring back it's shine? |
|
| Back to top |
|
|
bruces
Samba Member
Joined: October 12, 2009
Posts: 221
Location: sudbury ontario
|
| Posted: Mon Oct 14, 2013 10:18 pm Post subject: |
|
|
| I meant the old body ,isn't that the one made in Ontario? |
|
| Back to top |
|
|
Hecubus
Samba Member
Joined: March 28, 2005
Posts: 206
Location: Calgary Alberta
|
| Posted: Mon Oct 14, 2013 10:27 pm Post subject: |
|
|
Ok Yes the Yellow body looks to have been made in Ontario. I have only ever heard of one other body made by the same company.
Here is the tag attached at the same place you would expect to find the Manx id tag.
|
|
| Back to top |
|
|
tlcurtis
Samba Member

Joined: October 08, 2010
Posts: 38
Location: Kent, Wa
|
| Posted: Mon Oct 14, 2013 10:53 pm Post subject: Sears Rascal |
|
|
Nice score on the Sears Rascal, you can check mine out it still has the original gel-coat it's very faded not sure if it will need to be repainted good luck with your build 
_________________
Check out my build:
http://www.thesamba.com/vw/forum/viewtopic.php?t=528623 |
|
| Back to top |
|
|
Hecubus
Samba Member
Joined: March 28, 2005
Posts: 206
Location: Calgary Alberta
|
| Posted: Tue Oct 15, 2013 10:25 am Post subject: |
|
|
Tlcurtis. Your Rascal looks great. Has your dash been painted white or is that it's original colour as well? My dash is black but it has just a small amount of red metal flake in it. Almost as if they sprayed the black gelcoat at the same time as someone else did a red metal flake body near by.
After cleaning it up I put the rascal body on my pan. I was a little bit nearvous about that since I had made the pan specifically for my old body and I know every body is a bit different. It turns out my concern was very justified it fits perfectly on the frame rails but like I have noticed in other Rascal builds I am going to need to add at least 1" of body lift. Right now the body is resting on the transmission and front shock towers so it will not quite seat properly. It is too bad since if I had had this body from the start I could have used 2x2 for the frame rails and had the body lift built right into the frame. |
|
| Back to top |
|
|
Glasser
Samba Member

Joined: September 18, 2007
Posts: 1640
Location: Calgary Alberta Canada
|
|
| Back to top |
|
|
Hecubus
Samba Member
Joined: March 28, 2005
Posts: 206
Location: Calgary Alberta
|
| Posted: Tue Oct 15, 2013 1:04 pm Post subject: |
|
|
I wouldn't dream of kicking yours out in the cold. I was hoping to get the cage done before the snow started to fly but the new body put a definite set back on that plan. Plus before we can do a cage I will be needing to make a real decision on if I am going to mount the top or not as that will have a huge affect on the cage design.
I had a hard time this summer deciding on if I should spend time and money on the buggy or on getting the garage insulated and heated. I picked the buggy and am starting to regret it already. |
|
| Back to top |
|
|
|


