| Author |
Message |
VEE DUB BOYS
Samba Member

Joined: August 30, 2011
Posts: 146
Location: Greenville, SC

|
 Posted: Wed Apr 01, 2015 5:57 pm Post subject: Test run of the cowl louvers Posted: Wed Apr 01, 2015 5:57 pm Post subject: Test run of the cowl louvers |
 |
|
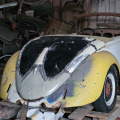
Thanks to a fellow VW hobbyist for the advice on the correct way to punch out the louvers. The first picture is just a rough
rendering to get the hang of things.
Last edited by VEE DUB BOYS on Thu Apr 02, 2015 2:57 pm; edited 1 time in total |
|
| Back to top |
|
 |
Hebster52
Samba Member
Joined: March 14, 2003
Posts: 1771
Location: Finland, Jakobstad
|
|
| Back to top |
|
|
VEE DUB BOYS
Samba Member
Joined: August 30, 2011
Posts: 146
Location: Greenville, SC
|
| Posted: Thu Apr 02, 2015 2:52 pm Post subject: |
|
|
| Hebster52 wrote: |
| Nice work indeed! |
Thanks! The work is actually relaxing. Spending time with my boy.
This is a picture of the finished test panel. I will try to get to the real panel in the near future. The holes may look crooked, but are straight.
The panel warped just a little from forming the louvers and need further massaging.
My little guy helping with the louvers. |
|
| Back to top |
|
|
T2
Samba Member
Joined: February 15, 2003
Posts: 187
Location: Yachats, Oregon
|
| Posted: Tue Apr 21, 2015 6:37 am Post subject: |
|
|
Very nice work. Glad to see you back on this. I am still in "collecting parts" mode. I need a split dash and a few other bits.
How did you do the louvers? |
|
| Back to top |
|
|
peter schepens
Samba Member
Joined: April 17, 2003
Posts: 1014
Location: belgium Caesars camp
|
| Posted: Tue Apr 21, 2015 11:58 am Post subject: |
|
|
| T2 wrote: |
Very nice work. Glad to see you back on this. I am still in "collecting parts" mode. I need a split dash and a few other bits.
How did you do the louvers? |
Just look at the picts.
Dril hole, stamp it bigger and concave, cut from hole to hole...bend the left over strip over a rounded iron with a U shaped profile... done.
Took me several attempts to find out how they are made. Then I teached others  
_________________
Zelensis, glassfibre body made in Belgium , disigned and built on a VW platform About 25 body's built.
Hebmuller info wanted for http://www.hebmueller-registry.com/home.html |
|
| Back to top |
|
|
VEE DUB BOYS
Samba Member
Joined: August 30, 2011
Posts: 146
Location: Greenville, SC
|
| Posted: Thu Dec 31, 2015 7:50 pm Post subject: Re: Starting to build my Heb. all steel replica |
|
|
Found the under hood braces for my Heb here on the Samba. Test fitted
On my buddie's 1950 standard.
|
|
| Back to top |
|
|
VEE DUB BOYS
Samba Member
Joined: August 30, 2011
Posts: 146
Location: Greenville, SC
|
| Posted: Thu Dec 31, 2015 8:31 pm Post subject: Re: Starting to build my Heb. all steel replica |
|
|
Last edited by VEE DUB BOYS on Fri Jan 01, 2016 6:32 pm; edited 1 time in total |
|
| Back to top |
|
|
Hebster52
Samba Member
Joined: March 14, 2003
Posts: 1771
Location: Finland, Jakobstad
|
|
| Back to top |
|
|
VEE DUB BOYS
Samba Member
Joined: August 30, 2011
Posts: 146
Location: Greenville, SC
|
| Posted: Fri Jan 01, 2016 5:18 pm Post subject: Re: Starting to build my Heb. all steel replica |
|
|
| They were advertised for $40 shipped. They are for a later car, but they'll be very convincing |
|
| Back to top |
|
|
usariemen
Samba Member

Joined: August 28, 2004
Posts: 1745
Location: Germany
|
| Posted: Sat Jan 02, 2016 2:36 pm Post subject: Re: Starting to build my Heb. all steel replica |
|
|
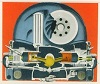
You may know.
But there is usually a metall tube welded to it that reaches up into the windscreen frame. And also it seems that yours are cut at the lower end.
They usually reach deeper down into the A-pilar and are fixed down there to the body.
Yours will reinforce as they are. But the way they once where works better.
_________________
Master of my domain! |
|
| Back to top |
|
|
VEE DUB BOYS
Samba Member
Joined: August 30, 2011
Posts: 146
Location: Greenville, SC
|
| Posted: Sat Jan 02, 2016 4:13 pm Post subject: Re: Starting to build my Heb. all steel replica |
|
|
great picture for reference. I believe the tube is for defrosting the windshield? If so, I will need to cut open the windshield frame
and bend a tube for it. I will check my donor frame. It is a 1954 oval convertible front clip. My reinforcements are from a 1965 convertible,
so I will have to lengthen the reach into the footwell. Does your frame bolt on from the inside with 3 bolts?
Thank you for your input |
|
| Back to top |
|
|
Hebster52
Samba Member
Joined: March 14, 2003
Posts: 1771
Location: Finland, Jakobstad
|
|
| Back to top |
|
|
usariemen
Samba Member
Joined: August 28, 2004
Posts: 1745
Location: Germany
|
| Posted: Sun Jan 03, 2016 5:16 am Post subject: Re: Starting to build my Heb. all steel replica |
|
|
| VEE DUB BOYS wrote: |
[img]
great picture for reference. I believe the tube is for defrosting the windshield? If so, I will need to cut open the windshield frame
and bend a tube for it. I will check my donor frame. It is a 1954 oval convertible front clip. My reinforcements are from a 1965 convertible,
so I will have to lengthen the reach into the footwell. Does your frame bolt on from the inside with 3 bolts?
Thank you for your input |
Yes it is bolted to the body . Behind the reinforcements left and right of the foot area.
The tube is not just for defrosting.
It has an opening to let the heating air out but then goes on through the frame. I think all around the windscreen. This will reinforce it. The roof, when locked, pulls a lot. So it is good to get as much strength there as possible.
And before you finally place these braces in the front quarters you should take care of the semaphore slots. Later you will not have much access to that area. This is the early style. Later from spring 1950 the semas had closed boxes. But also welded on from the rear.
The next problem you´ll get is this.
Vert meets sedan.
When welded together it has to be shaped by lead.
Just the Heb has this "step" in right above the upper front edge of the door.
_________________
Master of my domain! |
|
| Back to top |
|
|
Hebster52
Samba Member
Joined: March 14, 2003
Posts: 1771
Location: Finland, Jakobstad
|
| Posted: Sun Jan 03, 2016 6:43 am Post subject: Re: Starting to build my Heb. all steel replica |
|
|
[quote="usariemen"]
| VEE DUB BOYS wrote: |
And before you finally place these braces in the front quarters you should take care of the semaphore slots. Later you will not have much access to that area. This is the early style. Later from spring 1950 the semas had closed boxes. But also welded on from the rear.
|
I've got these for mine.. 
_________________
~Kris~
The Hebster52
The 912ST
The KidVRod project
The 356 Pre-A replica,SOLD
The 1966 Kommanderwagen, SOLD
The Doppel -67, SOLD
The Singlecab -72, SOLD |
|
| Back to top |
|
|
peter schepens
Samba Member
Joined: April 17, 2003
Posts: 1014
Location: belgium Caesars camp
|
|
| Back to top |
|
|
usariemen
Samba Member
Joined: August 28, 2004
Posts: 1745
Location: Germany
|
| Posted: Sun Jan 03, 2016 12:18 pm Post subject: Re: Starting to build my Heb. all steel replica |
|
|
I've got these for mine..
[/quote]
As I wrote this is the early Heb style.
They started by using the common semaphore holding panels from sedans.
But notice! Left side sedan becomes right side Heb and right side sedan becomes left side Heb.
_________________
Master of my domain! |
|
| Back to top |
|
|
Hebster52
Samba Member
Joined: March 14, 2003
Posts: 1771
Location: Finland, Jakobstad
|
|
| Back to top |
|
|
VEE DUB BOYS
Samba Member
Joined: August 30, 2011
Posts: 146
Location: Greenville, SC
|
| Posted: Sun Jan 03, 2016 9:46 pm Post subject: Re: Starting to build my Heb. all steel replica |
|
|
Super pictures and great information. This to me seems difficult to do until
I think of hand building the top frame and deck lid |
|
| Back to top |
|
|
usariemen
Samba Member
Joined: August 28, 2004
Posts: 1745
Location: Germany
|
| Posted: Mon Jan 04, 2016 12:46 am Post subject: Re: Starting to build my Heb. all steel replica |
|
|
| VEE DUB BOYS wrote: |
Super pictures and great information. This to me seems difficult to do until
I think of hand building the top frame and deck lid |
You found these inner panels of a vert. Maybe try to find a windscreen frame of one as well. It would have the right size and would save you a lot of work.
One of a Heb has small differences on top where the front woodbow meets it. But that is almost not visible and not importand for your project.
_________________
Master of my domain! |
|
| Back to top |
|
|
splitjunkie
Samba Member
Joined: April 04, 2006
Posts: 4092
|
| Posted: Mon Jan 04, 2016 8:19 am Post subject: Re: Starting to build my Heb. all steel replica |
|
|
You can also see the reinforcement tube laying just behind the windshield frame in this picture.
_________________
Chris
You know, a lot of these scratches will buff right out... Jerry Seinfeld |
|
| Back to top |
|
|
|


