| Author |
Message |
pearidge
Samba Member
Joined: November 04, 2013
Posts: 27
Location: sullivan mo

|
 Posted: Mon Nov 04, 2013 4:12 pm Post subject: careful of old construction Posted: Mon Nov 04, 2013 4:12 pm Post subject: careful of old construction |
 |
|
| Hi all new guy here.Been lurking for a few weeks.built a rail 20 years ago and had fun ,had it street legal but wasn't much fun in town.To much cam.No fun in the rain either.Owned a bug or to at times.Now about the current project.Found an old citation with the T style nose and hard top ,had been in a garage for 10 years.FG is in good shape.Duel port ran after cleaning carb and points.Thought i would do brakes and wiring and drive it awhile.Found a little rust on passenger side front of pan.So puuled the body and found a 4 inch square hole cut in pass side of tunnel 8 inches in front of shifter.Was just tacked back in place.Long story short it was cracked all the way over the top and 3 inches down the other side.So i will have a liitle more than rust to fix.Oh well will try to post pics tommorrow.Still thick i got a good deal just scared that i almost drove it like that! |
|
| Back to top |
|
 |
BL3Manx
Samba Member
Joined: August 29, 2006
Posts: 6767
Location: Northern California
|
| Posted: Mon Nov 04, 2013 4:17 pm Post subject: |
|
|
| Good post! |
|
| Back to top |
|
|
Wolfgangdieter
Samba Member
Joined: June 25, 2008
Posts: 1958
Location: FL Panhandle
|
| Posted: Mon Nov 04, 2013 7:53 pm Post subject: |
|
|
| BL3Manx wrote: |
| Good post! |
But no pictures!
_________________
CMC '57 Porsche Speedster Replica and Dolphin boat tailed full pan VW MOD-T Street Buggy |
|
| Back to top |
|
|
Glenn 
Mr. 010

Joined: December 25, 2001
Posts: 76940
Location: Sneaking up behind you
|
| Posted: Mon Nov 04, 2013 7:57 pm Post subject: |
|
|
You'd be amazed at the "hackery" and hidden dangers i've seen in the past 40 years of working on VWs.
Everything from license plates used to patch the floors to threaded rod used for a head stud.
PO's... you just gotta love them since killing them is illegal.
_________________
Glenn
74 Beetle Specs | 74 Beetle Restoration | 2180cc Engine
"You may not get what you pay for, but you always pay for what you get"
Member #1009
#BlueSquare |
|
| Back to top |
|
|
wythac
Samba Member

Joined: August 02, 2004
Posts: 2791
|
| Posted: Mon Nov 04, 2013 8:03 pm Post subject: |
|
|
| The placement makes it sounds like an inspection/access panel for a hydraulic clutch system. Is it right across from your pedal set? |
|
| Back to top |
|
|
weasel_ugs
Samba Member
Joined: March 16, 2012
Posts: 721
Location: Prescott Valley,Az.
|
| Posted: Mon Nov 04, 2013 8:27 pm Post subject: |
|
|
| Im still trying to figure out why a balljoint beam was installed on my kingpin pan and why a 3 gallon gas tank and a whole bunch of other hacks. |
|
| Back to top |
|
|
joescoolcustoms
Samba Member

Joined: August 08, 2006
Posts: 9054
Location: West By God Virginia
|
| Posted: Mon Nov 04, 2013 9:03 pm Post subject: |
|
|
I encountered foam used as a body lift.
Shocks welded on.
Wood Screws used as cotter pins on rear castle nuts.
Riding Lawnmower carbs used as dual carbs.
Steel welded to oil pump drive gear to make it long enough to engage cam.
Several Beams welded to pan heads.
Aluminum pop cans tin snipped and used to shim worm link bushings on LP front beams.
Paper Clips used to wire chokes open on carbs.
6 total bolts holding buggy body to pan.
Non-VW throw out bearings wired in place.
More times than I can count, house wiring used on cars.
_________________
Bad News Racing 2018 NORRA 1000 3rd in Class
Best Day Ever Racing 2022 NORRA 1000 2nd in Class and first All Female team to complete the race
Everyone is gifted. Some just do not open the package.
Looks like it was painted with a live chicken,polished with a brick and buffed with a pine cone |
|
| Back to top |
|
|
pearidge
Samba Member
Joined: November 04, 2013
Posts: 27
Location: sullivan mo
|
| Posted: Tue Nov 05, 2013 3:36 am Post subject: |
|
|
| i will try to post pics tonight.the wirirng was a mess .wire nuts,masking tape .no tape etc.the body is real good shape but looking at some of the build just makes me shake my head.the lady i bought it from got it from someone she worked with and only drove it twice.she is lucky it didn't break in half.the hole is between the shifter and pedals.still has cable clutch so not sure why hole was cut. |
|
| Back to top |
|
|
lil-jinx
Samba Member
Joined: August 14, 2013
Posts: 1109
Location: New Brunswick,Canada
|
| Posted: Tue Nov 05, 2013 5:23 am Post subject: |
|
|
| All those improvised repairs just proves the ease in which you can keep those vw running. |
|
| Back to top |
|
|
pearidge
Samba Member
Joined: November 04, 2013
Posts: 27
Location: sullivan mo
|
| Posted: Tue Nov 05, 2013 6:22 pm Post subject: |
|
|
here is the hole the po cut yes that is brazing you see |
|
| Back to top |
|
|
wythac
Samba Member
Joined: August 02, 2004
Posts: 2791
|
| Posted: Tue Nov 05, 2013 6:31 pm Post subject: |
|
|
| I'll bet one of the POs had trouble getting the pedal set off to replace it or replace a clutch cable and cut an access hole. What a mess. |
|
| Back to top |
|
|
pearidge
Samba Member
Joined: November 04, 2013
Posts: 27
Location: sullivan mo
|
| Posted: Tue Nov 05, 2013 6:31 pm Post subject: |
|
|
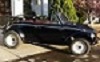
here it is 2 weeks ago |
|
| Back to top |
|
|
pearidge
Samba Member
Joined: November 04, 2013
Posts: 27
Location: sullivan mo
|
| Posted: Tue Nov 05, 2013 6:37 pm Post subject: |
|
|
and one more |
|
| Back to top |
|
|
pearidge
Samba Member
Joined: November 04, 2013
Posts: 27
Location: sullivan mo
|
| Posted: Tue Nov 05, 2013 6:40 pm Post subject: |
|
|
| wish i had the side curtains for it .the pan doesn't scare me i am a maint man /welder/electrician/mach////////what ever .it will just take time. |
|
| Back to top |
|
|
BL3Manx
Samba Member
Joined: August 29, 2006
Posts: 6767
Location: Northern California
|
| Posted: Tue Nov 05, 2013 7:20 pm Post subject: |
|
|
| Before you weld up the tunnel, look inside and make sure the clutch cable tube is secure and not going to break loose. You should also inspect around the parking brake handle mount, its a very common location for cracks especially if you have the heater control levers there. |
|
| Back to top |
|
|
heywebonya
Samba Member

Joined: July 08, 2010
Posts: 823
Location: Portage, MI
|
| Posted: Wed Nov 06, 2013 6:54 am Post subject: |
|
|
Amazing cracks. I would like to see the repairs as you complete them.
_________________
If I knew what I was doing; I wouldn't be building a buggy! |
|
| Back to top |
|
|
pearidge
Samba Member
Joined: November 04, 2013
Posts: 27
Location: sullivan mo
|
| Posted: Wed Nov 06, 2013 6:00 pm Post subject: |
|
|
got started on repair.only 2 pics camera battery died put a patch inside and pulled it up with bolts.welded thru holes and started welding crack quit for the night |
|
| Back to top |
|
|
SBD
Samba Member

Joined: October 24, 2012
Posts: 3269
Location: SOUTH DAKOTA
|
| Posted: Wed Nov 06, 2013 6:19 pm Post subject: |
|
|
Still a nice looking buggy if you bought it right!  |
|
| Back to top |
|
|
EVfun
Samba Member

Joined: April 01, 2012
Posts: 5481
Location: Seattle
|
| Posted: Wed Nov 06, 2013 6:52 pm Post subject: |
|
|
| pearidge wrote: |
here is the hole the po cut yes that is brazing you see |
OMG! My only advice is to make sure all the brass from the brazing work is removed before trying to weld. Brass and welding do not mix!
My buggy has a strait cut and butt welded together seam in the tunnel for the shortening (likely done back when I was a toddler.) There is no doubler or other reinforcement of the seam. The floor/spot weld flange do not quite line up between the front and back of the tunnel. After 40+ years I had some little frame cracks to weld up, none over 1 inch long.
By comparison, your frame cracks are terrifying.
_________________
| Wildthings wrote: |
| As a general rule, cheap parts are the most expensive parts you can buy. |
|
|
| Back to top |
|
|
pearidge
Samba Member
Joined: November 04, 2013
Posts: 27
Location: sullivan mo
|
| Posted: Thu Nov 07, 2013 3:37 am Post subject: |
|
|
| i am grinding away brass as i go.i do quite a bit of welding so not to worried.i already bought all new wheel cylinders and a dual circuit mastercylinder.and new brake shoes.ordered a new frame head bottom plate,cross member and pas side floor pan quarter .right now total investment is just under $2000 |
|
| Back to top |
|
|
|


