| Author |
Message |
lawn ninja
Samba Member

Joined: January 02, 2006
Posts: 1009
Location: Round Rock, TX

|
 Posted: Sat Nov 09, 2013 5:05 pm Post subject: My ongoing 63 Ghia saga... (updates inside) Posted: Sat Nov 09, 2013 5:05 pm Post subject: My ongoing 63 Ghia saga... (updates inside) |
 |
|
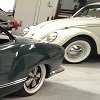
So I picked up a ghia that was advertised on TheSamba. I just sold my 65 bug not too long ago and I've been looking for a ghia to replace it. I had my eye on this one for a while and finally just decided to ask for some more pics of the car. Jim, the PO, sent me 73 pictures of the car. It covered every angle and showed me everything I wanted to see. The car is very rust free, minus the battery tray in the engine compartment, and I can't wait to get my hands on it. The car got delivered to my dad's house in CA since I am getting ready to move back there soon.
The car is original and unmolested. All the brakes have been redone as well as a completely rebuilt 40hp motor that is original to the car. There is a lot of mechanical work that went into the car and it will save me a lot of time and money. I'll update this thread with what I do to the car and some of that will start in Dec. The full resto will happen a few years down the road after I have some fun driving it and once my son is old enough to help. Until then I'm just going to clean up the interior and get everything on the car complete. I just plan on having a good time with it for now, I already have a full blown show car that I've had for 5 years and still haven't driven, ever. So this will not be that kind of car.
This is a quick overview of the car but if you guys have any requests for pics just ask it is likely that Jim sent me one or two of them. The plan for the car is to keep it period correct. Using the numbers matching motor I am going to do a vintage speed setup on it, using various parts. Then I am going to use my narrowed beam, dropped spindles, and dropped plates to lower it. I will probably put a set of BRM's on it, get some door panels, carpet and other interior stuff cleaned up, slap my YOM black and yellow plates on it. Get all the exterior bits sorted, chrome and whatnot. Then try to see if I can get the paint to polish out and see if I have any hope of getting the white roof back.
one of the pics that was in the ad.
_________________
Jason
My 64 1500 S Notchback project here
My 58 sedan project here
My 63 Ghia here
Last edited by lawn ninja on Wed Jan 01, 2014 10:39 pm; edited 4 times in total |
|
| Back to top |
|
 |
Karly
Samba Member
Joined: August 01, 2002
Posts: 641
Location: Australia
|
| Posted: Sun Nov 10, 2013 2:30 am Post subject: |
|
|
Congrats on finding a ghia 
Look forward to seeing progress pics and getting another one back on the road!
_________________
1960 Beetle ''Heidi" daily driver
1964 Karmann Ghia project |
|
| Back to top |
|
|
lawn ninja
Samba Member
Joined: January 02, 2006
Posts: 1009
Location: Round Rock, TX
|
| Posted: Mon Nov 11, 2013 8:46 pm Post subject: |
|
|
I'm looking forward to it too. I should have some more in depth pics and eval of it when I get back to CA in a couple of weeks. Right now my dad drove it and said it is one of the vbest running 40's he's driven since he used to race Formula Vee. From what he said it runs great, has tons of power (for a 40hp), shifts very smoothly and stops really well. He did say that the brake lights don't work on it and when you hit the brakes the blinker light on the dash goes on. So I'll have to sort that out when I get home. I guess the hinges on the drivers side are really worn out and the window is hard to roll up and down. So I'll have to tweak that stuff too. I'm looking forward to getting it all squared away so I can get to some of the fun stuff on it. I should have it at The Classic this year and that is pretty exciting to me because its been years since I had an aircooled car down there.
If you guys have any advice or tips for me on what to look for I'm all ears.
_________________
Jason
My 64 1500 S Notchback project here
My 58 sedan project here
My 63 Ghia here |
|
| Back to top |
|
|
ernstben
Samba Member

Joined: April 30, 2005
Posts: 621
Location: Manchester, Mi
|
| Posted: Tue Nov 12, 2013 4:48 pm Post subject: |
|
|
| lawn ninja wrote: |
If you guys have any advice or tips for me on what to look for I'm all ears. |
Take a look at the '63 that I worked on for a while? 1963 was a weird year for Ghias with a lot of hold-overs from earlier years and some newer things as well. Your doors, for example, are pretty unique, and the heater outlets under the rear seat are a one-year-only (or maybe a year and a half?) part.
Any specific questions, feel free to drop me a PM; I'd be happy to help!
Have fun!
_________________
Ben
'63 Ghia Coupe Project
'59 Panel Project
'56 Ragtop Project |
|
| Back to top |
|
|
lawn ninja
Samba Member
Joined: January 02, 2006
Posts: 1009
Location: Round Rock, TX
|
| Posted: Wed Nov 13, 2013 11:18 am Post subject: |
|
|
I watched your build actually. Nice car BTW. I may hit you up, I'm new to ghias and I'm about ready to go on a parts search for some trim bits and other odds and ends that the car is missing.
_________________
Jason
My 64 1500 S Notchback project here
My 58 sedan project here
My 63 Ghia here |
|
| Back to top |
|
|
lawn ninja
Samba Member
Joined: January 02, 2006
Posts: 1009
Location: Round Rock, TX
|
| Posted: Fri Nov 15, 2013 10:01 pm Post subject: |
|
|
Does anyone have a link for the weld on shock towers for narrowed beams? I know I saw some a while back but I can't find them anywhere. I need a set for my beam.
_________________
Jason
My 64 1500 S Notchback project here
My 58 sedan project here
My 63 Ghia here |
|
| Back to top |
|
|
lawn ninja
Samba Member
Joined: January 02, 2006
Posts: 1009
Location: Round Rock, TX
|
| Posted: Wed Jan 01, 2014 11:17 pm Post subject: |
|
|
So I got a little time today to dive into this car. I decided to start by re-cutting the paint to get the most I could out of the car's paint. It is a repaint and it was a metallic color. The whole car has been done and the roof looks to have been white originally so I'll go after that later. For now I just wanted to get rid of the pasty color it had going on with it.
So I am far from done with it. I only spent about 5 hours on it today. I'm not an expert at re-cutting paint so I took my time. I got some medium grit cutting compound and started work. I still need to finish polishing and waxing the car but it is looking pretty good so far.
Used my trusty 7" rotary buffer from Harbor Freight.
starting to get a little shine on it.
first pass on front fender
_________________
Jason
My 64 1500 S Notchback project here
My 58 sedan project here
My 63 Ghia here |
|
| Back to top |
|
|
lawn ninja
Samba Member
Joined: January 02, 2006
Posts: 1009
Location: Round Rock, TX
|
| Posted: Wed Jan 01, 2014 11:24 pm Post subject: |
|
|
The difference from one side of the nose to the other.
front after first pass with the hood still pasty.
difference is pretty good
Then I started running out of light so I put it away for the night and starting cleaning up the bumpers, handles and all the bright work.
_________________
Jason
My 64 1500 S Notchback project here
My 58 sedan project here
My 63 Ghia here |
|
| Back to top |
|
|
lawn ninja
Samba Member
Joined: January 02, 2006
Posts: 1009
Location: Round Rock, TX
|
| Posted: Fri Jan 03, 2014 5:15 pm Post subject: |
|
|
Well I thought there may have been more response to this, but I guess not. In any case I finished polishing out the paint yesterday and below is what it looks like. I have to pick up some rubber bits and finish polishing out the bumpers before I put them back on. Next in line after this is doing the suspension. I have a 4" narrowed beam w/drop spindles and I ordered a set of Atomwerks 2.4 inch drop plates for it about 3 weeks ago, so my wait for them is about over. I seem to have misplaced my 135's somehow so I need a new set of those and I'm going to pick up a set of wheels for it in the next little bit.
I have managed to piece together a whole set of side molding for the car and now I am looking for some 60-63 headlight rings for the car, some nose grilles and a good set of tail lights (one of mine is broken). Once I get the outside sorted I'm going to make some door panels for it and carpet it just to get it solid on the inside. The eventual plan is to completely refinish it, but I have to finish my 58 first before I start dumping too much money in this car. And I need to decide on a color for it before I get the final interior started, so that's why I'm making stuff for it. I figure I can get most of it done for fairly cheap and have some fun with it at shows this summer. Then hopefully next year I can start the build on it.
So anyways... Here are the pics of the way the paint will look for a while.
_________________
Jason
My 64 1500 S Notchback project here
My 58 sedan project here
My 63 Ghia here |
|
| Back to top |
|
|
AlanInMass54
Samba Member

Joined: August 29, 2003
Posts: 1070
Location: Massachusetts
|
| Posted: Sat Jan 04, 2014 5:11 pm Post subject: |
|
|
| It's looking great, nice job with cleaning it up! What does a 60 - 63 headlight ring look like? How is it different from an earlier or later one? I've got some miscellaneous ones hanging up out in my shed but don't know what years they're off of. |
|
| Back to top |
|
|
webberjames95
Snorkelstang Finder

Joined: January 18, 2011
Posts: 1091
Location: Pullman, Washington
|
|
| Back to top |
|
|
lawn ninja
Samba Member
Joined: January 02, 2006
Posts: 1009
Location: Round Rock, TX
|
| Posted: Sun Jan 05, 2014 3:56 pm Post subject: |
|
|
Alan,
The headlight rings are a bit different in that they hook on the bucket assembly. You can tell the difference because the earlier ones have a small notch in the ring at the 12 o'clock position. If you have some of these let me know and I will take them off your hands.
Thanks,
Jason
This will be an ongoing project BTW and work halts in between me coming and going between CA and TX. In the downtime I hope to pile up parts I need then execute on it when I get face time with this car. I do have to say this is a great car to drive and I can't wait to get it out to some shows and just enjoy having it. The 58 should also be at The Classic this year but it will likely follow me down on a trailer. I am going to drive that car around too, but not like this beautiful car.
_________________
Jason
My 64 1500 S Notchback project here
My 58 sedan project here
My 63 Ghia here |
|
| Back to top |
|
|
lawn ninja
Samba Member
Joined: January 02, 2006
Posts: 1009
Location: Round Rock, TX
|
| Posted: Mon Mar 10, 2014 9:51 pm Post subject: |
|
|
So I got some stuff done on my ghia this week. It's nothing overly exciting and I still have to finish it, but that will be easy now since I have officially been retired from Active Duty. Technically I still have until the end of March but I am home on terminal leave and I never have to report back in. So I'm out. This means a number of things but as far as my cars go it means I will finally finish my bug and my ghia is getting worked on a little bit every couple of days and I should have that pretty much ready to drive in the next month or two. That means this thread will finally have updates and so will the bug thread...
This week I decided to start stripping the roof back to the OG white so I can get the two tone back on the car. It's not the most exciting update but I am assembling the parts I need to wrap up this years swing at the car. The idea is to have it running, driving and setup the way I want by the classic this year so I can take part in it. In any case on to the pics, and if you are interested in what I'm doing with the car keep an eye out because I should have at least one update per week.
I started this weeks project by taking a blurry pic of the paint stripper and acetone.
Then I sacrificed a metal trash can and whipped out the gloves.
coated part of the roof in stripper. I prefer the brush on stuff for large jobs, it's easier to work with IMO
I used a putty knife to take the blue off after letting it set for a few minutes and then steel wool to take the red primer off. I found that if you put it on in a very small area and starting rubbing it with the wool almost instantly it comes off fairly easily.
I couldn't help but hit bare metal in some spots as you can see. the places this happened the primer was already wearing thin.
You can see some of the residual red primer smearing on the white. I tried to clean it up as best as I could as I went, but it still needs attention.
first side and first pass done.
Passenger side also done. This is only the first pass though and will require some more elbow grease. If I can't save it at least I got it back to a smooth surface and I'll just mask it off and paint it.
Here you can see some of the red left. This was because it seems to have been used as a high build primer so some of it was pretty stubborn.
As you can see it still needs a lot of work, but I will have gotten to the point later this week where I decide to paint it or just spot the bare metal areas. Good thing is I finally kind of have the time to do it. Enjoy the pics and yes it's a lot of pics for just stripping the roof but I take lots of pics and usually post them all.
_________________
Jason
My 64 1500 S Notchback project here
My 58 sedan project here
My 63 Ghia here |
|
| Back to top |
|
|
2true
Samba Member

Joined: December 13, 2004
Posts: 1218
|
| Posted: Tue Mar 11, 2014 3:29 am Post subject: |
|
|
I like Ghia's with the white top. Get a new grill please! (Easy fix)
Keep it up!
_________________
AKA Destroyer of the Rants...... |
|
| Back to top |
|
|
Big Bill
Samba Member
Joined: June 21, 2005
Posts: 1782
Location: Santa Rosa, Ca
|
| Posted: Tue Mar 11, 2014 7:23 am Post subject: |
|
|
Nice job on the roof, after a buff up I think it will match the rest of the car real nice.  I like white roofs too. I like white roofs too. |
|
| Back to top |
|
|
lawn ninja
Samba Member
Joined: January 02, 2006
Posts: 1009
Location: Round Rock, TX
|
| Posted: Tue Mar 11, 2014 12:08 pm Post subject: |
|
|
true, no worries... It is getting all new trim bits on the outside. The grilles, side molding, and all the scripts are getting polished up or replaced. The only thing that is staying old on the outside is the paint and that is only temporary too.
Bill, I'm hopeful it will buff out so I don't have to paint it. I like the white roofs too. I think it gives the car a more period look. I should have some more updates this week. I just came to a deal with Alaninmass for some parts and I have some other stuff I am going to start building this week.
_________________
Jason
My 64 1500 S Notchback project here
My 58 sedan project here
My 63 Ghia here |
|
| Back to top |
|
|
lawn ninja
Samba Member
Joined: January 02, 2006
Posts: 1009
Location: Round Rock, TX
|
| Posted: Sat Mar 29, 2014 4:32 pm Post subject: |
|
|
Ok, so I had a couple of hours to work on the ghia. Things have been pretty hectic since moving back to CA but they are starting to settle down so I can get some more work in on the cars. AlanInMass had some headlight rings I was looking for so we worked out a deal and he got some money and I got some rings. I'll be working on the car tomorrow too if all goes as planned so I should have some more updates.
I'm still in the cleanup phase of the car, mostly because I am stalling on the mechanical side of things because I want to have all the parts for one area and only visit it once if I can help it. So lots of time is spent on prep work. Also some of the parts I have I decided aren't going to work for what I want to do. I have a narrowed beam already but it doesn't have shock towers so I decided to sacrifice a link pin beam I have in order to get shock towers and the needle bearings. I'll have some pics of that once I'm done too but right now it is a work in progress. In any case this mini update is just more cleanup. I got the headlight rings and they needed a good cleaning so I went to work on those and I finished polishing up my bumpers.
Alan sent me 3 of these and I already had 1. so I picked the two best ones and cleaned them up. I ended up using the two of them that had the "made in germany" stamp on them.
This was the worst of the two that I picked out of the bunch. And its in really good shape IMO.
a little cloudy but overall in outstanding shape.
started polishing
cloudy
cloudy vs. polished
polished up
Cleaned up rings
That's it for now.
_________________
Jason
My 64 1500 S Notchback project here
My 58 sedan project here
My 63 Ghia here |
|
| Back to top |
|
|
kingkarmann
Samba Member

Joined: November 05, 2003
Posts: 4111
|
| Posted: Sun Mar 30, 2014 1:52 pm Post subject: |
|
|
Very nice 
I'm enjoying watching the progress.
_________________
"Depression is a malfunction of the instrument we use to determine reality.
Mike Gerson
What is your "Bespoke Reality"? |
|
| Back to top |
|
|
lawn ninja
Samba Member
Joined: January 02, 2006
Posts: 1009
Location: Round Rock, TX
|
| Posted: Sun Mar 30, 2014 4:53 pm Post subject: |
|
|
Thanks man I appreciate it. I know it hasn't been very exciting up until now, but it's about to be moving along...
_________________
Jason
My 64 1500 S Notchback project here
My 58 sedan project here
My 63 Ghia here |
|
| Back to top |
|
|
lawn ninja
Samba Member
Joined: January 02, 2006
Posts: 1009
Location: Round Rock, TX
|
| Posted: Wed May 06, 2015 10:30 pm Post subject: |
|
|
OK so I had some health issues last year that kept me from doing just about anything. I've started working on the car again so I actually have some progress. In my quest to build a new beam with towers I actually cut it too narrow. I just assumed it was the same as a bug and I could go 4" and keep the towers on it. Bzzzzt. Try again. So after I built the beam I had to hack the damn towers off. arggg. In any case I spent some time on it and got a few things done. I should be working on the car this Friday again so we'll see how far I can get with the rear suspension.
Ok... First off. I picked up a grille for it and I took both of them out and cleaned everything up, it also helped me to get a good look to see what the rust situation was in there.
started with a broken grille.
pulled them out
cleaned the area up
painted all the things.
and put the replacements in.
refurbed with old parts so nothing looks new.
_________________
Jason
My 64 1500 S Notchback project here
My 58 sedan project here
My 63 Ghia here |
|
| Back to top |
|
|
|


