| Author |
Message |
Mark33563
Samba Member
Joined: November 13, 2005
Posts: 1667
Location: Tampa Bay. FL

|
 Posted: Tue Feb 25, 2014 8:43 am Post subject: Posted: Tue Feb 25, 2014 8:43 am Post subject: |
 |
|
The reason I inquired is that many people overlook that important tid bit: clearance between tires and equipment.
You do not want to go cruising and have the tire cut the line. Gets expensive to fix, recharge, etc. |
|
| Back to top |
|
 |
NOVA Airhead
Samba Member

Joined: July 20, 2005
Posts: 5221
Location: Richmond, VA
|
| Posted: Fri Feb 28, 2014 1:47 pm Post subject: |
|
|
I routed my hose a bit differently to try to avoid the wheel if you can see it in these photos:
I also rerouted the driver's side air tube a bit:
_________________
Ghia Owner Emeritus |
|
| Back to top |
|
|
JuanLoman
Samba Member
Joined: September 24, 2006
Posts: 15
|
| Posted: Fri Feb 28, 2014 7:14 pm Post subject: |
|
|
| Can you please supply the wiring connections please? I have an A/C bpd and I need the connection diagram so I can hook it up, I would really appreciated if someone can provide, Thanks in advance |
|
| Back to top |
|
|
22manybugs
Samba Member

Joined: March 30, 2006
Posts: 373
Location: Yorba Linda, Calif
|
| Posted: Sat Mar 01, 2014 2:33 pm Post subject: |
|
|
| NOVA Airhead wrote: |
I routed my hose a bit differently to try to avoid the wheel if you can see it in these photos:
|
I'll double-check and see if I can get some pictures from underneath. I don't think there's any interference with the current setup, but it doesn't hurt to check again. It might be a little bit before I get to it, I just tweaked my back and all car work is on-hold until I can move again. Uh, I guess it would "hurt to check again" if I tried to crawl under the car right now!  Gotta keep a sense of humor through the pain (or maybe it's because of the pain meds). Gotta keep a sense of humor through the pain (or maybe it's because of the pain meds).
| NOVA Airhead wrote: |
I also rerouted the driver's side air tube a bit:
|
I like the way you ran the air tube, looks clean. My battery is turned 90-deg from yours (it's widest side-to-side instead of front-to-back), so I can't fit the tube between the battery and compressor, and I had to run it in a big loop to clear everything, see the picture below. It seems to put out plenty of heat at the vents, so that's the important thing.
_________________
Lon
1969 Karmann Ghia convertible
1971 Westfalia camper
Last edited by 22manybugs on Sat Mar 01, 2014 3:08 pm; edited 1 time in total |
|
| Back to top |
|
|
22manybugs
Samba Member
Joined: March 30, 2006
Posts: 373
Location: Yorba Linda, Calif
|
| Posted: Sat Mar 01, 2014 3:07 pm Post subject: |
|
|
| JuanLoman wrote: |
| Can you please supply the wiring connections please? I have an A/C bpd and I need the connection diagram so I can hook it up, I would really appreciated if someone can provide, Thanks in advance |
I only know about the Gilmore system:
The blower unit in the passenger compartment has five wires to connect:
1) Pink wire (the instructions say it may be either pink or black wire, mine was pink) goes to a +12V switched fuse.
2) Red wire goes from the 30-amp breaker mounted behind the blower assembly to +12V continuous unfused power - make the connection before the fuse box.
3) Brown wire from the relay and 4) black wire from the blower motor goes to ground. I connected both ground wires at one of the mounting screws for the blower assembly.
5) Yellow wire goes from the relay post #87 all the way back and connects to the condenser fans, also connects to a red wire at that point that runs back to the compressor.
Everything else was pre-wired.
_________________
Lon
1969 Karmann Ghia convertible
1971 Westfalia camper |
|
| Back to top |
|
|
22manybugs
Samba Member
Joined: March 30, 2006
Posts: 373
Location: Yorba Linda, Calif
|
| Posted: Sun Mar 09, 2014 5:29 pm Post subject: |
|
|
I thought my next post would be after charging the A/C system, but haven't got there yet. I did have something happen yesterday that I want to bring up so others can avoid the same problem:
Yesterday (Saturday 3/8/14) was the first day I could drive the car after mostly recovering from hurting my back (WooHoo, finally ! it was too painful to push in the clutch pedal the last two weeks), so I was driving it to do some errands. It was really warm yesterday, in the upper 80's deg-F. After leaving a store and pulling onto the road, the car suddenly stumbled - stumbled - then died. I'll try to keep it short - there was no gas in the carb bowl but the gas tank was 1/2 full. I disconnected the fuel line at the carb and ran it overboard, but no gas came out while cranking the starter. After adding some gas to the carb bowl, the car started back up and I drove home with no issues. Since the car ran fine afterward, the fuel pump seems to be okay. I think it was vapor-lock.
Good vapor-lock article in Wikipedia here: http://en.wikipedia.org/wiki/Vapor_lock . From Wikipedia:
A vapor lock can also develop when the engine is stopped while hot and the vehicle is parked for a short period. The fuel in the line near the engine does not move and can thus heat up sufficiently to form a vapor lock. The problem is more likely in hot weather or high altitude in either case.
That sounds like exactly what happened to me.
I've never had a problem with vapor-lock on the car before, so started looking for something that had changed. The metal fuel line where it bends around the fan housing was resting directly on the intake manifold. I used to have it mounted in the fan housing clip where it's supposed to go, but could not fit it there with the A/C compressor. I think that's the cause of the problem. I moved the metal fuel line above the battery ground wire, wrapped that portion in rubber fuel line slit lengthwise for insulation, then in aluminum tape. I also wrapped the portion of the ground wire in aluminum tape, then supported both with a zip-tie to keep everything away from the intake manifold:
I tested it today (another hot day), got the engine good and hot, then let it heat-soak awhile, then drove it some more. The problem didn't repeat, so I hope that solved it. I really think the important item was keeping the fuel line from contacting the intake manifold; the rest might be unnecessary, but I'll take the extra steps if it lessens the chance of being stuck on the side of the road again.
I wanted to mention this so anyone else installing an A/C system can avoid the problem by keeping the fuel line away from the intake manifold.
_________________
Lon
1969 Karmann Ghia convertible
1971 Westfalia camper |
|
| Back to top |
|
|
22manybugs
Samba Member
Joined: March 30, 2006
Posts: 373
Location: Yorba Linda, Calif
|
| Posted: Sun Mar 09, 2014 6:49 pm Post subject: |
|
|
Answering some other topics that I've been meaning to get to:
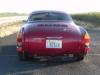
Here's a picture from directly underneath showing the space between the A/C hose and tire on the front-right side. This is looking up along the tire into the wheel well. The tire is turned as close to the hose as I can get it. There's a fair amount of space and I don't see that the tire will ever rub against the hose.
Here's the knee space of the driver. I have more difficulty getting around the steering wheel, don't have any problem bumping the A/C blower housing. (I'm 6'0" tall.)
Here's the passenger side. Again, no problem; I would really have to slouch in the seat to bump into the housing.
In the passenger side, people with larger feet can get a foot behind the hoses in the right corner of the footwell. That's the only area that may have any interference with passengers.
_________________
Lon
1969 Karmann Ghia convertible
1971 Westfalia camper |
|
| Back to top |
|
|
22manybugs
Samba Member
Joined: March 30, 2006
Posts: 373
Location: Yorba Linda, Calif
|
| Posted: Wed May 21, 2014 11:44 pm Post subject: |
|
|
I forgot to add this update:
If you remember, the air conditioner pulley has one hex-head bolt that sits in one of the holes of the aluminum generator pulley so that the pulley doesn't slip. Well, that didn't last too long; the bolt broke after a few weeks without ever even turning on the compressor and loading the pulley. The engine started making a noise and I found out the a/c pulley was completely loose.
I realized when you torque the pulley bolt, friction tends to rotate the a/c pulley clockwise, moving the hex-head bolt away from the edge of the hole. Then belt load with the engine running tends to pull the pulley counterclockwise, loosening the pulley bolt then probably banging the hex-head bolt against the side of the hole until it snaps.
It doesn't seem that the small hex-head bolt would be able to take the load by itself. I finally decided to just drill two holes through both pulleys and bolt them together. Here's the front and back of the pulleys afterward:
The front was countersunk so that the bolt heads are flush. I also countersunk the nuts on the back, and drilled the hole just a little undersize then tapped-in the nuts with a hammer, so the nuts are restrained in the pulley. This should lock the pulleys together.
_________________
Lon
1969 Karmann Ghia convertible
1971 Westfalia camper |
|
| Back to top |
|
|
NOVA Airhead
Samba Member
Joined: July 20, 2005
Posts: 5221
Location: Richmond, VA
|
| Posted: Thu May 22, 2014 6:26 am Post subject: |
|
|
| 22manybugs wrote: |
I forgot to add this update:
If you remember, the air conditioner pulley has one hex-head bolt that sits in one of the holes of the aluminum generator pulley so that the pulley doesn't slip. Well, that didn't last too long; the bolt broke after a few weeks without ever even turning on the compressor and loading the pulley. The engine started making a noise and I found out the a/c pulley was completely loose.
I realized when you torque the pulley bolt, friction tends to rotate the a/c pulley clockwise, moving the hex-head bolt away from the edge of the hole. Then belt load with the engine running tends to pull the pulley counterclockwise, loosening the pulley bolt then probably banging the hex-head bolt against the side of the hole until it snaps.
It doesn't seem that the small hex-head bolt would be able to take the load by itself. I finally decided to just drill two holes through both pulleys and bolt them together. Here's the front and back of the pulleys afterward:
The front was countersunk so that the bolt heads are flush. I also countersunk the nuts on the back, and drilled the hole just a little undersize then tapped-in the nuts with a hammer, so the nuts are restrained in the pulley. This should lock the pulleys together. |
I experienced a problem last weekend with the fans on the condenser. They started making a terrible racket. One corner was loose allowing the whole assembly to rattle around. I got it as tight as I could. Its not as noisy as it was but still noisier than I would like. Of course these fans are pretty powerful - similar to what would be on a radiator. If you have been around a car when they kick on you know they are pretty loud.
I have an email into Gilmore asking if there is anything that can be done.
_________________
Ghia Owner Emeritus |
|
| Back to top |
|
|
22manybugs
Samba Member
Joined: March 30, 2006
Posts: 373
Location: Yorba Linda, Calif
|
| Posted: Thu May 22, 2014 7:32 pm Post subject: |
|
|
| NOVA Airhead wrote: |
I experienced a problem last weekend with the fans on the condenser. They started making a terrible racket. One corner was loose allowing the whole assembly to rattle around. I got it as tight as I could. Its not as noisy as it was but still noisier than I would like. Of course these fans are pretty powerful - similar to what would be on a radiator. If you have been around a car when they kick on you know they are pretty loud.
I have an email into Gilmore asking if there is anything that can be done. |
When you find out what it is, post some pictures and what you did to fix it. It just takes two bolts to drop the condenser & fan assembly, then you'd have a little more room to look around at the fans.
The fans are pretty loud, but they shouldn't have a rattle. When I first connected all the fans, I turned them on to test (engine off, compressor not connected), my wife comes out "what's that racket?", "oh, just the fans", her response:  . Like you said, they sound like radiator fans, not that noticeable with the engine on, but loud by themselves. . Like you said, they sound like radiator fans, not that noticeable with the engine on, but loud by themselves.
_________________
Lon
1969 Karmann Ghia convertible
1971 Westfalia camper |
|
| Back to top |
|
|
OLD VW NUT
Samba Member
Joined: February 23, 2011
Posts: 2776
Location: High Desert of Washington 98823
|
| Posted: Thu May 22, 2014 8:35 pm Post subject: |
|
|
Has any of you guys with the Gilmore AC taken off the air vents? I want to remove mine to widen those 'metering holes' as Gilmore calls them but I'm worried about how thin the housing unit is. I'd hate to break it. I'm not getting quite the air flow out of the vents that I think I should be getting with those two big fans under the dash unit. I'm getting nice cool air - just not as much as I'd like. It works fine up to about 85* - above that I need more air. I asked Gilmore about the size of those holes - his answer was that it keeps the coils from freezing up - apparently a 'new' design right when I bought mine a couple of years ago.
I had to go out and turn on the air without the car started. Just had to hear if those fans were working - they are. No rattles - yet. Never have heard the fans while driving but that might be because of the Mondo muffler. Kind of loud - but I like it.
I was gassing it up the other day and had a guy come over from another pump - remarked on what a beautiful car it was - then had to ask what it was. I showed him the Volkswagen script (block letters on a 71) - he was surprised and had never seen a VW that looked like that and had never heard of Karmann Ghia. He was under 40 I'm guessing.
_________________
71 Ghia Coupe - stock body - no rust! Powered by a 2110 W/Dual HPMX 44's - Rancho Pro Street Transaxle - A/C by Gilmore
Other car - 2013 VW Golf TDI |
|
| Back to top |
|
|
22manybugs
Samba Member
Joined: March 30, 2006
Posts: 373
Location: Yorba Linda, Calif
|
| Posted: Sat May 24, 2014 12:18 am Post subject: |
|
|
| OLD VW NUT wrote: |
Has any of you guys with the Gilmore AC taken off the air vents? I want to remove mine to widen those 'metering holes' as Gilmore calls them but I'm worried about how thin the housing unit is. I'd hate to break it. I'm not getting quite the air flow out of the vents that I think I should be getting with those two big fans under the dash unit. I'm getting nice cool air - just not as much as I'd like. It works fine up to about 85* - above that I need more air. I asked Gilmore about the size of those holes - his answer was that it keeps the coils from freezing up - apparently a 'new' design right when I bought mine a couple of years ago.
|
Wow, what a perfect lead-in for my next topic!
Yes you can remove the vents, just pry them off with a screwdriver at the side. Just be careful not to scratch the plastic. I think you have to remove the two outer vents anyways to get to the mounting screws behind them. To modify the holes, though, it would be better to come in from the back; see below.
I got the system charged and tried it out, it happened to be a nice hot 95 degF day. The air coming out seemed plenty cold, but not enough volume of air was coming out, so the interior was not cooling down well. I talked to Ed at Gilmore about it, he said that they had made a change to the air ducting, but it had resulted in too much restriction of the airflow in some cases. They then made further changes for better airflow. He sent me a new front vent portion of the blower assy (the part that changed) to replace.
Here's a picture with the front vent portion being removed. Most of the blower assembly looks like it is both screwed together and glued, but the seam between the vent and blower sections is only screwed together. It's straightforward to take off; it's held on with 8 screws around the outside, you also remove the two knobs and undo the nuts holding the rotary switches, then leave the switches attached to the main blower section when you remove the front portion.
Below is a picture looking at the back of the vent portion. The only difference I can see between the old and new is the internal air passages on the new section are a little bigger. There are two round holes going to the passenger vents, and a rectangular hole going to the passage for the driver vents. It looks like it would be easy enough to modify an existing piece to make the openings bigger.
Dimensions:
Passenger-side round holes:
Old: 3/4 inch diameter
New: 7/8 inch diameter
Driver-side rectangular slot:
Old: 6 inch long x 1-1/2 inch tall
New: 6-5/8 inch long x 1-1/2 inch tall
Some things I noticed when I had the vent portion removed:
1) I opened the rectangular slot about another 1/4-inch to 3/8-inch in the long direction before I ran up against the screws. So total opening is now close to 7 inches long. The driver side vents seemed to have the least airflow, so I wanted to improve that as much as possible.
2) The fan switch has several electrical spade connectors that sit in the airflow to the driver side. I made sure the connectors were parallel to the direction of airflow when I put the switch back in to limit the airflow restriction.
3) The driver vent on the right side of the steering wheel seemed to have the least airflow of all. My thought is that the air is flowing along the channel, the vent mechanism sticks out in the airflow and tends to restrict/deflect the air away from the opening, then the airflow has to turn perpendicular to come out the vent. That's probably why that particular vent has the least amount of air. So I made a deflector for that vent that I mounted at an angle to the airflow, with vanes to help direct air out the vent. It's mounted behind the vent mechanism. I haven't tested both with and without the deflector to prove it helps, but it seems that it should. In any case, it's installed now.
Deflector:
Installed in housing:
I got it all back together last Sunday, and I am getting much better airflow out of it now. There haven't been any hot days since I got it back together; I'm waiting for another 95 degF day to really test out the system.
One other comment: I have no complaints about engine power with the A/C running. You definitely know the air is running, but it's not any worse than any other car with A/C on.
_________________
Lon
1969 Karmann Ghia convertible
1971 Westfalia camper |
|
| Back to top |
|
|
OLD VW NUT
Samba Member
Joined: February 23, 2011
Posts: 2776
Location: High Desert of Washington 98823
|
| Posted: Sat May 24, 2014 8:39 am Post subject: |
|
|
Thanks for posting that. When I talked to Ed last August he assured me it would work as made. I disagreed having driven in my 95+ degree weather here but he seemed to think he was right. Maybe he got a flood of calls after I called him. Maybe I should call him back.
I was thinking of just taking off the center two vents and using a hole saw just make a few more holes next to those metering holes. Maybe I'll modify mine like your's is. 4 quarter sized holes aren't adequate and Gilmore should have known that. I doubt they tested out the design change - nobody could be very happy with the air flow in anything above 80* IMO. Using the AC in 95* weather was better than an open window but not exactly as cool as I'd like it. The AC pump is adequate for a much larger interior volume than a Ghia - those two squirrel cage fans inside pump lots of volume but that restriction just doesn't allow for enough air flow.
Even with the air flow problem I'm having I'd still recommend this to anyone looking to install an AC unit. The parts all fit and the heat exchangers under the car are quiet from inside the car - they are noisy from outside but no more than any modern car with the AC on - it activates the fans and no fan is quiet.
_________________
71 Ghia Coupe - stock body - no rust! Powered by a 2110 W/Dual HPMX 44's - Rancho Pro Street Transaxle - A/C by Gilmore
Other car - 2013 VW Golf TDI |
|
| Back to top |
|
|
22manybugs
Samba Member
Joined: March 30, 2006
Posts: 373
Location: Yorba Linda, Calif
|
| Posted: Sat May 24, 2014 6:59 pm Post subject: |
|
|
You're welcome. Yeah, it sounds like you are experiencing the same issue I was having. If the A/C doesn't hardly help on 95+ degree days, it's not very useful. It does seem that Gilmore has modified the design and improved the airflow.
| OLD VW NUT wrote: |
| I was thinking of just taking off the center two vents and using a hole saw just make a few more holes next to those metering holes. Maybe I'll modify mine like your's is. 4 quarter sized holes aren't adequate ... |
Where do you have four holes? I only have two round holes going to the passenger side vents, then the large rectangular opening to the driver side vents. Just want to make sure we're talking the same thing. From the vent/front side, you can get to the holes on the passenger side and drill them bigger, but you cannot reach the rectangular slot for the driver side - the slot is off to the side and the rotary switches block access. My bigger concern is lack of airflow to the driver side (since I'm sitting there), so I would want to enlarge the rectangular slot. Do you have two holes for the driver side instead of the rectangular slot? The only other round holes I see are on the front panel for mounting the rotary switches, which aren't for airflow.
_________________
Lon
1969 Karmann Ghia convertible
1971 Westfalia camper |
|
| Back to top |
|
|
OLD VW NUT
Samba Member
Joined: February 23, 2011
Posts: 2776
Location: High Desert of Washington 98823
|
| Posted: Sat May 24, 2014 7:48 pm Post subject: |
|
|
I have four holes - no rectangular slots - just four quarter size holes.
This picture shows the size of the hole that Gilmore expected to meter the air through and be sufficient. There are four of them in total - each about the size of a quarter. I was skeptical when I saw that but Gilmore assured me there would be enough air flow to make me happy. I'm happy - to about 80* - past that not so much. The piece that broke off was damaged in shipping and was epoxied back on. It broke off in a single piece. The plastic is very fragile. IMO for the price I paid it should have been made from fiberglass. I was also one hose short of a full kit. Gilmore should check their kits before shipping for missing parts. I know I sound critical of Gilmore - and I am - but I've read some of the horror stories from people that have tried some of the other brands. My problems are minimal compared to some of those. Still and all - Gilmore could do better.
_________________
71 Ghia Coupe - stock body - no rust! Powered by a 2110 W/Dual HPMX 44's - Rancho Pro Street Transaxle - A/C by Gilmore
Other car - 2013 VW Golf TDI |
|
| Back to top |
|
|
22manybugs
Samba Member
Joined: March 30, 2006
Posts: 373
Location: Yorba Linda, Calif
|
| Posted: Sat May 24, 2014 11:09 pm Post subject: |
|
|
Okay, your vent assembly is different than mine. Not sure how much of my experience applies to your system. Maybe you could open up the metering holes to be similar to what I have, but since your assembly is different, I'm just guessing. It might be better to talk to Ed first.
Regarding the plastic material for the housing, it's flexible but seems to be durable. I've had the entire assembly installed and removed a few times with no problem, and I had no problem using a small hacksaw blade to cut the rectangular opening a little larger. You should be okay to open up the metering holes a bit.
I think the airflow in mine will be acceptable now, but once the weather turns warm again and I can test the system, if the airflow still doesn't seem great, my first step will be to open up the holes and slot a little further. I'm not worried about breaking the plastic in that case.
_________________
Lon
1969 Karmann Ghia convertible
1971 Westfalia camper |
|
| Back to top |
|
|
22manybugs
Samba Member
Joined: March 30, 2006
Posts: 373
Location: Yorba Linda, Calif
|
| Posted: Sun Jun 08, 2014 10:20 pm Post subject: |
|
|
Latest info:
Well, Murphy is alive and well! Apparently I over-torqued a couple of the fittings and damaged the O-rings. About two weeks ago on the first warm day, I turned the A/C on and got nothing but warm air. I took it to the shop to check out, they found the damaged O-rings, replaced them and refilled the refrigerant.
I asked the shop owner about how to properly torque the fittings, he said it should be just snug them down, then tighten them "nnntt" just a little more. ("Nnntt" is a small grunt - just a little!) He said everyone tends to overtighten them because they're big fittings that need big wrenches, so it's easy to overtighten. There are special short wrenches that people working on A/C often use so it's harder to overtorque, but most people use regular crescent/open-end wrenches.
I also opened up the rectangular slot a little more to get more air to the driver side - took off about 1/8" over the 7" long side (right up to the glue line), so that's a decent increase is cross-section. I'm really happy now with the volume of air coming out.
I checked the air temp coming out by sticking a meat thermometer into one of the vents; it averages about 36 deg. I tested the A/C on a day with mid-80's outside temp, it kept the car plenty cold such that I had to turn down the fan speed from the highest setting. I am waiting for a really hot day (over 95 deg) for one last test, but based on current results I'm expecting it to perform great.
_________________
Lon
1969 Karmann Ghia convertible
1971 Westfalia camper |
|
| Back to top |
|
|
NOVA Airhead
Samba Member
Joined: July 20, 2005
Posts: 5221
Location: Richmond, VA
|
| Posted: Mon Jun 09, 2014 6:49 am Post subject: |
|
|
| 22manybugs wrote: |
| NOVA Airhead wrote: |
I experienced a problem last weekend with the fans on the condenser. They started making a terrible racket. One corner was loose allowing the whole assembly to rattle around. I got it as tight as I could. Its not as noisy as it was but still noisier than I would like. Of course these fans are pretty powerful - similar to what would be on a radiator. If you have been around a car when they kick on you know they are pretty loud.
I have an email into Gilmore asking if there is anything that can be done. |
When you find out what it is, post some pictures and what you did to fix it. It just takes two bolts to drop the condenser & fan assembly, then you'd have a little more room to look around at the fans.
The fans are pretty loud, but they shouldn't have a rattle. When I first connected all the fans, I turned them on to test (engine off, compressor not connected), my wife comes out "what's that racket?", "oh, just the fans", her response: . Like you said, they sound like radiator fans, not that noticeable with the engine on, but loud by themselves. |
There are nylon connectors that hold the fans to the condenser - somewhat similar to nylon ties. I used several to secure it. Its much better now.
_________________
Ghia Owner Emeritus |
|
| Back to top |
|
|
NOVA Airhead
Samba Member
Joined: July 20, 2005
Posts: 5221
Location: Richmond, VA
|
| Posted: Mon Jun 09, 2014 6:57 am Post subject: |
|
|
| OLD VW NUT wrote: |
I have four holes - no rectangular slots - just four quarter size holes.
This picture shows the size of the hole that Gilmore expected to meter the air through and be sufficient. There are four of them in total - each about the size of a quarter. I was skeptical when I saw that but Gilmore assured me there would be enough air flow to make me happy. I'm happy - to about 80* - past that not so much. The piece that broke off was damaged in shipping and was epoxied back on. It broke off in a single piece. The plastic is very fragile. IMO for the price I paid it should have been made from fiberglass. I was also one hose short of a full kit. Gilmore should check their kits before shipping for missing parts. I know I sound critical of Gilmore - and I am - but I've read some of the horror stories from people that have tried some of the other brands. My problems are minimal compared to some of those. Still and all - Gilmore could do better.
|
I have not found a problem with the air flow but another poster did and posted some details in this thread:
http://www.thesamba.com/vw/forum/viewtopic.php?t=541940&highlight=air+conditioning
_________________
Ghia Owner Emeritus |
|
| Back to top |
|
|
OLD VW NUT
Samba Member
Joined: February 23, 2011
Posts: 2776
Location: High Desert of Washington 98823
|
| Posted: Mon Jun 09, 2014 9:03 am Post subject: |
|
|
I'm going to modify mine and add that rectangular hole - taking out at least one of those quarter sized holes in the process. Its going to be 85* here today - about the max temp where this AC unit works well. Next month and into about mid-September is another story. Temps average 90* and above so I need to do something with it if I intend to drive it - and I intend to do just that in about 15 minutes - its time for a round of golf. The thermostat was coiled up and stuffed inside the air box - my understanding is the thermostat needs to be in contact with the evap coils to prevent icing up. Even where it is now it cycles the compressor - I can hear it clicking on and off while driving. Not sure what to do with that since it already 'works'.
Gilmore should have stuck with what works. Mine 'works' but only because a nephew and I had the time and equipment to be able to modify the compressor mount so it wouldn't interfere with the dual carb linkage. Gilmore seemed adamant about the kit clearing the linkage for dual 44mm carbs (HPMX - same as Weber 44 IDF) but I'm wondering if he actually mounted his kit on a car equipped with these carbs. There is nothing different between the HPMX and IDF setups.
And I'm still not happy having to spend $60 out of pocket for a hose that should have been included.
_________________
71 Ghia Coupe - stock body - no rust! Powered by a 2110 W/Dual HPMX 44's - Rancho Pro Street Transaxle - A/C by Gilmore
Other car - 2013 VW Golf TDI |
|
| Back to top |
|
|
|


