| Author |
Message |
oakman
Samba Member

Joined: February 05, 2014
Posts: 1715
Location: Edge of the Desert, Ca

|
 Posted: Wed Aug 06, 2014 6:26 pm Post subject: Posted: Wed Aug 06, 2014 6:26 pm Post subject: |
 |
|
| notchboy wrote: |
Are there any stock pics out there for you to go by? What kind of material did they use originally?
Was this stock?
|
As far as I can tell it is original to the camper. The cushions even have eyelets sewn into them so the air can escape when you sit or lay down on the bed. Fluxcap's camper had same color brown but without the basketweave texture. The first link on the first page of this thread shows one that looks exactly like mine. I have yet to find any info except what I have found here on The Samba.
Last edited by oakman on Thu Aug 07, 2014 12:06 pm; edited 1 time in total |
|
| Back to top |
|
 |
notchboy
Samba Member

Joined: April 27, 2002
Posts: 22460
Location: Escondido CA
|
| Posted: Wed Aug 06, 2014 8:05 pm Post subject: |
|
|
Was this originally a fit it yourself kit or were these sold through someone built?
I would think its a build it yourself kit?
_________________
| t3kg wrote: |
OK, this thread is over. You win. |
Jason "notchboy" Weigel
1964 1500 S
1964 T34 S Convertible
1977 Westfalia Camper pop-top |
|
| Back to top |
|
|
oakman
Samba Member
Joined: February 05, 2014
Posts: 1715
Location: Edge of the Desert, Ca
|
| Posted: Thu Aug 07, 2014 10:34 am Post subject: |
|
|
If you read through this thread on the "Alabama Camper" he tells the story of purchasing the bus from the daughter of the original owner who used her insurance money from hail damage to pay for the conversion. http://www.thesamba.com/vw/forum/viewtopic.php?t=487777&highlight=alabama+camper
There are variations among these kits from the few I've seen here. Mine had 120 volt hookup and a 120volt fluorescent light that looked absolutely original to the kit. (the other outlets and lights you can see in the first pics are obviously hacked in). They all have the same random groove paneling, swooped curtain valances, and the curved counter top/sink combo. In the I.D. your camper thread it refers to them as Montgomery Ward AKA Coleman?? |
|
| Back to top |
|
|
oakman
Samba Member
Joined: February 05, 2014
Posts: 1715
Location: Edge of the Desert, Ca
|
| Posted: Sun Aug 17, 2014 11:34 am Post subject: |
|
|
I re-installed the folding bed unit to figure out how it actually works. This is quite the odd contraption!! The folding leg in the front was missing so I made a new one.
I have an early bay window westy bed I was thinking of using instead, but I think I'll stick with what was og, besides I really don't want to drill any more holes in the bus! This is just test fitting, I'm rebuilding it with new wood and new upholstery.
The hammer is not original equipment...
As scary as it looks, I put my trust in the design of this thing and tried it out. It actually seems to work pretty good and it folds up/down nicely.
Finished building the door tables. I'm pleased with how they turned out.
Started on the seat behind driver. I only have a partial photo of one so it's taking some time to get the fit right. That's it for now, back to work! |
|
| Back to top |
|
|
wcfvw69 
Samba Purist

Joined: June 10, 2004
Posts: 13389
Location: Arizona
|
| Posted: Sun Aug 17, 2014 11:56 am Post subject: |
|
|
Those tables look fantastic! Can I ask where you bought the laminate and especially, that aluminum trim you wrapped it in?
Thanks
_________________
Contact me at [email protected]
Follow me on instagram @sparxwerksllc
Decades of VW and VW parts restoration experience.
The Samba member since 2004.
**Now rebuilding throttle bodies for VW's and Porsche's**
**Restored German Bosch distributors for sale or I can restore yours**
**Restored German Pierburg fuel pumps for sale or I can restore yours**
**Restored Porsche fuel pumps or I can restore yours**
**Restored Porsche distributors or I can restore yours** |
|
| Back to top |
|
|
oakman
Samba Member
Joined: February 05, 2014
Posts: 1715
Location: Edge of the Desert, Ca
|
| Posted: Sun Aug 17, 2014 12:27 pm Post subject: |
|
|
| wcfvw69 wrote: |
Those tables look fantastic! Can I ask where you bought the laminate and especially, that aluminum trim you wrapped it in?
Thanks |
Thanks! These tables are my own home-brew concoction. Started with Masonite, painted the Masonite with Silver White paint from Wolfsburg West. Sprinkled some Martha Stewart Vintage glitter, then used Triple Thick Glaze which is like shellac in a spray can. After letting the clear dry a few days, wet sanded it and buffed out with compound. Glued it to 1/2" plywood. The aluminum trim is from Vintage Trailer Supply. It's the satin finish, they also have it in polished but is a slightly different size. It took a few failures to end up where I'm at. One issue is making sure the glitter is all laying flat. If I did it over again I would probably try an automotive clear with gold flake in it. |
|
| Back to top |
|
|
hoagy86
Samba Member
Joined: September 18, 2012
Posts: 366
Location: Illinois
|
| Posted: Sun Aug 17, 2014 1:12 pm Post subject: |
|
|
wow I also love the way you have updated your bus it has come along way nice job!  |
|
| Back to top |
|
|
wcfvw69
Samba Purist
Joined: June 10, 2004
Posts: 13389
Location: Arizona
|
| Posted: Sun Aug 17, 2014 1:13 pm Post subject: |
|
|
| oakman wrote: |
| wcfvw69 wrote: |
Those tables look fantastic! Can I ask where you bought the laminate and especially, that aluminum trim you wrapped it in?
Thanks |
Thanks! These tables are my own home-brew concoction. Started with Masonite, painted the Masonite with Silver White paint from Wolfsburg West. Sprinkled some Martha Stewart Vintage glitter, then used Triple Thick Glaze which is like shellac in a spray can. After letting the clear dry a few days, wet sanded it and buffed out with compound. Glued it to 1/2" plywood. The aluminum trim is from Vintage Trailer Supply. It's the satin finish, they also have it in polished but is a slightly different size. It took a few failures to end up where I'm at. One issue is making sure the glitter is all laying flat. If I did it over again I would probably try an automotive clear with gold flake in it. |
Holy cow! You really went for it, creating you're own masonite top color. It's really looks good.
Was the aluminum trim hard to bend around the corners of the table? Thanks for sharing where you sourced it.
_________________
Contact me at [email protected]
Follow me on instagram @sparxwerksllc
Decades of VW and VW parts restoration experience.
The Samba member since 2004.
**Now rebuilding throttle bodies for VW's and Porsche's**
**Restored German Bosch distributors for sale or I can restore yours**
**Restored German Pierburg fuel pumps for sale or I can restore yours**
**Restored Porsche fuel pumps or I can restore yours**
**Restored Porsche distributors or I can restore yours** |
|
| Back to top |
|
|
oakman
Samba Member
Joined: February 05, 2014
Posts: 1715
Location: Edge of the Desert, Ca
|
| Posted: Sun Aug 17, 2014 2:27 pm Post subject: |
|
|
| hoagy86 wrote: |
| wow I also love the way you have updated your bus it has come along way nice job! |
Thank you! It's been fun, can't wait to get it finished though. |
|
| Back to top |
|
|
oakman
Samba Member
Joined: February 05, 2014
Posts: 1715
Location: Edge of the Desert, Ca
|
| Posted: Sun Aug 17, 2014 2:34 pm Post subject: |
|
|
| Quote: |
| Was the aluminum trim hard to bend around the corners of the table? Thanks for sharing where you sourced it. |
The trim is very easy to bend even around tight corners. I just screwed it on as I went, then trimmed the excess. I ended up buying from Vintage Trailer because I couldn't seem to find anything else locally. |
|
| Back to top |
|
|
Dustin B
Samba Member

Joined: March 29, 2007
Posts: 1017
Location: hesperia, Ca USA
|
| Posted: Sun Aug 17, 2014 11:31 pm Post subject: |
|
|
Stop it. Just stop it. Your making everyone around you look bad. Lol
Hey I got something for you next time I see you.
Dustin
_________________
Wanted Victoria motors licence plate frame.
62 og paint L469 type 1
61 og paint L31 DD panel type 2
64 heilite viscount tent trailer
71 sears clamshell trailer
I <3 Brazilian busses
Original paint and patina extravaganza http://www.thesamba.com/vw/forum/viewtopic.php?t=187156 |
|
| Back to top |
|
|
fluxcap
Samba Member
Joined: February 07, 2006
Posts: 1969
Location: Newnan GA
|
| Posted: Mon Aug 18, 2014 5:46 am Post subject: |
|
|
Great job man! Those tables are awesome, and I love seeing how that seat/bed works. I never tried to install mine, but just looking at it, I never could wrap my head around how it would function.
_________________
Eric - 1966 camper bus
"It's like, how much more black could this be, and the answer is none.......none more black." |
|
| Back to top |
|
|
oakman
Samba Member
Joined: February 05, 2014
Posts: 1715
Location: Edge of the Desert, Ca
|
| Posted: Mon Aug 18, 2014 10:04 am Post subject: |
|
|
^^^Thanks Fluxcap, I was worried it was going to collapse when I tried it out, such an odd set up.
| Dustin B wrote: |
Stop it. Just stop it. Your making everyone around you look bad. Lol
Hey I got something for you next time I see you.
Dustin |
 You would have been laughing your ass off watching me hunt down supplies at all the local craft stores! Let's get crafty! You would have been laughing your ass off watching me hunt down supplies at all the local craft stores! Let's get crafty!
Cruise night friday? |
|
| Back to top |
|
|
rebapuck
Samba Member
Joined: May 17, 2007
Posts: 1023
Location: Chapel Hill NC
|
| Posted: Mon Aug 18, 2014 8:21 pm Post subject: |
|
|
My bed , just like yours, is the easiest thing to set up. Won't collapse once you have the under-seat block-off.
For those trying to figure it out, make sure you have the chain connecting it to the rear deck.
_________________
Judy
1966 Camper "Hannah"
1967 SingleCab "Khady" |
|
| Back to top |
|
|
rebapuck
Samba Member
Joined: May 17, 2007
Posts: 1023
Location: Chapel Hill NC
|
| Posted: Mon Aug 18, 2014 8:22 pm Post subject: |
|
|
Can you show us the door-mounted brackets holding the tables up?
_________________
Judy
1966 Camper "Hannah"
1967 SingleCab "Khady" |
|
| Back to top |
|
|
oakman
Samba Member
Joined: February 05, 2014
Posts: 1715
Location: Edge of the Desert, Ca
|
| Posted: Tue Aug 19, 2014 10:24 am Post subject: |
|
|
| rebapuck wrote: |
| Can you show us the door-mounted brackets holding the tables up? |
I made some table props from paneling scraps to get the fit right. I'll do it in metal later.
The aluminum catches are original to the kit I'm sure, they're pieces of the ice box counter trim reversed & upside down. Do you have a photo of the main table leg? I'm not sure what it should be. |
|
| Back to top |
|
|
rebapuck
Samba Member
Joined: May 17, 2007
Posts: 1023
Location: Chapel Hill NC
|
| Posted: Tue Aug 19, 2014 8:32 pm Post subject: |
|
|
My table leg is long gone. I got rid of it because I always seemed to kick it, spilling everything. But it was cut out of the same paneling as the walls.
_________________
Judy
1966 Camper "Hannah"
1967 SingleCab "Khady" |
|
| Back to top |
|
|
BarryL
Samba Member

Joined: November 01, 2004
Posts: 14266
Location: Casa de Oro, California
|
| Posted: Wed Aug 20, 2014 8:44 am Post subject: |
|
|
| A lot of Sundials have that same type table stay, fwiw. |
|
| Back to top |
|
|
oakman
Samba Member
Joined: February 05, 2014
Posts: 1715
Location: Edge of the Desert, Ca
|
| Posted: Wed Aug 20, 2014 2:35 pm Post subject: |
|
|
| ^^^Good to know, thank you all for your replies. |
|
| Back to top |
|
|
oakman
Samba Member
Joined: February 05, 2014
Posts: 1715
Location: Edge of the Desert, Ca
|
| Posted: Wed Sep 10, 2014 7:16 pm Post subject: |
|
|
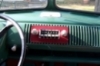
A little more progress on the interior. Still many things to do but here's where I'm at:
The upholstery was extra from a buddy. Late bay re-pop material, nice stuff with foam backing. The Ward's emblem was advertised as a motorcycle side cover badge, whatever, I had to have it! I was suprised how much more quiet the bus is now with the flooring, seats etc. Still need to pick out curtain fabric.
Last edited by oakman on Wed Sep 10, 2014 7:22 pm; edited 1 time in total |
|
| Back to top |
|
|
|


