| Author |
Message |
AZ66Bug
Samba Member

Joined: February 17, 2014
Posts: 311
Location: Chandler, AZ

|
 Posted: Sun Jun 15, 2014 7:26 pm Post subject: Restoration of our 66 Bug in Arizona Posted: Sun Jun 15, 2014 7:26 pm Post subject: Restoration of our 66 Bug in Arizona |
 |
|
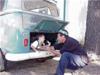
We picked up this 66 beetle early this year. Pretty rough shape but said to be solid and rust free and the price was right. A 1300 (we later discovered the original engine has been swapped for a 12000. We plan to keep it pretty much stock but with a few upgrades such as front disk brakes, a 1600 DP and some custom gauges to name a few.
Here is the car when we first unloaded it from the trailer and after a little disassembly:
_________________
66 Beetle Sedan, restored 2014
66 Mustang: Original Owner, restored 2008
66 Ford F250: 4th Owner, restored 2013 |
|
| Back to top |
|
 |
AZ66Bug
Samba Member
Joined: February 17, 2014
Posts: 311
Location: Chandler, AZ
|
| Posted: Sun Jun 15, 2014 7:30 pm Post subject: |
|
|
The rust-free part was a little optimistic! Here are some more shots of the disassembly. This car obviously spent a fair amount of time wallowing in the mud like a pig!
_________________
66 Beetle Sedan, restored 2014
66 Mustang: Original Owner, restored 2008
66 Ford F250: 4th Owner, restored 2013 |
|
| Back to top |
|
|
AZ66Bug
Samba Member
Joined: February 17, 2014
Posts: 311
Location: Chandler, AZ
|
| Posted: Sun Jun 15, 2014 7:38 pm Post subject: |
|
|
Starting to make some positive progress. Had the body sand blasted and got it over to our body man for lots of work and paint - eventually. We wanted to do as much as possible on our own but our single bay in the garage is just not big enough for painting. Also got the chassis over the the blaster. Amazing that the pan fit perfectly in the bed of our 66 F250!
_________________
66 Beetle Sedan, restored 2014
66 Mustang: Original Owner, restored 2008
66 Ford F250: 4th Owner, restored 2013 |
|
| Back to top |
|
|
AZ66Bug
Samba Member
Joined: February 17, 2014
Posts: 311
Location: Chandler, AZ
|
| Posted: Sun Jun 15, 2014 7:58 pm Post subject: |
|
|
Found out the rust was not terrible. Had to replace the passenger rear floor pan. It looked like Swiss cheese after blasting. The driver rear was much better and will just need a little work to fill a few rust holes. With the whole thing apart we also decided to tackle the clutch tube reinforcement. Should have cut the holes a little bigger but we managed to get the job done. This is our first attempt to weld with our new little MIG 135 - so no laughing  Used a little z-bar support in the middle and added some spot welds to the front support. Used a little z-bar support in the middle and added some spot welds to the front support.
Needed to replace the driver seat track and the passenger rear pan. A little hard to see in the photos but it was Swiss cheese! Again, our first welding attempt so no laughing. We will tackle the seat track in the coming week.
Got some of the suspension parts blasted in our home cabinet and painted.
Stay tuned for more progress
_________________
66 Beetle Sedan, restored 2014
66 Mustang: Original Owner, restored 2008
66 Ford F250: 4th Owner, restored 2013 |
|
| Back to top |
|
|
noah2burchell
Samba Member

Joined: September 04, 2012
Posts: 147
Location: morristown tennessee
|
| Posted: Sun Jun 15, 2014 8:25 pm Post subject: |
|
|
Nice work guys. I'm always glad to see a car come back to life. Keep up the good work.
_________________
Wanted: Anything from Risacher Motors VW dealership in Morristown, Tennessee or Westgate VW in St. Louis Missouri.
Original flat window 1302 Super Beetle |
|
| Back to top |
|
|
AZ66Bug
Samba Member
Joined: February 17, 2014
Posts: 311
Location: Chandler, AZ
|
| Posted: Tue Jun 24, 2014 6:50 pm Post subject: |
|
|
Got some more work done on the chassis this past week. Got the new seat track welded in. Had to trim the teeth on the tunnel side for the slide catch - the repop ones were the wrong size. Got seam sealer on around the floor pan weld and a few other places where there were gaps.
Decided to go with Master Series for the chassis. Two coats of the rust encapsulator primer in silver and then one top coat of the two part gloss black. The paint went on nice with a foam roller and paint brush. Might put on a second coat on the bottom side if there is enough material. Messy and smelly but looks like it will hold up nicely.
We can't wait to start installing all the restored and new suspension and brake components!
_________________
66 Beetle Sedan, restored 2014
66 Mustang: Original Owner, restored 2008
66 Ford F250: 4th Owner, restored 2013 |
|
| Back to top |
|
|
Cusser
Samba Member

Joined: October 02, 2006
Posts: 31361
Location: Hot Arizona
|
|
| Back to top |
|
|
bigdog1962
Samba Member

Joined: August 11, 2010
Posts: 1586
Location: Augusta, Georgia
|
| Posted: Wed Jun 25, 2014 4:50 am Post subject: |
|
|
| Noticed you said "we" - whose your helper? (I'm just jealous..) |
|
| Back to top |
|
|
AZ66Bug
Samba Member
Joined: February 17, 2014
Posts: 311
Location: Chandler, AZ
|
| Posted: Wed Jun 25, 2014 5:42 am Post subject: |
|
|
| bigdog1962 wrote: |
| Noticed you said "we" - whose your helper? (I'm just jealous..) |
Its a father/son project and it will ultimately become my son's first car!
_________________
66 Beetle Sedan, restored 2014
66 Mustang: Original Owner, restored 2008
66 Ford F250: 4th Owner, restored 2013 |
|
| Back to top |
|
|
charliesnyder
Samba Member
Joined: June 10, 2008
Posts: 81
Location: Spanaway, WA
|
| Posted: Sat Jun 28, 2014 11:39 am Post subject: |
|
|
Subscribed! Awesome to have a father/son project, great work so far!
I can't wait until my boy is old enough to work in the garage with me! |
|
| Back to top |
|
|
AZ66Bug
Samba Member
Joined: February 17, 2014
Posts: 311
Location: Chandler, AZ
|
| Posted: Sat Jun 28, 2014 12:24 pm Post subject: |
|
|
Yea - its a ton of fun. My son is actually getting to be a pretty competent mechanic. And he has a better memory than me so that will be handy when we get to areas where we forgot to take enough pictures of the deconstruct
He has been helping with all our old cars. Helped install the interior on our 66 Mustang when he was 10 and helped with a bunch of work on our 66 truck in the last two years - still more to do on that one.
Getting ready to bolt on the axle beam and get the front suspension put together. More photos soon!
_________________
66 Beetle Sedan, restored 2014
66 Mustang: Original Owner, restored 2008
66 Ford F250: 4th Owner, restored 2013 |
|
| Back to top |
|
|
AZ66Bug
Samba Member
Joined: February 17, 2014
Posts: 311
Location: Chandler, AZ
|
| Posted: Sun Jun 29, 2014 9:31 pm Post subject: |
|
|
Finished painting the top side of the pan and got the axle beam mounted. Was not looking forward to reloading the torsion springs but it turned out not to be all that bad. Adapted some advice from the forum and the Haynes repair manual. Rounded over one end of all the leaves a tiny bit to prevent any hangups. Started with the center four wide leaves, then the two thin on top, the single on top and then repeated this for the bottom. One thing that was helpful was to use a thin stick of wood underneath the leaves because the thinner leafs on the bottom had a tendency to sag toward the middle of the beam. The wood stick provided a small platform underneath and kept the leaves from sagging. Still had to hunt and peck for the hole but it was pretty quick. Would not want to do this again anytime soon but it went well and better that we had hoped.
Got the torsion arms mounted on both sides top and bottom. Ready for the spindle next.
_________________
66 Beetle Sedan, restored 2014
66 Mustang: Original Owner, restored 2008
66 Ford F250: 4th Owner, restored 2013 |
|
| Back to top |
|
|
johnr156
Samba Member
Joined: April 06, 2013
Posts: 144
Location: Dixon, Ca.
|
| Posted: Mon Jun 30, 2014 3:15 pm Post subject: |
|
|
| Did you have to replace the torshion arm bearings inside the tubes? |
|
| Back to top |
|
|
AZ66Bug
Samba Member
Joined: February 17, 2014
Posts: 311
Location: Chandler, AZ
|
| Posted: Mon Jun 30, 2014 8:07 pm Post subject: |
|
|
Luckily, no. The bearing were in good condition. Cleaned them up a bit and then re-greased. Tried to clean out the gobs of grease in the tube as best we could. Black as coal but not gritty.
_________________
66 Beetle Sedan, restored 2014
66 Mustang: Original Owner, restored 2008
66 Ford F250: 4th Owner, restored 2013 |
|
| Back to top |
|
|
pdowty68
Samba Member
Joined: April 07, 2014
Posts: 224
Location: Long Island, New York
|
| Posted: Tue Jul 01, 2014 5:36 am Post subject: |
|
|
| I just got a 66 with a 1200 In March! Mines not as near as nice as yours though |
|
| Back to top |
|
|
AZ66Bug
Samba Member
Joined: February 17, 2014
Posts: 311
Location: Chandler, AZ
|
| Posted: Sat Jul 12, 2014 7:52 pm Post subject: |
|
|
Some more progress. Got more of the front suspension installed including the disc brake kit. Got the pedals installed and ran the accelerator and clutch cables. Finally got the transaxle back from the shop (AZ Transaxle in PHX). Installed those pesky spring plates. Learned all the things not to do again with the first one - the second one went on pretty smoothly. The biggest challenge was the do this without any weight on the pan. At one point we had the whole family sitting in the pan plus bags of water softner salt and tool boxes. Finally got enough weight in the pan to keep it from lifting off the ground before we got the spring plates high enough to sit on that little ledge. The new bushing were a pain too. At least one of them had the whole off center which made in impossible to install the cover plate on the torsion tube. Ended up using a few of the original ones, which surprisingly were still in decent shape and pliable. May try to reinstall the new ones later on.
Then installed the transaxle - pretty straightforward. We only had to lift it in and out twice  Still screwed up though when we discovered one cannot run the clutch cable through the bowden ltube and the little support on the top of the tranny with it hooked up to the pedal. Looks like we will be taking the pedal assemble off again to restring the cable. Got a little ahead of ourselves on that one. Still screwed up though when we discovered one cannot run the clutch cable through the bowden ltube and the little support on the top of the tranny with it hooked up to the pedal. Looks like we will be taking the pedal assemble off again to restring the cable. Got a little ahead of ourselves on that one.
The body shop is making great progress. Got the driver quarter panel replaced and repaired some rust in the rear heat channel. The guide coat went on some pieces and paint is not far away after more body panel alignment. Still pondering the final color. Rear brakes and shocks are next. Stay tuned!
_________________
66 Beetle Sedan, restored 2014
66 Mustang: Original Owner, restored 2008
66 Ford F250: 4th Owner, restored 2013 |
|
| Back to top |
|
|
gt1953
Samba Member
Joined: May 08, 2002
Posts: 13848
Location: White Mountains Arizona
|
| Posted: Sun Jul 13, 2014 7:46 am Post subject: |
|
|
Looks like the progress is going good, when can I bring mine to you?
_________________
Volkswagen: We tune what we drive.
Numbers Matching VW's are getting harder to find. Source out the most Stock vehicle and keep that way. You will be glad you did.
72 type 1
72 Squareback
({59 Euro bug, 62, 63, 67, 68, 69, 73 type ones 68 & 69 type two, 68 Ghia all sold}) |
|
| Back to top |
|
|
AZ66Bug
Samba Member
Joined: February 17, 2014
Posts: 311
Location: Chandler, AZ
|
| Posted: Sun Jul 13, 2014 8:01 am Post subject: |
|
|
if it was up to my son, he'd say when this one in done I know the first thing he will say when this 66 is done - so dad, what's next? Make your appointment now!
_________________
66 Beetle Sedan, restored 2014
66 Mustang: Original Owner, restored 2008
66 Ford F250: 4th Owner, restored 2013 |
|
| Back to top |
|
|
AZ66Bug
Samba Member
Joined: February 17, 2014
Posts: 311
Location: Chandler, AZ
|
| Posted: Sat Jul 19, 2014 11:16 am Post subject: |
|
|
More progress. Got the rear suspension wrapped up, including the drum brakes. Installed the MC and bleed the brakes. After installing the tie rods we now see our scheme for connecting the dual circuit MC to a single original reservoir is going to need some modification. We will be bleeding the brakes again  Found a great thread here on Samba that uses a bus dual circuit reservoir on top the MC, which is then feed by the original reservoir in its original location (http://www.thesamba.com/vw/forum/viewtopic.php?t=484617&postdays=0&postorder=asc&start=20). Got some parts on order. Will probably run a short rubber line from the bus reservoir to a metal line to avoid the rubbing issues noted in the thread. Got the brake pedal adjusted as well. Found a great thread here on Samba that uses a bus dual circuit reservoir on top the MC, which is then feed by the original reservoir in its original location (http://www.thesamba.com/vw/forum/viewtopic.php?t=484617&postdays=0&postorder=asc&start=20). Got some parts on order. Will probably run a short rubber line from the bus reservoir to a metal line to avoid the rubbing issues noted in the thread. Got the brake pedal adjusted as well.
The body work and paint are moving along very well. The car was originally Bahama blue but we are going with a 57-58 color Agave Green (L240). There were a lot of great greens for beetles pre 1966 and this was the one we finally chose after having 7 spray out cards made in greens and blues. So far, just an opening coat on the interior, trunk and engine bay. I think we made the right choice. We have an ivory steering wheel and plan to do two-tone wheels with the ivory and either black or body color in the center of the wheel. Plan to run 195/65/15 all around. Have some after-market 5.5 x 15 wheels 67+.
Still pondering the many engine options. Since the car did not end up having its original 1300 we are going to start from scratch. At the moment we are leading towards a 1776 DP with a single center carb. The options and opinions on different routes (SP/DP, single/dual carb, stroke/non-stroke) are making our heads hurt.  If anyone wants to chime in - go ahead!! Guess we like the ease of a single carb (maybe a 34PIC3) but know the advantages of a dual set-up like some Weber IDFs. Right now Dan at Competition Engineering is going to find us a solid Mag block and we will go from there. The 1200 mag block in the car did not have cam bearings and its very close to beyond machining to add them. If anyone wants to chime in - go ahead!! Guess we like the ease of a single carb (maybe a 34PIC3) but know the advantages of a dual set-up like some Weber IDFs. Right now Dan at Competition Engineering is going to find us a solid Mag block and we will go from there. The 1200 mag block in the car did not have cam bearings and its very close to beyond machining to add them.
More to come!
_________________
66 Beetle Sedan, restored 2014
66 Mustang: Original Owner, restored 2008
66 Ford F250: 4th Owner, restored 2013 |
|
| Back to top |
|
|
Cusser
Samba Member
Joined: October 02, 2006
Posts: 31361
Location: Hot Arizona
|
| Posted: Sat Jul 19, 2014 11:51 am Post subject: |
|
|
| AZ66Bug wrote: |
| Since the car did not end up having its original 1300 we are going to start from scratch. At the moment we are leading towards a 1776 DP with a single center carb. The options and opinions on different routes (SP/DP, single/dual carb, stroke/non-stroke) are making our heads hurt. If anyone wants to chime in - go ahead!! Guess we like the ease of a single carb (maybe a 34PIC3) but know the advantages of a dual set-up like some Weber IDFs. |
My only hands-on experience with larger-than-stock engines is my own 1835cc DP. I did this upgrade in 1976, refreshed once since. I have a single Weber (40DCNF) and German 009 on it, reground non-counterweighted stock crankshaft, stock cam, stock rebuilt DP heads (except for opening up), quiet exhaust, CB Maxi2 26mm oil pump/filter. I'm pretty happy with its power.
So I think 1776 DP with a single center carb would be a good choice; if you want to drive my VW to use as a guide, PM me, north Phoenix.
_________________
1970 VW (owned since 1972) and 1971 VW Convertible (owned since 1976), second owner of each. The '71 now has the 1835 engine, swapped from the '70. Second owner of each. 1988 Mazda B2200 truck, 1998 Frontier, 2014 Yukon, 2004 Frontier King Cab. All manual transmission except for the Yukon. http://www.thesamba.com/vw/forum/album_page.php?pic_id=335294 http://www.thesamba.com/vw/forum/album_page.php?pic_id=335297 |
|
| Back to top |
|
|
|


