| Author |
Message |
Vee-Dubs 87
Samba Member
Joined: April 02, 2014
Posts: 28
Location: Houston

|
 Posted: Wed Aug 13, 2014 8:45 am Post subject: Solar with NO permanent mods Posted: Wed Aug 13, 2014 8:45 am Post subject: Solar with NO permanent mods |
 |
|
Hi ya'll
I did a search on this and didn't really find what I was looking for so I figured I'd see if anyone could help me out.
Not happy with my current solar set up in my Westy and I wanted to get some opinions. My goal is to make ZERO permanent modifications to the van. No holes, no cuts, no nothing. Right now, I've got an 80 watt panel zip tied to the bottom of my safari rack (and to be clear, it's zip tied IN the rack, not UNDER the rack). The panel wires are routed through the roof vent and secured to the driver's side B pillar in the van. Obviously this configuration is far less than ideal for a number of reasons.
Essentially I want to be able to take the whole system out of the van without any trace that it was there in the first place.
With those parameters in mind, is the set up I have now as good as I'm going to get? I thought about moving the panel to the luggage rack and running the wires through the tent flap, but I've never seen it done so I don't know if there are any potential problems with that. Or maybe run the wires through the door somehow? I dunno.
Anyone have any thoughts or ideas on this? |
|
| Back to top |
|
 |
Ahwahnee
Samba Member

Joined: June 05, 2010
Posts: 9796
Location: Mt Lemmon, AZ
|
| Posted: Wed Aug 13, 2014 8:57 am Post subject: |
|
|
When I set mine up in camp the panel is in the roof rack and I run the wires thru the drivers side door opening and just close the door. Plenty of give in seal that the wires aren't pinched or damaged.
But that is a static thing -- I have not driven with the wires coming past the seal so I can't say if air whistles through there or other annoying things happen. |
|
| Back to top |
|
|
MSmyth
Samba Member
Joined: September 02, 2008
Posts: 39
Location: Morgantown, WV
|
| Posted: Wed Aug 13, 2014 9:00 am Post subject: |
|
|
My panel is attached to Yakima bars using standard Yakima mounts (round plastic mounts with wing nuts). It can be attached or removed quickly so that I can best utilize available sunlight with solar cable extensions.
The cables pass through the existing access grommets used by the rear hatch defroster cables, passed the AC cabinet and down through the hanging closet to the area under the rear seat where my batteries and controller are housed.
Other than the Yakima bar mounts, this is all removable. You don't state how your safari basket is attached but if it is a Thule/Yakima type system this setup would be reversible.
_________________
Current driveway art:
1984 Westy / Bostig
2013 Toyota Prius Plug-in
1979 Land Rover Series III 109 Safari
2000 Dodge Dakota 4x4 Magnum
2004 Range Rover HSE (latest project... looking for a motor!) |
|
| Back to top |
|
|
Vee-Dubs 87
Samba Member
Joined: April 02, 2014
Posts: 28
Location: Houston
|
| Posted: Wed Aug 13, 2014 9:25 am Post subject: |
|
|
| MSmyth wrote: |
My panel is attached to Yakima bars using standard Yakima mounts (round plastic mounts with wing nuts). It can be attached or removed quickly so that I can best utilize available sunlight with solar cable extensions.
The cables pass through the existing access grommets used by the rear hatch defroster cables, passed the AC cabinet and down through the hanging closet to the area under the rear seat where my batteries and controller are housed.
Other than the Yakima bar mounts, this is all removable. You don't state how your safari basket is attached but if it is a Thule/Yakima type system this setup would be reversible. |
Sorry, yes they are Yakima bars/mounts as well
I didn't think of the grommets in the rear, that might work. What gauge wire are you running from the panel? Wondering if 10 gauge will fit through
Last edited by Vee-Dubs 87 on Wed Aug 13, 2014 10:20 am; edited 1 time in total |
|
| Back to top |
|
|
danfromsyr
Samba Member

Joined: March 01, 2004
Posts: 15141
Location: Syracuse, NY
|
| Posted: Wed Aug 13, 2014 9:55 am Post subject: |
|
|
run the wires to the back and down the rear vents and pillars.
then in the engine compartment tie into the 12v system at the alternator post or the stud in the black box.
allow a little length for poptop movement but not much at the back corner.
_________________
| Abscate wrote: |
| These are the reasons we have words like wanker |
|
|
| Back to top |
|
|
rym
Samba Member
Joined: August 03, 2013
Posts: 119
Location: vancouver bc
|
| Posted: Wed Aug 13, 2014 12:59 pm Post subject: |
|
|
anyone done this, connecting the charge controller at the alternator? sure is nice to enter at the hatch defrost grommet then keep wiring runs to a minimum. All tucked away in the black box. Any issues come up when hooking up like this?
Then the relay/yandina/whatever you have set up for aux battery wouldn't know the difference between alt or solar chargin..except way less current, which i think doesn't change their operation.
| danfromsyr wrote: |
run the wires to the back and down the rear vents and pillars.
then in the engine compartment tie into the 12v system at the alternator post or the stud in the black box.
allow a little length for poptop movement but not much at the back corner. |
_________________
1990 westy auto |
|
| Back to top |
|
|
shadetreetim
Samba Member

Joined: January 10, 2011
Posts: 1994
Location: Riverside, California
|
| Posted: Wed Aug 13, 2014 1:54 pm Post subject: |
|
|
| danfromsyr wrote: |
run the wires to the back and down the rear vents and pillars.
|
I did this, but then routed the wire through the engine bay, and in through the old heater hose opening to my aux batteries under the back seat. The charge controller is under the back seat as well. Solar panel mounted to Thule rack on roof. Completely reversible if desired, although that wasn't my goal. 
The weatherproof UV rated 10 gauge wire I ran from the solar panel is too large to fit through any existing grommet around the rear hatch.
_________________
Tim Potts
Doing my best every time I drive it to dispel the myth these Vanagons have to be slow!
'89 Vanagon Bluestar/Country Homes 1.8T & .77 4th
'74 Jeep CJ5 |
|
| Back to top |
|
|
Alex Proulx
Samba Member

Joined: August 26, 2010
Posts: 294
Location: Moncton, New Brunswick, Canada
|
|
| Back to top |
|
|
jmranger
Samba Member
Joined: January 14, 2010
Posts: 701
Location: Quebec
|
| Posted: Wed Aug 13, 2014 4:24 pm Post subject: |
|
|
| shadetreetim wrote: |
| danfromsyr wrote: |
run the wires to the back and down the rear vents and pillars.
|
I did this, but then routed the wire through the engine bay, and in through the old heater hose opening to my aux batteries under the back seat. The charge controller is under the back seat as well. Solar panel mounted to Thule rack on roof. Completely reversible if desired, although that wasn't my goal. |

Mine's at the bottom of this page:
http://www.thesamba.com/vw/forum/viewtopic.php?t=295946&start=60
(multiple good ideas in that thread)
No regret on the luggage rack setup - I'd redo it the same. The wiring that goes through the tent window is annoying, though. The charge controller is under the driver's seat, connecting to the fridge relay through a Y custom-made harness that allowed a no-wire-cut setup. No regret on that part too. All the wiring is undersized by most standards, but I still only have one battery, and I'm pretty much using the panel as an oversized tender. |
|
| Back to top |
|
|
alain riaud
Samba Member
Joined: October 13, 2011
Posts: 172
Location: France
|
| Posted: Wed Aug 13, 2014 10:30 pm Post subject: |
|
|
Does not fit exactly your requirements as my rig is a VW factory plastic high top with a custom made camping Equipment.
I dont't like to drill holes either.
I installed a pair of male/female MC4 sockets on one side of the vent. So I had to drill the vent static part only.
Using sockets is very convenient, with a pair of extending cables, I can park the van in the shade while the solar panel is in full sun.
The wiring is based on 6mm2 solar cable going through existing holes down t0 the solar controller Under the driver's seat. |
|
| Back to top |
|
|
MSmyth
Samba Member
Joined: September 02, 2008
Posts: 39
Location: Morgantown, WV
|
| Posted: Thu Aug 14, 2014 8:21 am Post subject: |
|
|
| Vee-Dubs 87 wrote: |
| MSmyth wrote: |
My panel is attached to Yakima bars using standard Yakima mounts (round plastic mounts with wing nuts). It can be attached or removed quickly so that I can best utilize available sunlight with solar cable extensions.
The cables pass through the existing access grommets used by the rear hatch defroster cables, passed the AC cabinet and down through the hanging closet to the area under the rear seat where my batteries and controller are housed.
Other than the Yakima bar mounts, this is all removable. You don't state how your safari basket is attached but if it is a Thule/Yakima type system this setup would be reversible. |
Sorry, yes they are Yakima bars/mounts as well
I didn't think of the grommets in the rear, that might work. What gauge wire are you running from the panel? Wondering if 10 gauge will fit through |
10 AWG was a tight fit, but I made it work. I prefer this to using the vents as it is less obvious and I was able to route the two wires from the panel under my rocket box (which shares the Yakima bars with the solar panel) and through the grommet. I also wrapped the two solar wires together in white wire wrap to more match the pop top fiberglass. I'm very happy with the results.
_________________
Current driveway art:
1984 Westy / Bostig
2013 Toyota Prius Plug-in
1979 Land Rover Series III 109 Safari
2000 Dodge Dakota 4x4 Magnum
2004 Range Rover HSE (latest project... looking for a motor!) |
|
| Back to top |
|
|
Vee-Dubs 87
Samba Member
Joined: April 02, 2014
Posts: 28
Location: Houston
|
| Posted: Thu Aug 14, 2014 10:45 am Post subject: |
|
|
And this is exactly why I love this forum. Ya'll rock, those are some great ideas. MSmyth, I am in complete agreement with you about the vents so I'm inclined to give the grommets a shot first and see if I can squeeze some 10 ga through as well.
I just picked up a 100 watt Renogy panel and a 30 amp controller from eBay plus a second 122 ah battery from Wally World, so I have some tinkering to do anyway. I will update with pics.
I'm all about the ideas on this, so if anyone else has a good one, keep em coming. Thanks! |
|
| Back to top |
|
|
Huxmobile
Samba Member
Joined: June 16, 2008
Posts: 141
Location: SF Bay area
|
| Posted: Thu Aug 14, 2014 11:07 am Post subject: |
|
|
| Quote: |
| I just picked up a 100 watt Renogy panel and a 30 amp controller from eBay |
I'm thinking of getting the portable 100W Renogy panel........out of curiosity, which charge controller did you spring for? and why?
_________________
87 Westy 2.1L, manual (sold) |
|
| Back to top |
|
|
Vee-Dubs 87
Samba Member
Joined: April 02, 2014
Posts: 28
Location: Houston
|
| Posted: Thu Aug 14, 2014 12:42 pm Post subject: |
|
|
| Huxmobile wrote: |
| Quote: |
| I just picked up a 100 watt Renogy panel and a 30 amp controller from eBay |
I'm thinking of getting the portable 100W Renogy panel........out of curiosity, which charge controller did you spring for? and why? |
Renogy has a good rep. Really good Amazon reviews on their panels too.
Short answer on the controller is that it came in a package with the panel, so I didn't have much say in the matter. It's a Renogy 30 amp PWM controller up to 400 watts. Doesn't seem to have the bells and whistles but I'm ok with that as long as it keeps my batteries from frying. I hear mixed things about their controllers, but it can't be any worse than the Harbor Freight 7 amp I'm using now.
The panel and controller are in the mail as we speak so once I get everything here I'll start taking some pictures
Last edited by Vee-Dubs 87 on Thu Aug 14, 2014 3:32 pm; edited 1 time in total |
|
| Back to top |
|
|
crazyvwvanman
Samba Member

Joined: January 28, 2008
Posts: 9916
Location: Orbiting San Diego
|
| Posted: Thu Aug 14, 2014 1:09 pm Post subject: |
|
|
I wouldn't worry about making 10 awg wire fit, use something smaller. Using 14 awg would be fine for 100 watt or less if the run isn't too long.
Mark |
|
| Back to top |
|
|
Vee-Dubs 87
Samba Member
Joined: April 02, 2014
Posts: 28
Location: Houston
|
| Posted: Thu Aug 14, 2014 3:28 pm Post subject: |
|
|
| crazyvwvanman wrote: |
I wouldn't worry about making 10 awg wire fit, use something smaller. Using 14 awg would be fine for 100 watt or less if the run isn't too long.
Mark |
How about to the battery? Would 14 gauge do the trick too? |
|
| Back to top |
|
|
crazyvwvanman
Samba Member
Joined: January 28, 2008
Posts: 9916
Location: Orbiting San Diego
|
| Posted: Thu Aug 14, 2014 5:19 pm Post subject: |
|
|
That depends on the wire distance between the charge controller and the battery as well as the watts of the panel. But why not use 10 awg where there isn't an issue with squeezing it into an existing narrow aperture?
Runs of light wire between the panel and charge controller will reduce the charging but not by as much as some people might think. So for example when using a detached panel set out way away from the van in the sun you don't have to run such heavy wire out to the panel if you can live with some loss.
Mark
| Vee-Dubs 87 wrote: |
| crazyvwvanman wrote: |
I wouldn't worry about making 10 awg wire fit, use something smaller. Using 14 awg would be fine for 100 watt or less if the run isn't too long.
Mark |
How about to the battery? Would 14 gauge do the trick too? |
|
|
| Back to top |
|
|
ryecatcher
Samba Member

Joined: January 02, 2014
Posts: 81
Location: Tampa, Florida
|
| Posted: Fri Aug 15, 2014 7:14 am Post subject: |
|
|
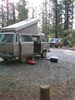
I didn't want to drill holes in mine, either. This is what I did:
http://www.thesamba.com/vw/forum/viewtopic.php?p=7155904&highlight=#7155904
I suppose the velcro is "reversible" if you go at it with some goo-gone and the like. But, man, that industrial stuff sticks like crazy.
_________________
1982 Westfalia Camper, Air Cooled
"Wendeline" |
|
| Back to top |
|
|
MSmyth
Samba Member
Joined: September 02, 2008
Posts: 39
Location: Morgantown, WV
|
| Posted: Fri Aug 15, 2014 7:32 am Post subject: |
|
|
| Vee-Dubs 87 wrote: |
I just picked up a 100 watt Renogy panel and a 30 amp controller from eBay plus a second 122 ah battery from Wally World, so I have some tinkering to do anyway. I will update with pics.
I'm all about the ideas on this, so if anyone else has a good one, keep em coming. Thanks! |
That is the panel I have. My house batteries (two 6 volt golf cart batteries from Sam's Club) power my truck fridge, house lights, an inverter that doesn't get much use, and three 12 volt outlets that get a lot of use charging devices. I'm always fully charged (battery separator light on) by noon each day. I truly couldn't be happier with the setup.
One basic lesson I did learn on battery conservation is to keep the truck fridge freezer packed full. Having that thermal mass keeps the fridge operating at its most efficient. I keep a box of otter pops in the closet and put them in the freezer as needed to replace food as we use it. (Makes us real popular with the kids camping nearby too!)
_________________
Current driveway art:
1984 Westy / Bostig
2013 Toyota Prius Plug-in
1979 Land Rover Series III 109 Safari
2000 Dodge Dakota 4x4 Magnum
2004 Range Rover HSE (latest project... looking for a motor!) |
|
| Back to top |
|
|
Vee-Dubs 87
Samba Member
Joined: April 02, 2014
Posts: 28
Location: Houston
|
| Posted: Fri Aug 15, 2014 12:25 pm Post subject: |
|
|
Thats a slick set up. I think considering you didn't have to drill, the wires out the back is a fair compromise (and really, it doesn't look horrible anyway). That's pretty much what I'm picturing for my set up here soon. Batteries in the same place under the rear seat. Looks good! |
|
| Back to top |
|
|
|
