| Author |
Message |
JBong
Samba Member
Joined: February 24, 2012
Posts: 138
Location: Goodyear AZ

|
 Posted: Thu Jan 22, 2015 12:16 pm Post subject: 1970 VW Restore *Purist Beware* Posted: Thu Jan 22, 2015 12:16 pm Post subject: 1970 VW Restore *Purist Beware* |
 |
|
Hello there from Phoenix AZ, nice 73 degrees today with a slight wind. Perfect time to be restoring my 1970 VW bug. Although I miss using her as a Daily driver. So about a month or so ago, i wanted to give the ole gal a freshing up. Like a lot of dub drivers she was my daily driver, so I couldn't just take her off the streets until I had another mode of transportation. So one day while driving her to work I noticed some smoke coming from the exhaust. It was a bit alarming but I needed to get to work. I would check it out on my next day off. So I decided to check the oil, the dip stick showed over flowed on oil. Well this is not good, I immediately drained the oil and it smelled like gas.
Well at that moment I knew the girl was sick. I called the wife and told her I was going out to find another car so I can get the 70 fixed. So I went out and bought a 2008 VW Rabbit with 44000 miles on it. Perfect gas mileage and in really good condition. So let the restore begin, now this was going to be a paint job and a engine over haul.
My plan was to put 66 fenders and add a rag top. Which includes replacing the front and rear apron. I know I know, why don't I just buy a pre 66 VW. Well because I love my 70 and I think she would look sexy with those 66 style headlights and the bumpers.
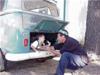
Here is a photo about a week before the restore process began.
Last edited by JBong on Thu Jan 22, 2015 4:02 pm; edited 1 time in total |
|
| Back to top |
|
 |
JBong
Samba Member
Joined: February 24, 2012
Posts: 138
Location: Goodyear AZ
|
| Posted: Thu Jan 22, 2015 12:24 pm Post subject: |
|
|
So you know the typical taking the car apart. Now lets not forget this is going to be my first restore. I first started removing the hood and fenders.
Deck lid removed... Notice the Cal style rear apron? Well it will be replaced with 66 apron.
All the glass came out real easy. Well except the front windshield, I would like to take a moment and remember the great Windshield disaster of 2014.
Rolled the girl out side, I think she know something is not right here.
Gas Tank removed. This tank will be sandblasted and repainted
|
|
| Back to top |
|
|
JBong
Samba Member
Joined: February 24, 2012
Posts: 138
Location: Goodyear AZ
|
| Posted: Thu Jan 22, 2015 12:34 pm Post subject: |
|
|
Just looking at the rats nest of wire, I am just gutting all wire and replacing it with all new wire. Purchased a complete wire harness. That way i can make it look really good.
Took me a while to figure out how to get the control knobs removed so I can get them out.
My dad bought me a Sandblast box for my 40th birthday! This is going to come in real handy for my restore.
Off to do some things around town. I will continue this later today. |
|
| Back to top |
|
|
miller0358
Samba Member
Joined: November 07, 2007
Posts: 1200
Location: northford,ct
|
| Posted: Thu Jan 22, 2015 1:38 pm Post subject: restore |
|
|
| Looks good. It's all worth it when your finally done. What color are you going with? Jeff |
|
| Back to top |
|
|
TX-73
Samba Member

Joined: January 04, 2013
Posts: 1133
Location: Texas
|
| Posted: Thu Jan 22, 2015 1:51 pm Post subject: |
|
|
Very nice  I've got the smaller blast cabinet - one of my favorite shop tools. Clean up on stuff is in minutes lol. I've got the smaller blast cabinet - one of my favorite shop tools. Clean up on stuff is in minutes lol.
Keep up the good work!
_________________
My 1973 Standard Beetle Build SOLD
Click to view image |
|
| Back to top |
|
|
JBong
Samba Member
Joined: February 24, 2012
Posts: 138
Location: Goodyear AZ
|
| Posted: Thu Jan 22, 2015 1:59 pm Post subject: Re: restore |
|
|
| miller0358 wrote: |
| Looks good. It's all worth it when your finally done. What color are you going with? Jeff |
Thanks, I have two paint colors I am throwing around. Silver or New Beetle green. |
|
| Back to top |
|
|
JBong
Samba Member
Joined: February 24, 2012
Posts: 138
Location: Goodyear AZ
|
| Posted: Thu Jan 22, 2015 2:00 pm Post subject: |
|
|
| TX-73 wrote: |
Very nice I've got the smaller blast cabinet - one of my favorite shop tools. Clean up on stuff is in minutes lol.
Keep up the good work! |
Yeah that blasting cabinet is killer! Makes this restore much easier in the long run. |
|
| Back to top |
|
|
JBong
Samba Member
Joined: February 24, 2012
Posts: 138
Location: Goodyear AZ
|
| Posted: Thu Jan 22, 2015 2:13 pm Post subject: |
|
|
When I wanted the Cal look I removed the original rear apron. You can tell since my welding is not the best.
All jacked up and no where to go
A buddy of mine loaned me his engine stand. There will be more photos of the engine tear down later in the posts.
This was my first engine removal. I kind of cheated and removed everything before i actually got the engine out.
|
|
| Back to top |
|
|
JBong
Samba Member
Joined: February 24, 2012
Posts: 138
Location: Goodyear AZ
|
| Posted: Thu Jan 22, 2015 2:23 pm Post subject: |
|
|
OK so I removed everything that needed to be taken off to get the body removed, had my best friend help me with the process. Sorry I dont have any photos of the process of actually removing the body from the pan. Although all the bolts came out nicely. There was no broke bolts in the making of this restore.
Not sure you can see the pan completely, but this is the good part. See prior to removing the body my intentions were not going to include a body off restore. I was going to get her ready to goto the body shop for the welding of the new aprons and then off to get the rag top cut. Well the PO decided that it was a good idea to put 3/4 carpet pad with 1/4 dead sounding and 1/2 tar paper. The carpet was not fitting in the bug correctly. So I figure crap this is going to be a PITA. So that is when I pulled the trigger and took the body off the pans. And this is what I found.
The PO also 1" of bondo on both pan halves. Not just one spot I mean the complete pan had 1" of bondo.
|
|
| Back to top |
|
|
houseofboyd
Samba Member

Joined: September 28, 2014
Posts: 613
Location: Flatwoods, Ky
|
|
| Back to top |
|
|
Cusser
Samba Member

Joined: October 02, 2006
Posts: 31379
Location: Hot Arizona
|
| Posted: Thu Jan 22, 2015 2:54 pm Post subject: |
|
|
Don't worry about what the "purists" think - it's your car, and how you like it is what counts, like with wine. My oldest lives in your neck of the Valley.
Alert above: gal spotted in your man cave !!!
_________________
1970 VW (owned since 1972) and 1971 VW Convertible (owned since 1976), second owner of each. The '71 now has the 1835 engine, swapped from the '70. Second owner of each. 1988 Mazda B2200 truck, 1998 Frontier, 2014 Yukon, 2004 Frontier King Cab. All manual transmission except for the Yukon. http://www.thesamba.com/vw/forum/album_page.php?pic_id=335294 http://www.thesamba.com/vw/forum/album_page.php?pic_id=335297 |
|
| Back to top |
|
|
VWporscheGT3
Samba Member
Joined: September 01, 2006
Posts: 2076
Location: Gardnerville, NV
|
| Posted: Fri Jan 23, 2015 2:03 pm Post subject: |
|
|
Good looking little car before... the pan is a horror story but, looked like a fun car before... I guess as I get older my expectations get lower....and lower... and lower 
_________________
Schnell, SCHNELL!
I like being wrong, Because, it is another opportunity to learn. If you stop learning from your mistakes than what is the point?
If you have any questions about Forged ICON 4032 VW pistons just shoot me a line. |
|
| Back to top |
|
|
gt1953
Samba Member
Joined: May 08, 2002
Posts: 13848
Location: White Mountains Arizona
|
| Posted: Fri Jan 23, 2015 2:33 pm Post subject: |
|
|
And who says cars in Arizona are not rusted!!
The pan looks misserable.
_________________
Volkswagen: We tune what we drive.
Numbers Matching VW's are getting harder to find. Source out the most Stock vehicle and keep that way. You will be glad you did.
72 type 1
72 Squareback
({59 Euro bug, 62, 63, 67, 68, 69, 73 type ones 68 & 69 type two, 68 Ghia all sold}) |
|
| Back to top |
|
|
Cusser
Samba Member
Joined: October 02, 2006
Posts: 31379
Location: Hot Arizona
|
| Posted: Fri Jan 23, 2015 2:51 pm Post subject: |
|
|
| gt1953 wrote: |
And who says cars in Arizona are not rusted!!
The pan looks misserable. |
Gordon - no one says his bug lived its whole life here, yep, that pan is terrible (now).
_________________
1970 VW (owned since 1972) and 1971 VW Convertible (owned since 1976), second owner of each. The '71 now has the 1835 engine, swapped from the '70. Second owner of each. 1988 Mazda B2200 truck, 1998 Frontier, 2014 Yukon, 2004 Frontier King Cab. All manual transmission except for the Yukon. http://www.thesamba.com/vw/forum/album_page.php?pic_id=335294 http://www.thesamba.com/vw/forum/album_page.php?pic_id=335297 |
|
| Back to top |
|
|
JBong
Samba Member
Joined: February 24, 2012
Posts: 138
Location: Goodyear AZ
|
| Posted: Fri Mar 13, 2015 7:23 pm Post subject: |
|
|
Well its been awhile since I posted anything good about my restore,
Started working on my 70 stock steering wheel.
Finished Project
|
|
| Back to top |
|
|
JBong
Samba Member
Joined: February 24, 2012
Posts: 138
Location: Goodyear AZ
|
| Posted: Fri Mar 13, 2015 7:25 pm Post subject: |
|
|
Decided to color match the grills with the sterring wheel.
Turned out nice
Well this is before, I guess I didnt take a photo after the color match. I guess you will just have to believe me. |
|
| Back to top |
|
|
JBong
Samba Member
Joined: February 24, 2012
Posts: 138
Location: Goodyear AZ
|
| Posted: Fri Mar 13, 2015 7:45 pm Post subject: |
|
|
Pan Status
Got the old pans off and sent the tunnel to be blasted. Looks fricking awesome.
After the pans came in we did a dry test and they fit like a glove.
Well time to get the pans spot welded back on. I didnt trust myself with a welder I took then to a local VW guy to help me out. He cut me a deal if I was doing alot of the work.
Well both pans installed and seamed sealed.
|
|
| Back to top |
|
|
JBong
Samba Member
Joined: February 24, 2012
Posts: 138
Location: Goodyear AZ
|
| Posted: Fri Mar 13, 2015 7:49 pm Post subject: |
|
|
Well I got the chassis back home. Now its time to paint the primer on her to keep her from rusting back over.
|
|
| Back to top |
|
|
awreed
Samba Member

Joined: January 14, 2010
Posts: 1268
Location: Kirkland, WA
|
| Posted: Fri Mar 13, 2015 7:58 pm Post subject: |
|
|
Very nice. I have no problem with going with the older style look. Looks like you're going all out.
Why would anyone bondo the floor pans? That doesn't make any sense at all to me seeing as how they're really not that difficult to replace in the first place. It's a good thing you're keeping that baby alive.
My 70 was very straight and only required a mini restore. The only non stock items I opted for were the aluminum running boards and aluminum bumpers.
|
|
| Back to top |
|
|
JBong
Samba Member
Joined: February 24, 2012
Posts: 138
Location: Goodyear AZ
|
| Posted: Fri Mar 13, 2015 8:02 pm Post subject: |
|
|
| Looks like a clean 70! |
|
| Back to top |
|
|
|


