| Is it acceptable to install a solid headline in a westfalia pop top |
| Yes |
|
69% |
[ 16 ] |
| No |
|
13% |
[ 3 ] |
| Maybe |
|
17% |
[ 4 ] |
|
| Total Votes : 23 |
|
| Author |
Message |
Our79Westy
Samba Member
Joined: August 08, 2012
Posts: 97
Location: Bronson, FL

|
 Posted: Mon Mar 23, 2015 4:59 pm Post subject: Posted: Mon Mar 23, 2015 4:59 pm Post subject: |
 |
|
Thanks DaleNW, Too right!
I heard about that issue during my seal corner edge searches. I've been reading a lot of the threads and am considering consolidating them within this thread as maybe a one stop refurb shop as there are many ways to do it.
You're in here already, so there's only like 2 more to go right? lol. We'll see when I make said compilation.
anyone feel free to beat me to it? 
Thanks again DaleNW and to everyone who has or will contribute to this thread.
_________________
1979 Westfalia DELUXE 2.0 FI manual
Mexican beigeutiful and mostly original.
See the most up to date status of Constance on YouTube
https://m.youtube.com/channel/UCvO1ZedS22IepvvRYaTxiPQ
My 1979 Westfalia Campmobile's sundry Tales of Constance
http://www.thesamba.com/vw/forum/viewtopic.php?t=620965
1990 Vanagon, Red, Driven 70,000 miles till sold. |
|
| Back to top |
|
 |
Bala
Samba Member

Joined: December 04, 2003
Posts: 2613
Location: Austin, TX
|
| Posted: Tue Mar 24, 2015 8:18 am Post subject: |
|
|
Dale is right, get the bulb! At low speeds the non-bulb seal will be fine, but get on the highway and you'll get some noise. And I think it's nearly impossible to get the bulb seal in without removing the rack.
Also, while you have the luggage rack off glue some window screen on the underside of the drain holes. Anything you can do to keep debris out from under the rack is good.
_________________
1976 Westy
1966 Beetle |
|
| Back to top |
|
|
PITApan
Samba Member
Joined: November 09, 2014
Posts: 1058
Location: Northern Colorado
|
| Posted: Tue Mar 24, 2015 9:36 am Post subject: |
|
|
| I'm for leaving it off and putting a cargo basket in its place. That's a lot of plastic for not a lot of storage and baskets don't collect leaves. |
|
| Back to top |
|
|
Our79Westy
Samba Member
Joined: August 08, 2012
Posts: 97
Location: Bronson, FL
|
| Posted: Sat Mar 28, 2015 5:08 pm Post subject: Poptop refurb and shining process |
|
|
Hello again and thank you for following along in the refurbishment of my 1979 Campmobile's Pop-top.
Special Thanks to the contributors both past, present and future.
Hoody, Im not sure why you deleted your post and welcome your perspective and knowledge.
Bala, I saw (but cannot seem to find again) another Sambanite? glue garden hose screens in the holes of the luggage rack. These appeared to work great because said screens are tapered like a cone and have a rubber seal at the base to glue in place on the underside. I thought it looked neat how the little cones stuck out of the holes and then though of the things that I will eventually place in said rack. Any hard luggage like wood, cooler, etc. would appear to push or crush the screens and maybe dislodge them causing me to have to remove said luggage carrier rack in order to repair
not likely as the custom headliners and nonesuch may not yield to another entry
gracefully
i.e. without damage.
I like what you have done but have the same hesitation
because I camp and live in a wilderness my luggage rack and underneath collected the tree detritus shown here. My trees shed sticks, acorns, pinecones and stuff that may also poke through a screen mounted as such and cause the same dreaded fix.
Soo, it would appear the garden hose screens or equivalent sillycorned (reads as Silicone) into the drain holes from the TOP side would appear to be the best? Option? This way any future repair may be effected from above the vehicle with said luggage rack still installed. This is what I will research at the local hardware store
hmm I think I remember seeing stainless washing machine hose screens when I installed leaksafe hoses on the washer.
DaleNW et al., I am torn on the bulbed seal as many others have posted elsewhere. I dont want to reuse the 36 year old original seal as it is cracked and rusty. I read someone using a piece of folded rubber roof gasket slipped into the front seam and someone else using self-adhesive half inch weather-strip. I will look into this further as I am considering using something decorative like a chrome plated plastic strip or something
LEDs in clear tubing
hmmmm.
I understand the importance of allowing the water to drain, abatement of wind noise, etc. And am hoping there is enough adjustment to allow the luggage rack to seat tight against the roof. Worst case is I may have to elongate or redrill the holes in the mounting brackets? Honestly, Im not sure and dont want to have to buy another seal if it can be helped, I figured my supplier would(should) have known my needs for what was available at the time of my order.
| PITApan wrote: |
| I'm for leaving it off and putting a cargo basket in its place. That's a lot of plastic for not a lot of storage and baskets don't collect leaves. |
PITApan, this is an interesting concept. I just dont know how I would then seal the pop-top itself as the luggage rack forms the front part of the seal and primary air deflector. Hence the dreaded flat seal conundrum. If you have seen this done I would love to see it
I have been secretly wanting to put a moon roof in the area demarked by the inside of the luggage rack, but have not pursued it further at this juncture.
I looked through the Tech Tips section for pop-top and canvas and I felt I wanted as much as I could find on the various subjects of my project, i.e. the entire top of my Campmobile. What follows below is a collection of some of the threads on pop-top roof, canvas replacements, fiberglass refurbs, etc. that I referenced when working on my own. I would like to personally thank each of you for your time in posting your efforts. Your experiences and perspectives and photodocumentation helped me immeasurably. It seems no matter how many photos I take, invariably the one I need had not been taken before
pursuing action.
http://www.thesamba.com/vw/forum/viewtopic.php?t=471946&highlight=luggage+screen
http://www.thesamba.com/vw/forum/viewtopic.php?t=5...ole+screen
http://www.thesamba.com/vw/forum/viewtopic.php?t=58119&highlight=poptop+paint+canvas
http://www.thesamba.com/vw/forum/viewtopic.php?t=5...ight=paint
http://www.thesamba.com/vw/forum/viewtopic.php?t=298782&highlight=poptop+paint+canvas
http://www.thesamba.com/vw/forum/viewtopic.php?t=1...d3a6ee5fd9
http://www.thesamba.com/vw/forum/viewtopic.php?p=2920264&highlight=#2920264
http://www.thesamba.com/vw/forum/viewtopic.php?t=225829&highlight=poptop+paint+canvas
quote="MrBreeze"]Here is some info on restoring pop tops and replacing the canvas:
Search Results:
http://www.thesamba.com/vw/forum/viewtopic.php?t=58119&highlight=clean+poptop
http://www.thesamba.com/vw/forum/viewtopic.php?t=117573&highlight=poptop+clean
Fiberglass Pop Top Restoration
http://www.type2.com/library/camper/fiberpo.htm
Fiberglass Pop Top Painting
http://www.type2.com/library/camper/poppaint.htm
Canvas Searches:
http://www.thesamba.com/vw/forum/viewtopic.php?t=27292&highlight=canvas
http://www.thesamba.com/vw/forum/viewtopic.php?t=153906&highlight=canvas
http://www.thesamba.com/vw/forum/viewtopic.php?t=150766&highlight=canvas
http://www.thesamba.com/vw/forum/viewtopic.php?t=317107&highlight=poptop+seal+edge
http://www.thesamba.com/vw/forum/viewtopic.php?t=128100&highlight=poptop+seal+edge
http://www.thesamba.com/vw/forum/viewtopic.php?t=430613&highlight=poptop+corner
Ok, so I covered a lot of material above in the process of refurbing my pop-top. I have been working on replacing or repainting the various nuts and bolts that connect the Pop-top to the vehicle itself.
Further I have continued to work on polishing the hardware such as the H-bar, hinges, etc. Ive been using wet sandpaper of 800 followed by 1000 grit followed by 000 steel wool, Marine Cleaner Wax on a buffing wheel at 3600 RPM and finally Marine Polish by hand. I am ever pleased with the amount of shine that was hidden behind the years of oxidation and initial rough casting processes used during their manufacturing in 1978.
Can someone please help me figure out what was used to seal the penetrations of the 6 (six) carriage bolts that bolt the rear hinges to the fiberglass pop-top? It looks white, almost like plumbers putty.
Can someone please help me figure out what black sticky goo was used to seal the 6 (six) bolts that connect the rear hinges to the top of the vehicle itself. Again, I was thinking of using plumber putty instead.
Further, there are 4 carriage bolts that secure the luggage rack to the roof of the bus. These have rubber grommets that appear in great shape, however there did not appear to be any other type of sealant in these holes. I will replace said grommets, maybe using thinner ones (bicycle inner tube circles) in order to lower the gap from the new seal?
Question is whether I should also seal these (AS WELL AS ANY OTHER PENETRATIONS LIKE THE GRAB HANDLE mounting bolts, holddown latch plate, etc.) with plumbers putty or silicone or something in addition to the rubber gaskets. I say this because it appears the wooden headliner in the drivers compartment has had water damage in this area. You can see it in the picture as the blackened or darkened sections.
You will be able to see more pictures of the rest of the headliners in a future sundry Tale of Constance, once I catch up on that thread.
Till then, heres some pictures of the polishing process.
Once the hardware and nuts and bolts are ready, then the fitting process will begin and the thread will end? since it is directed towards refurbing the pop-top and installing a headliner on a solid substrate.
Thanks again for following along, your advice and thoughts and I will keep you posted as things progress.
_________________
1979 Westfalia DELUXE 2.0 FI manual
Mexican beigeutiful and mostly original.
See the most up to date status of Constance on YouTube
https://m.youtube.com/channel/UCvO1ZedS22IepvvRYaTxiPQ
My 1979 Westfalia Campmobile's sundry Tales of Constance
http://www.thesamba.com/vw/forum/viewtopic.php?t=620965
1990 Vanagon, Red, Driven 70,000 miles till sold. |
|
| Back to top |
|
|
khalimadeath
Samba Member
Joined: June 24, 2014
Posts: 768
Location: Reno, NV
|
| Posted: Sat Mar 28, 2015 6:38 pm Post subject: |
|
|
| I wonder if there is any point in doing this on an early bay pop top? |
|
| Back to top |
|
|
Our79Westy
Samba Member
Joined: August 08, 2012
Posts: 97
Location: Bronson, FL
|
| Posted: Sat Mar 28, 2015 8:08 pm Post subject: |
|
|
Depends, (they're not just absorbitant undergarments... lol)
I guess, it's a matter of what you want to do to your bus, how much do you want to do yourself and how much can you afford to have someone else do it.(their way based on your directions and guidance).
As stated in the beginning of this thread, I have a gentleman's agreement at an accredited restoration facility to ONLY RESTORE the outer surface of the fiberglass for $3000.00. I would have to deliver it to the autobody restoration establishment devoid of hardware and canvas and afterwards still have to deal with the INSIDE fiberglass as well as the flaking flocking.
I wish money were no option, but unfortunately i am not in the position to shell out the cash to have these things done by others...yet.
Further, most of the "professionals" that would even consider working on a 36 year old vehicle are hours away. (anyone please feel free to correct me on this) and will charge whatever is appropriate for the services rendered. Here in Virginia a "regular" mechanic charges $95 USD an hour. I've read threads discussing mechanic charges and agree that the experience and tools required to work on our busses is expensive. This being a vintage vehicle, I've had some mechanics say they wont touch it. "It's just a looker".
So it's a matter of choices, personal preferences and fundage.
I appreciate that thesamba provides perusers with options and guidance for a direction and plethera solutions to the real life problems experienced by our aging vehicles.
Thanks for the comment and I look forward to hopefully see how you ultimately solve your dilemma.
Best regards and best of luck.
_________________
1979 Westfalia DELUXE 2.0 FI manual
Mexican beigeutiful and mostly original.
See the most up to date status of Constance on YouTube
https://m.youtube.com/channel/UCvO1ZedS22IepvvRYaTxiPQ
My 1979 Westfalia Campmobile's sundry Tales of Constance
http://www.thesamba.com/vw/forum/viewtopic.php?t=620965
1990 Vanagon, Red, Driven 70,000 miles till sold. |
|
| Back to top |
|
|
khalimadeath
Samba Member
Joined: June 24, 2014
Posts: 768
Location: Reno, NV
|
| Posted: Sat Mar 28, 2015 8:42 pm Post subject: |
|
|
| Our79Westy wrote: |
Depends, (they're not just absorbitant undergarments... lol)
I guess, it's a matter of what you want to do to your bus, how much do you want to do yourself and how much can you afford to have someone else do it.(their way based on your directions and guidance).
As stated in the beginning of this thread, I have a gentleman's agreement at an accredited restoration facility to ONLY RESTORE the outer surface of the fiberglass for $3000.00. I would have to deliver it to the autobody restoration establishment devoid of hardware and canvas and afterwards still have to deal with the INSIDE fiberglass as well as the flaking flocking.
I wish money were no option, but unfortunately i am not in the position to shell out the cash to have these things done by others...yet.
Further, most of the "professionals" that would even consider working on a 36 year old vehicle are hours away. (anyone please feel free to correct me on this) and will charge whatever is appropriate for the services rendered. Here in Virginia a "regular" mechanic charges $95 USD an hour. I've read threads discussing mechanic charges and agree that the experience and tools required to work on our busses is expensive. This being a vintage vehicle, I've had some mechanics say they wont touch it. "It's just a looker".
So it's a matter of choices, personal preferences and fundage.
I appreciate that thesamba provides perusers with options and guidance for a direction and plethera solutions to the real life problems experienced by our aging vehicles.
Thanks for the comment and I look forward to hopefully see how you ultimately solve your dilemma.
Best regards and best of luck. |
Well I just meant in terms of the position of an early bay top being opposite of a late bay, and not sleeping directly under it. I havent camped in it yet and dont know if others have had issued with the early tops as they are at a different angle. |
|
| Back to top |
|
|
Ernie Punkin
Samba Member

Joined: August 31, 2014
Posts: 84
Location: Hawaii/B.C. Canada/Seattle
|
|
| Back to top |
|
|
Our79Westy
Samba Member
Joined: August 08, 2012
Posts: 97
Location: Bronson, FL
|
| Posted: Sun Mar 29, 2015 6:54 am Post subject: |
|
|
KALI, Thanks for the clarification and I wish I had an answer for you. I'm sure someone is willing to share their knowledge on your specific issue and I hope this thread can help as many Baysters as possible so please bring on the questions.
Earnie P, Thanks for the kind words and material selection options. I am assuming you want the size of the solid substrate glued to the poptop itself?
As for the panels, MY poptop inside measurement, from the corner where the wood embedded in the fiberglass poptop meets the roof itself was 96 (ninety six) inches long and 47.5 (forty seven and a half) inches wide...but remember (see pictures above) I didn't run it all the way to the front because of the mounting hardware clearance issues.
All the other "panels" are original bus parts that desperately needed headlining and starting from front to back are the:
driver compartment was 52.5 in. wide by 42 in. Long.
Hinged bed was 45.5 in. Wide and 24.5 in. Long.
fixed bed was 45.5 in. wide and 46 in. Long.
Rear hanging cabinet was 36 in. wide and 23 in. Long.
All 4 upper valences "plywood roof trim" (covering bus metal between the ceiling and wood grained curtain valences) are 44 5/8 in. Long and 4 inches wide with the 2 rear most panels expanding to 4.5 inches immediately approaching the rear of the bus.
Your solid substrate option looks great for some things/panels, however, minimum order is 4 panels ($46 USD) plus shipping. Further the maximum panel size is 39 by 65, therefor you would have a seam or seams somewhere that will show through your ultimate headliner material after install.
lesson learned, fill any imperfections, joints, seams and gaps before installing your headliner.
The fabric would look nice 4 sure and is definitely wide enough for the poptop itself. Another lesson learned. ..IF you are reheadlining your bus with a material that has a pattern, make sure the pattern runs in the right direction.
I rererereread section 1 of my Bently last night and unfortunately it doesn't cover Campmobiles 1974 and later (see section one, page 30, item 7. Campmobile equipment). Beyond stating to use new self locking nuts and not to squeeze the rubber spacers too hard I can't find a mention of sealing substances.
I hope someone can advise me with what they used as the sealant for the poptop penetrating hardware. Silly corn, Plumbers putty, rooftar?
Thanks again for your contributions, comments and advice.
_________________
1979 Westfalia DELUXE 2.0 FI manual
Mexican beigeutiful and mostly original.
See the most up to date status of Constance on YouTube
https://m.youtube.com/channel/UCvO1ZedS22IepvvRYaTxiPQ
My 1979 Westfalia Campmobile's sundry Tales of Constance
http://www.thesamba.com/vw/forum/viewtopic.php?t=620965
1990 Vanagon, Red, Driven 70,000 miles till sold. |
|
| Back to top |
|
|
Jjrady
Samba Member

Joined: March 09, 2013
Posts: 16
Location: El Segundo, CA
|
| Posted: Sun May 31, 2015 10:29 am Post subject: |
|
|
Our79Westy, curious what happened with your luggage rack seal situation? Did you use the bulb-less seal? Did it leak air at high speeds?
Gonna do a big ol refresh in a week or two so wanna make sure I have the right parts ready to go.
Thanks
Also, what did you use to top coat all that shiny hardware you so patiently polished?
_________________
79' (CA) Mexican beige Delux Westy |
|
| Back to top |
|
|
Our79Westy
Samba Member
Joined: August 08, 2012
Posts: 97
Location: Bronson, FL
|
| Posted: Wed Jun 17, 2015 4:15 pm Post subject: |
|
|
Sorry for the belated response.
Hey Jj, good luck on your refresh.
YES, bulbless and YES it leaks AIR at speed...but no noticible noise, merely canvas billowing inside, i.e. filling up with air. I don't drive in the rain...yet (needs wiper refresh) but I would expect water to follow the air.
I have a few fixes in mind that do NOT include changing the new seal, but HOT weather and other bus projects are keeping this particular problem/fix on hold. As a teaser I'm thinking LED lights in a clear tubing filling the gap between the rack and the roof and or redrilling the holes in the supports at a lower position than they were originally...thus "pulling" the luggage rack closer to the roof and eliminating the gap. I guess the ultimate fix has yet to be determined and posted.
As for the hardware I used the Attwoods Marine Polish pictured above as the final top coat on the aluminum. It's the same cleaner wax combo I used everywhere else on the bus (i.e. paint, chrome, etc.) as well. Seemed to work great and I am now just waiting for the test of time to see how it all holds up.
It's been 90 days and the parts are as shiny as the day I waxed them....except for a few spots that I just looked at as of this post and will comment on in a later post, might have just been dirty gloves, but I expect it to wipe off with the polish and be shiny again soon.
FYI I used "stainless" plumbers putty on all of the penetrations of the metal roof. I used it for ease of installation/removal, pliability, relative inertness and cleanliness.
Again, good luck and be patient with those screws that go in the corners of the canvas mounting strip as they are a bear to install. I had to leave my canvas installed and relaxing for 2 weeks before I could stretch it enough to finally get a screwdriver in there to seat the final front two corner screws.
_________________
1979 Westfalia DELUXE 2.0 FI manual
Mexican beigeutiful and mostly original.
See the most up to date status of Constance on YouTube
https://m.youtube.com/channel/UCvO1ZedS22IepvvRYaTxiPQ
My 1979 Westfalia Campmobile's sundry Tales of Constance
http://www.thesamba.com/vw/forum/viewtopic.php?t=620965
1990 Vanagon, Red, Driven 70,000 miles till sold. |
|
| Back to top |
|
|
Our79Westy
Samba Member
Joined: August 08, 2012
Posts: 97
Location: Bronson, FL
|
| Posted: Fri Oct 05, 2018 4:46 pm Post subject: Re: 1979 Pop top refurb w/ "solid" headliner install |
|
|
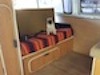
3 year update...
been camping a few times now, with the longest being 1 continuos week. weathered several rain storms and beating hot hot beach sun of kitty hawk north carolina...still very happy with the results over all,
heated power seat from an audi...bolted right in...kinda...but sits too high...might be able to drop further with extensive seat/seat rail modification.
dingles are cool
I'm still very happy with the fabrics working together
when the sewing store Hancock's went out of business we bought almost all their foam and bolts of fabric...the master bed is now 3 inches thick while the guest bed is a luxurious 4inches...
seems the contact glue may have separated, so I am considering using 1 inch bamboo cut in half as horizontal tension supports.
and while parked during a torrential downpour I noticed a drip coming off the black pull-down handle...gonna have to reseal my bolts...
thanks for your comments and advice aaaand happy restomodding!
_________________
1979 Westfalia DELUXE 2.0 FI manual
Mexican beigeutiful and mostly original.
See the most up to date status of Constance on YouTube
https://m.youtube.com/channel/UCvO1ZedS22IepvvRYaTxiPQ
My 1979 Westfalia Campmobile's sundry Tales of Constance
http://www.thesamba.com/vw/forum/viewtopic.php?t=620965
1990 Vanagon, Red, Driven 70,000 miles till sold. |
|
| Back to top |
|
|
|


