| Author |
Message |
NewTechnicIan
Samba Member

Joined: May 28, 2013
Posts: 367
Location: Burlington, VT

|
 Posted: Wed Apr 08, 2015 8:30 am Post subject: 1679 Engine Build - A First-Timer's Tale Posted: Wed Apr 08, 2015 8:30 am Post subject: 1679 Engine Build - A First-Timer's Tale |
 |
|
Hello all,
Figured I'd start a thread devoted to the work I'm doing on my engine. I've had all kinds of one-off questions that I've been throwing around and now that I'm starting to build it back up I figure I'll put all this in one place for Posterity, or at least so people know to avoid this thread if they don't want to see an amateur's attempts at a good job 
I'll put all my reference threads down below, but for now, here's the stats on my engine, as much as I can remember while I'm wasting time at work 
 Stock engine case from my 73 beetle. Dual relief Stock engine case from my 73 beetle. Dual relief
CB Maxi 2 oil pump - with oil filter mount on pump cover
Eagle 2231 cam, deburred (Mileage motor cam)
AA Performance 88mm Thick Wall pistons and cylinders
Aircooled.net L3 heads machined for thick wall pistons
HD single valve springs
Stock rockers
Swivel ball valve adjusters
Stock pushrods (Hoping that they work for the rocker geometry, not sure on new heads)
Stock crank (69 mm stroke)
Stock 200 mm flywheel, 4 dowel
Stock clutch and pressure plate
Stock connecting rods
Stock DVDA Distributor
34 PICT 3 Carb - rejetted to 55 idle and 125 main (to start)
Stock heater boxes
Streetster Hideaway header and muffler from CB Performance
What I'm looking for is a reliable engine that requires some care from me to build (but doesn't require my own machine shop!) and will not take too much constant care from me to run I'm hoping all these decisions make sense. Pictures and more to come!
_________________
My 73 Standard build - It's painted! It drives under its own power! Time to get it wired and upholstered!
My 1679 Engine build.
Last edited by NewTechnicIan on Tue Apr 21, 2015 9:27 am; edited 1 time in total |
|
| Back to top |
|
 |
NewTechnicIan
Samba Member
Joined: May 28, 2013
Posts: 367
Location: Burlington, VT
|
| Posted: Wed Apr 08, 2015 8:42 am Post subject: |
|
|
First thing's first, I had to do some work on my engine case to get it up to snuff. Cross posted from my build thread:
I realized that my oil sump was in pretty bad shape from corrosion and wanted to fix it. Found an old thread on the Engines forum and started asking questions. You can find it here but also copied below.
Posting for posterity here, but also to open myself up to criticism. I couldn't find anyone's process of JB welding their oil sump so I figure I'll post up what I did and hopefully I didn't ruin anything. Maybe I did 
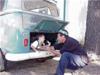
So here's the original corrosion:
I took the dremel to it with a wire brush and carbide bit:
Replaced my studs with M6 x 25 mm bolts to strengthen their hold in the case, then taped up the threads to make sure no JB weld would get through:
Taped my drain plate to prevent JB weld sticking to it and tightened the drain nuts:
What was left on my engine stand was a nice space to apply JB weld, which I did carefully and tried to get all the voids out of the space.
Applied JB:
Let dry 24 hours and took the drain plate off. Then used my oil change kit gasket as a boundary line to shoot for:
Had to repeat this about 4 times per side, every time I would scuff up the JB weld with a wire brush on my dremel to give it some more tooth to adhere to. Seems to have done a good job.
Finished results:
And it fits the oil screen in smoothly but relatively snug:
Since I'll be running an external filter to this system, I plan on sealing this area quite nicely and only touching it very rarely aside from draining the oil. In this way I'm hoping the JB weld won't have to be tested for all it's worth and my craftsmanship won't be called into question. 
Soo, for anyone else looking to do it, that was my way.
Thanks for watching!
Ian
_________________
My 73 Standard build - It's painted! It drives under its own power! Time to get it wired and upholstered!
My 1679 Engine build. |
|
| Back to top |
|
|
mark tucker
Samba Member

Joined: April 08, 2009
Posts: 23937
Location: SHALIMAR ,FLORIDA
|
| Posted: Wed Apr 08, 2015 8:53 am Post subject: |
|
|
| the issue I see with the jb "fix" is if you didnt get every bit of crosion out the jb will lock it in so it can spread under the jb and debonding the jb. I would of got a new case. or bored it way biger and made a biger plate. |
|
| Back to top |
|
|
NewTechnicIan
Samba Member
Joined: May 28, 2013
Posts: 367
Location: Burlington, VT
|
|
| Back to top |
|
|
LivinInnaVWBus
Samba Member

Joined: October 07, 2013
Posts: 968
|
| Posted: Wed Apr 08, 2015 5:59 pm Post subject: |
|
|
You're going to get flamed for this, certainly. But kudos for knowing this and having the balls to post it. Realistically, there are situations(especially with ACVW owners) where we NEED to make repairs but do not have the funds or time to do it correctly, leaving us with two options. Ride it till it blows, or put a band-aid on it and pray. I've done both, multiple times. With every engine I touch, I document the issues, the fixes and future potential issues on a note pad and put it in the glove box - this will give you an idea of the first place to look for problems if you need to diagnose an issue.
Admittedly, I cringed hard when I saw this post. Luckily, I've got the tools and parts to fix an issue like this easily myself however I understand most people do not.
When I tell you this, you may find comfort... but keep in mind this could be a false sense of comfort as well. I have previously successfully "repaired" pulling oil pump and cylinder head studs with JB weld by simply pulling the studs out, spraying brake cleaner in the holes, allowing it to dry and then filling the holes with 24 hour JB and installing the studs. I tightened them by hand and never bothered torquing... but it worked. I pulled apart the engine that I did the head stud on after a year or two of daily driving and I could barely get the head stud out to ship the case off the be machined. I wouldn't count on this being the case for most situations, but color me impressed. |
|
| Back to top |
|
|
howardvw 
Samba Member

Joined: December 15, 2003
Posts: 73
Location: mostly the web
|
| Posted: Thu Apr 09, 2015 6:11 am Post subject: |
|
|
hey ian, couple things- is the case cut yet? are those bolts threaded into the case? i wouldnt want 1 pushed in doing a simple oil change- if threaded reverse em.
whats the tolerances with jb weld, heat, swelling and vibrations might loosen it up over time.
kudos for great work and ideas though, ballsy for sure.
personally i would toss it. whats your engine code? AE?
ive seen an engine eaten away like this from a yellow bug a few years ago. |
|
| Back to top |
|
|
gt1953
Samba Member
Joined: May 08, 2002
Posts: 13848
Location: White Mountains Arizona
|
| Posted: Thu Apr 09, 2015 6:56 am Post subject: |
|
|
I like where you are going with this. Honestly if it were mine another case would have been my choice. Do look at the 2280 cheater cam grind.
_________________
Volkswagen: We tune what we drive.
Numbers Matching VW's are getting harder to find. Source out the most Stock vehicle and keep that way. You will be glad you did.
72 type 1
72 Squareback
({59 Euro bug, 62, 63, 67, 68, 69, 73 type ones 68 & 69 type two, 68 Ghia all sold}) |
|
| Back to top |
|
|
NewTechnicIan
Samba Member
Joined: May 28, 2013
Posts: 367
Location: Burlington, VT
|
| Posted: Thu Apr 09, 2015 9:01 am Post subject: |
|
|
LivinInnaVWBus, haha thanks for the flame warning. Yeah I know this build will not be the kind of engine porn that most of the epic 2+ liter engine builders post, but it says it right in the title that this is a first timer's build. I want to be clear with all I'm doing and where I'm making allowances for the fact that I don't have a sweet machine shop and $7000 budget. That said, I do want to do things right and if you look at the thread I linked to, the folks there thought it would be a reasonable fix. Keep in mind that this engine block won't be seeing the kind of abuse that a 2+ liter engine would also.
Howard VW, the bolts are threaded into the case to prevent pulling out on normal operation. I got that advice from the thread I linked to. My budget doesn't really allow for tossing the case and I think I can save it but I do realize the risk I'm taking.
gt1953, I thought about the cheater cam as well and maybe I just didn't do enough research but I decided on the 2228 because I'm looking for a really mild mileage motor at the end of this build, and top end power and even acceleration kind of take a backseat in my considerations. I'm a really mild driver, especially when I'll be taking this thing out more for cruising than for anything else. Maybe the Cheater cam is just as good but I want to try this out too.
Anyway, a little more history, checking, and build up. I filled out most of the engine blueprint sheet from the stickies once I got all the parts cleaned up.
(You can find it here: http://www.thesamba.com/vw/archives/info/Engine_Blueprint_Specifications_Worksheet.pdf)
I decided to take all the parts to a local engine builder to:
Get my crankshaft, conrods, and flywheel balanced
Have them get me a new set of con rod and main bearings
Install the #3 and #4 main bearings and the timing gears on the crankshaft so it was ready to build up on my own.
So I got the pieces home and started building up the crankshaft:
Started by checking that the con rod bearings they gave me were the right size using Plastigage:
Comparing to the standard tolerances they got the bearings right. I have to check my blueprint sheet but I think they were the first undersize, since they took a little metal off the journals to start.
Then I checked sideplay in each con-rod. All within spec:
I had to trust their judgement on the #3 and #4 main bearings since they were already on the crank when I got it from the machine shop but they had greased them and I felt a nice resistance from the grease but they had smooth operation and I checked the #2 split bearing with Plastigage with good results as well. No pictures unfortunately.
Everything checked out from the blueprinting worksheet so I put the crank together:
Squeaky clean inside and out:
Greased up:
Each con rod attached and torqued up with Blue Loctite:
Showing that I matched up the numbers on each split on the pistons, bump side up, each con-rod in its place as the machine shop balanced it:
I couldn't take any video but I tested the Wilson book's recommendation to let the con-rods fall simultaneously and got reasonably close results for resistance to falling. With that, the crank is ready for installation. Store until later.
_________________
My 73 Standard build - It's painted! It drives under its own power! Time to get it wired and upholstered!
My 1679 Engine build. |
|
| Back to top |
|
|
NewTechnicIan
Samba Member
Joined: May 28, 2013
Posts: 367
Location: Burlington, VT
|
| Posted: Thu Apr 09, 2015 9:27 am Post subject: |
|
|
Checking out my cam:
So I got my cam bearings from CB Performance. Even though I just want a nice mild engine, I also want it to be as resilient as possible so I went with double thrust bearings on the front of the cam.
There's some debate over whether to grind off the second bearing's tang or to file a gap in the case. I went with grinding the tang off.
Grind grind grind:
She fits!
Plastigaged the cam to make sure that my clearances were good:
All within spec. Even using the mallet-tapping method of trying to seat the shoulder bearings, there was still an interference fit with the cam shoulders so I had to take some sandpaper to them, but eventually I got the clearance I needed there to make sure the cam didn't "walk out" of the bearings when I rotated the crank backwards, as the Wilson book recommends.
Then I checked my oil pump against the front of the cam gear to make sure the body didn't interfere. I've heard that can happen. It cleared just fine for me.
Then I took a file to the cam lobes to make sure I didn't have any burrs. That metal is hard to file! I taped it up ahead of time to make sure I didn't scrape any bearing surfaces:
After shots. I didn't see any big issues but someone chime in if they do:
And that's just about it for the cam. I didn't really have the tools to check the degreeing on it, so there's some small risk of the grind being off. I think that might have to wait until mockup with the heads to really determine that.
_________________
My 73 Standard build - It's painted! It drives under its own power! Time to get it wired and upholstered!
My 1679 Engine build. |
|
| Back to top |
|
|
NewTechnicIan
Samba Member
Joined: May 28, 2013
Posts: 367
Location: Burlington, VT
|
| Posted: Thu Apr 09, 2015 10:25 am Post subject: |
|
|
So most of the short block is about ready to build up, now that I've gotten the blueprint sheet filled out and checked tolerances, fit, etc on the internals. I know that it's easiest to prep the distributor and drop it in to place with shims before I seal the case, so I moved on to prepping that.
I used a GREAT tutorial with a ton of pictures to rebuild my DVDA unit. you can find it here: http://www.thesamba.com/vw/forum/viewtopic.php?t=558307
Started with my dirty distributor:
Took off the old points and took out the retard platform:
Dirty bearing surface:
View of the dirt below:
The Circlip of doom. It SUUUCKS to get off. I broke 3 dentist hooks getting at it and when it finally happened it was my girlfriend who got it and there was this crazy spark. We thought it had FLOWN across the room. Thank god Carol was there, I have apparently no coordination nor good enough eyes to work on these things.
Then it came off and it was ready to clean:
Unfortunately I couldn't get the drive dog off with my tools so that's as far apart as the distributor came. The axial play tolerance is really small but I was trying to move the shaft up and down in the housing and it felt so secure that I'm not worried that there's excessive play.
Dizzy all apart in its areas:
Anyway, a ton of soap, water, carb cleaner, elbow grease, and mystery oil later, here's the buildup process.
Cleaned up base:
Got some new fiber washers of the correct size from Fastenal and doubled them up for Close-to-spec values to the original washers:
Lubed up the lobes:
Springs installed:
Cleaned retard/points platform:
Installed and with new points:
Vacuum can reinstalled:
Cap installed:
Ready to install:
I may in the end go back to a SVDA can because I think my Vac Retard side is broken on this vacuum can. The vacuum advance is still good though, so I'm ok with keeping it on for now. Also, I may replace my coil just to be safe. I have one sitting in my parts box that I haven't put on yet but I may do that.
_________________
My 73 Standard build - It's painted! It drives under its own power! Time to get it wired and upholstered!
My 1679 Engine build. |
|
| Back to top |
|
|
Marv [UK]
Samba Member

Joined: January 07, 2009
Posts: 2225
Location: UK
|
| Posted: Thu Apr 09, 2015 12:13 pm Post subject: |
|
|
Not wanting to piss on your chips, but if you'd taken the spring off the drive dog and driven the pin out with a drift, the whole assembly would have come out and you could have cleaned, polished and lubricated the drive shaft too.
Would have made the rest easier to access too
_________________
The opinion of the author as expressed does not always reflect that of the author nor does he extend any apologies or assume any liability or responsibility for its content or lack thereof or for any lack of humour of the reader of any content at all, anywhere, ever. The reader agrees to all risk by reading it and is advised that any issue is theirs alone as they chose to read it. |
|
| Back to top |
|
|
NewTechnicIan
Samba Member
Joined: May 28, 2013
Posts: 367
Location: Burlington, VT
|
|
| Back to top |
|
|
Marv [UK]
Samba Member
Joined: January 07, 2009
Posts: 2225
Location: UK
|
| Posted: Thu Apr 09, 2015 12:50 pm Post subject: |
|
|
| NewTechnicIan wrote: |
| Hi Marv, I know it would have been easier but I don't have a press and I swear I was whanging on that pin for 2 days and couldn't get it to move! I really didn't want to do it that way but this is what I get for renting my place and not having space or money for the good tools |
A 2lb hammer, $2 drift and 2 blocks of wood does it for me every time back yard is all you need
_________________
The opinion of the author as expressed does not always reflect that of the author nor does he extend any apologies or assume any liability or responsibility for its content or lack thereof or for any lack of humour of the reader of any content at all, anywhere, ever. The reader agrees to all risk by reading it and is advised that any issue is theirs alone as they chose to read it. |
|
| Back to top |
|
|
drumbum68
Samba Member

Joined: October 15, 2010
Posts: 566
|
| Posted: Thu Apr 09, 2015 2:07 pm Post subject: |
|
|
| Am I mistaken or did you use spray lithium grease for an assembly lube? |
|
| Back to top |
|
|
NewTechnicIan
Samba Member
Joined: May 28, 2013
Posts: 367
Location: Burlington, VT
|
|
| Back to top |
|
|
modok
Samba Member

Joined: October 30, 2009
Posts: 26781
Location: Colorado Springs
|
| Posted: Thu Apr 09, 2015 6:10 pm Post subject: |
|
|
Polish the cam thrust surface, it looks dark.
Corrections to the wilson book:
-white grease, change to "assembly lube or heavy oil"
-Torque for 8mm head studs, change to 18 ft-lb
-Grooved plunger is for single relief cases, dual relief engines cases normally do not have a grooved plunger. |
|
| Back to top |
|
|
NewTechnicIan
Samba Member
Joined: May 28, 2013
Posts: 367
Location: Burlington, VT
|
|
| Back to top |
|
|
modok
Samba Member
Joined: October 30, 2009
Posts: 26781
Location: Colorado Springs
|
| Posted: Thu Apr 09, 2015 6:43 pm Post subject: |
|
|
Yes, on the cam. They are supposed to mask that off all bearing surfaces when the cam is parkerized, but they don't, I don't know why.
You polish that and your cam bearing will be much happier! |
|
| Back to top |
|
|
Bret2094
Samba Member

Joined: March 22, 2012
Posts: 665
Location: Linden, Texas or College Station Texas
|
| Posted: Thu Apr 09, 2015 7:26 pm Post subject: |
|
|
Well shit....I tossed an engine case just like this one the first time I tried to build an engine...why didn't I think of that
Bret
_________________
1959 baja beetle ragtop( going back to Full body)
1959 beetle
1960 Beetle frame Custom buggy
1962 Karmann Ghia
1967 beetle( august 66, first car)
1967 beetle (parts car)
1977 Westfalia Camper
1972 Plymouth Duster
Just another 22 year old jackass who caught the bug, and lives by the motto " NO fatchicks allowed" , I've got too many cars as is (buses N/A) |
|
| Back to top |
|
|
GraysonM
Samba Member
Joined: July 17, 2013
Posts: 98
Location: United States
|
| Posted: Thu Apr 09, 2015 7:28 pm Post subject: |
|
|
Enjoying this one! Keep up the good work!
Have you thought about a higher performance carb set up to take advantage of the heads and cam? I'll bet a single 40mm weber would do well on top of all this! |
|
| Back to top |
|
|
|


