| Author |
Message |
bugsgaragevw
Samba Member
Joined: April 23, 2015
Posts: 9
Location: Brazil

|
 Posted: Thu Apr 23, 2015 9:34 pm Post subject: Porsche 550 Spyder - Replic - 1600 Etanol and fuel injection Posted: Thu Apr 23, 2015 9:34 pm Post subject: Porsche 550 Spyder - Replic - 1600 Etanol and fuel injection |
 |
|
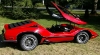
Hi guys, my name is Fabio and I am from Brazil.
I am opening this topic to share information about the rebuild of one replic of Pirsche Spyder that I bought and to receive ideas to how do it well.
I will start putting some pictures here since the day that I rescue the car until now showing my progress in the project.
Feel free to give ideas, tips and send pictures for a good known Spyders replics.
|
|
| Back to top |
|
 |
bugsgaragevw
Samba Member
Joined: April 23, 2015
Posts: 9
Location: Brazil
|
| Posted: Fri Apr 24, 2015 12:54 pm Post subject: More Pictures |
|
|
I had to totally disasemble the vehicle. Some parts were not fitted correctly and the colors was not exactly as I like. |
|
| Back to top |
|
|
Dale M.
Samba Member

Joined: April 12, 2006
Posts: 20380
Location: Just a tiny bit west of Yosemite Valley
|
| Posted: Fri Apr 24, 2015 1:39 pm Post subject: |
|
|
Some times somebody elses builds do not quit meet expectations, you will be happier when its done.... Looking forward to completed build...
Dale
_________________
Fear The Government That Wants To Take Your Guns" - Thomas Jefferson.
"Kellison Sand Piper Roadster" For Street & Show.
"Joe Pody Sandrover" Buggy with 2180 for Autocross (Sold)
============================================================
All suggestions and advice are purely my own opinion. You are free to ignore them if you wish ... |
|
| Back to top |
|
|
jspbtown
Samba Member
Joined: January 27, 2004
Posts: 5157
|
| Posted: Fri Apr 24, 2015 4:00 pm Post subject: |
|
|
| I wish my projects started out that way! |
|
| Back to top |
|
|
wythac
Samba Member

Joined: August 02, 2004
Posts: 2791
|
| Posted: Fri Apr 24, 2015 10:39 pm Post subject: |
|
|
| Very nice looking kit. Look forward to seeing your progress. |
|
| Back to top |
|
|
bugsgaragevw
Samba Member
Joined: April 23, 2015
Posts: 9
Location: Brazil
|
|
| Back to top |
|
|
bugsgaragevw
Samba Member
Joined: April 23, 2015
Posts: 9
Location: Brazil
|
| Posted: Mon Apr 27, 2015 9:59 am Post subject: Updates |
|
|
So guys, I will give you some updates and tips about the parts that i replaced/changed
The first thing is that after I finish to clean all the engine case, I decided to paint it in a black colour and all others stuffs also. The colour used was vinylic matte black that it is one colour temperature resistent.
Other cool thing that I made was replace the valve covers, front pulleys, and adjustable pushrod tube
Another good tip it is replace all Nuts to Parlock Nuts, the visual stays good and they are made of stainless steel so it does not rust.
|
|
| Back to top |
|
|
wythac
Samba Member
Joined: August 02, 2004
Posts: 2791
|
| Posted: Mon Apr 27, 2015 11:16 am Post subject: |
|
|
Not a good idea to paint a case, but its not uncommon to see that. Less of a good idea to paint cooling fins on the cylinders. Black absorbs heat. The idea of cooling fins is to radiate it, and coating them with paint essentially adds a layer of insulation.
Good thing is that the paint should cook off pretty quickly. It may smoke like crazy and stink a bit during that process, but it probably won't catch fire. |
|
| Back to top |
|
|
bugsgaragevw
Samba Member
Joined: April 23, 2015
Posts: 9
Location: Brazil
|
| Posted: Mon Apr 27, 2015 5:53 pm Post subject: |
|
|
Probably you are right about the cooling fins on the cylinders. But I already started the engine with a simple carburator, just to check the engine and this smoke for a time and after that stopped to smoke....
I will post soon the video of the engine... |
|
| Back to top |
|
|
andygere
Samba Member

Joined: January 31, 2014
Posts: 600
Location: Central Coast, CA
|
| Posted: Mon Apr 27, 2015 6:54 pm Post subject: |
|
|
| Fabio, that is one cool looking car, and nice detailed photos on your build. |
|
| Back to top |
|
|
bugsgaragevw
Samba Member
Joined: April 23, 2015
Posts: 9
Location: Brazil
|
| Posted: Sun May 03, 2015 4:25 pm Post subject: Porsche Spyder updates - Few |
|
|
Hi guys,
Often we work hard in our cars and didn´t achieve our Project goals...
a screw that does not loose...
spare part that you discover that you don´t have when you are assembling something and all spares stores are already closed etc...
So, let start the updates...
You can see in the link bellow the first engine start.
I started with a single carburator just to check the engine life and now I am assembling the fuel injection system.
https://www.youtube.com/watch?v=Mh4x7Y9uv5o
1- I removed the shock absorber mounts because in my car the shock absobers are not fitted there.
2- Dual inlet manifold fitted
3- Engine and transmission finally together / all other engine stuffs
That´s it... I hope you like the updates... one more Picture that you can see my next Project in the background
-> Fábio Purgailis |
|
| Back to top |
|
|
wythac
Samba Member
Joined: August 02, 2004
Posts: 2791
|
| Posted: Mon May 04, 2015 11:20 am Post subject: |
|
|
| Very nice. Moving right along. Great also to see another poster from the Southern Hemisphere...lots of great cars down there we don't see much of. |
|
| Back to top |
|
|
bugsgaragevw
Samba Member
Joined: April 23, 2015
Posts: 9
Location: Brazil
|
| Posted: Mon May 04, 2015 5:19 pm Post subject: |
|
|
| wythac wrote: |
| Very nice. Moving right along. Great also to see another poster from the Southern Hemisphere...lots of great cars down there we don't see much of. |
Yeah, we have a lot of good beetles and bugs here...
I´m a boxer lover and I started to try share my project with all people that could be interest on it and I think that the Samba forun is the best to do it.
Just to you guys know, I have another 2 beetles and now a Karmann Ghia that will be my next project.
|
|
| Back to top |
|
|
BL3Manx
Samba Member
Joined: August 29, 2006
Posts: 6767
Location: Northern California
|
| Posted: Tue May 05, 2015 7:34 am Post subject: |
|
|
| wythac wrote: |
Not a good idea to paint a case, but its not uncommon to see that. Less of a good idea to paint cooling fins on the cylinders. Black absorbs heat. The idea of cooling fins is to radiate it, and coating them with paint essentially adds a layer of insulation.
Good thing is that the paint should cook off pretty quickly. It may smoke like crazy and stink a bit during that process, but it probably won't catch fire. |
Black actually radiates heat better than raw magnesium or iron. Yes a paint can also insulate, but a very thin layer of flat black can improve heat radiation. Optimum is black anodizing on things like sumps or rocker covers.
https://www.physicsforums.com/threads/black-body-radiator-vs-painted-surface.694536/ |
|
| Back to top |
|
|
wythac
Samba Member
Joined: August 02, 2004
Posts: 2791
|
| Posted: Tue May 05, 2015 10:58 pm Post subject: |
|
|
BL3Manx, we will have to agree to disagree. I read the link which seems to be inconclusive. I think putting a coating of any kind on cooling fins increases insulation and therefore reduces cooling.
Gene Berg (the man, not the website) told me years ago as a teenage gearhead not to paint cylinder fins and not to use chrome engine tin because it was reflective.
Yet, I've ridden several air cooled motorcycles into the ground over the years that had black painted cooling fins. Who knows? I get well over 100k out of a set of P/L's, so I think I'll keep running my fins "naked". As often as I might have a motor out and apart for other reasons, ring wear and cylinder warping have never been an issue, which might actually support the idea that it doesnt hurt to paint fins....they have cooling to spare. |
|
| Back to top |
|
|
Meco
Samba Member

Joined: January 09, 2009
Posts: 148
Location: Chula Vista, CA
|
| Posted: Wed May 06, 2015 2:15 pm Post subject: |
|
|
| Gene Berg also liked the black painted factory stamped valve covers. Because they radiate heat better. I'm not understanding how black engine tin helps radiate heat, but black cylinder fins prevent heat from escaping. |
|
| Back to top |
|
|
wythac
Samba Member
Joined: August 02, 2004
Posts: 2791
|
| Posted: Wed May 06, 2015 3:58 pm Post subject: |
|
|
| Has more to do with the material used (thin metal for the black stock ones, and usually cast aluminum for the others). I will defer any further debate to another thread on another forum, and return this one to the guy with the sweet yellow 550 kit. |
|
| Back to top |
|
|
Letterman7
Samba Member
Joined: March 14, 2004
Posts: 3198
Location: Downingtown, PA
|
| Posted: Wed May 06, 2015 6:24 pm Post subject: |
|
|
| I think my brain just imploded a little from reading through BL3's link.... |
|
| Back to top |
|
|
bugsgaragevw
Samba Member
Joined: April 23, 2015
Posts: 9
Location: Brazil
|
| Posted: Sun Jun 07, 2015 6:07 pm Post subject: I am back... project updates |
|
|
Hi guys, today I am sharing with you the recently updates.
I hope this car be finished in 2 months!
It was necessary to reinforce the front suspension...
When I bought this vehicle, it was with the suspension to low and after some checks I found that the last owner cut the front chassi fixing to do something that I have no idea and the chassi was only supported bu the fiber glass...
Firstly, I had to put the car on top of a well-reinforced wood table to than have space to weld well... it took time and a help from 3 friends...
The place to be reinforced
Spyder on the heights Lol Lol
Square tube properly cutted
Hard work being done!!
Welding points revised in rear suspension to then finally receive the chassi paint
That´s all Folks! |
|
| Back to top |
|
|
didget69
Samba Member
Joined: July 22, 2004
Posts: 4927
Location: Raleigh, North Carolina
|
| Posted: Tue Jun 09, 2015 6:40 am Post subject: |
|
|
Nice work so far - one recommendation would be to replace the red urethane mounts & use stock VW factory style trans mounts instead.
bnc
_________________
I never found the need to impress people with any mechanic certifications, trophies or track wins... unless it was for Mom to post on the refrigerator door. |
|
| Back to top |
|
|
|


