| Author |
Message |
sjbartnik
Samba Member
Joined: September 01, 2011
Posts: 5998
Location: Brooklyn

|
 Posted: Fri May 22, 2015 7:07 am Post subject: Posted: Fri May 22, 2015 7:07 am Post subject: |
 |
|
| t3kg wrote: |
Can't see how Bentley would be more authoritative than Volkswagen.  |
Volkswagen wrote the manual. Bentley just published it in the U.S. 
_________________
1965 Volkswagen 1500 Variant S
2000 Kawasaki W650 |
|
| Back to top |
|
 |
sjbartnik
Samba Member
Joined: September 01, 2011
Posts: 5998
Location: Brooklyn
|
| Posted: Fri May 22, 2015 7:31 am Post subject: |
|
|
Yesterday my light bulb kit from Wolfsburg West came in so I got the fuel gauge light replaced and working.
Getting much better at removing/installing that black plastic bulb holder on the back of the fuel gauge. 
For reasons unknown Keith had switched around the positions of the headlight and wiper switches which was making it hard to drop the fuse box as there wasn't a lot of slack in the wiring with the headlight switch in the far left position. So I took the opportunity to switch those back around to where they're supposed to be. Gives me more room to drop the fuse box anyway.
Keith was also having issues with the washer system leaking into the car from the switch when pressurized so he had deactivated it. So I picked up an NOS switch from the classifieds in the hope that the internal seals would still be good (a bit of a long shot). When replacing the switch I did note that the washer hose ends that connect to the switch were a little iffy so I cut a bit off the ends to where I got to good hose. Haven't tried to pressurize it yet but fingers crossed I'll have a working washer soon.
Spent some time chasing my tail on a "problem" that I don't think is really a problem after all; thought I had done something last time I had the bulb holder out to disable the high beam indicator light so I went through a bunch of steps last night trying to get it to work, replaced bulb, bulb holder was a little loose so tightened it up, finally realized it was glowing but just really really dim compared to the other lights. So WTF I got the meter out, checked out the resistance between the bulb socket ground and chassis ground, all good and comparable to the other sockets whose bulbs were glowing brightly.
Then I got my flashlight out and shined it through the back of the fuel gauge itself to verify the lenses, turns out the blue high beam lens is quite a bit darker than the other 3 - the light shines through brightest for the oil and gen lights, little bit less for the parking lights light and the high beam light is noticeably dimmer.
Then I checked power supply to the bulb, the feed wire is just crimped into the connector at the fusebox that runs off to one of the high beam bulbs and then it's a direct short hop up to the back of the bulb holder. Crimp was good, clean tight connectors on both ends, so I'm scratching my head. Put the meter on it and realized that when I activate high beam I'm reading 4.5V at the high beam wire at fusebox. Then I kind of had a duh moment, in that I'm doing this with the engine off so working strictly off the battery. When I activate high beams directly off the battery with the generator not running the load drops the battery voltage down to 4.5 or so, so OF COURSE the light is gonna be dim (battery voltage was 6.2 with no load but by this time I had been dicking around for a couple hours so I probably drained it a little bit). So at this point I just put it all back together and figured I'll try it out with the engine running and generator charging to really verify the brightness of the high beam light. Then I called myself a dumbass.
Good news for all you 6-volters, I ordered bulbs from Wolfsburg West so I'd have spares of everything. On their site they advertise the brake/turn signal bulbs as 6V/18W and the photos on the site show Osram but when I got the bulbs they were all Flosser 6V/21W. Nice! So assuming all connections are in good shape these should be as bright as regular standard 12V/21W bulbs. I decided to put these bulbs in immediately and keep the existing Philips 6V/18W ones that were in the car as spares.
The dual filament park/turn signal bulbs for the front were also Flosser 5W/21W.
_________________
1965 Volkswagen 1500 Variant S
2000 Kawasaki W650 |
|
| Back to top |
|
|
sjbartnik
Samba Member
Joined: September 01, 2011
Posts: 5998
Location: Brooklyn
|
| Posted: Fri May 22, 2015 7:52 am Post subject: |
|
|
Anybody else think they hear a bit of an exhaust leak in this vid? Or am I just being a hypochondriac?
Link
_________________
1965 Volkswagen 1500 Variant S
2000 Kawasaki W650 |
|
| Back to top |
|
|
t3kg
Samba Member
Joined: June 14, 2006
Posts: 2712
Location: Los Angeles
|
|
| Back to top |
|
|
t3kg
Samba Member
Joined: June 14, 2006
Posts: 2712
Location: Los Angeles
|
|
| Back to top |
|
|
Erik G
Samba Member
Joined: October 16, 2002
Posts: 13281
Location: Tejas!
|
| Posted: Fri May 22, 2015 8:36 am Post subject: |
|
|
| t3kg wrote: |
| sjbartnik wrote: |
| Anybody else think they hear a bit of an exhaust leak in this vid? Or am I just being a hypochondriac? |
I think you may have a slight leak. I'd check all the connections and listen/look carefully to see if you can locate a source. |
yep. sounds before the muffler to me, so check the connections at the head
_________________
Stop dead photo links! Post your photos to The Samba Gallery! |
|
| Back to top |
|
|
sjbartnik
Samba Member
Joined: September 01, 2011
Posts: 5998
Location: Brooklyn
|
| Posted: Fri May 22, 2015 8:38 am Post subject: |
|
|
Thanks guys, I'll check 'em out. I feel like my most likely candidates are the two lower joints of the muffler to heat exchangers.
_________________
1965 Volkswagen 1500 Variant S
2000 Kawasaki W650 |
|
| Back to top |
|
|
t3kg
Samba Member
Joined: June 14, 2006
Posts: 2712
Location: Los Angeles
|
|
| Back to top |
|
|
sjbartnik
Samba Member
Joined: September 01, 2011
Posts: 5998
Location: Brooklyn
|
| Posted: Fri May 22, 2015 1:57 pm Post subject: |
|
|
Woohoo look what showed up in the mail today!
Handy dandy VW service wrench by Elora, 17mm hex on one end (for the transaxle) and 21mm box end on the other for the generator pulley nut. Apparently this has been discontinued by Elora and there are "limited" supplies remaining so let me know if you want to grab one and want to know where I got it.
_________________
1965 Volkswagen 1500 Variant S
2000 Kawasaki W650
Last edited by sjbartnik on Sat May 23, 2015 7:57 pm; edited 1 time in total |
|
| Back to top |
|
|
sjbartnik
Samba Member
Joined: September 01, 2011
Posts: 5998
Location: Brooklyn
|
| Posted: Fri May 22, 2015 8:58 pm Post subject: |
|
|
Today I filled up the washer tank and crossed my fingers while I pressurized it at the local gas station. It works! and it's not dribbling on the floor inside the car either.
Put the new horn on today, I got it from Wolfsburg West, nothing fancy, just a disc horn but it's a Flosser Italian-made compared to the one that was on it, which I think was the CIP1 cheapie. Definitely louder now which will be helpful though it still has the meep sound.
Despite my long-winded rant about the high beam indicator light, it turns out to be a problem after all. It is lighting but it's extremely dim - you really have to be completely in the dark to see that it's lighting up. The high beam light that it feeds off of works fine so I'm going to have to get the meter out again and do some more serious troubleshooting.
_________________
1965 Volkswagen 1500 Variant S
2000 Kawasaki W650 |
|
| Back to top |
|
|
t3kg
Samba Member
Joined: June 14, 2006
Posts: 2712
Location: Los Angeles
|
|
| Back to top |
|
|
sjbartnik
Samba Member
Joined: September 01, 2011
Posts: 5998
Location: Brooklyn
|
| Posted: Sat May 23, 2015 6:26 am Post subject: |
|
|
Thanks for that, I'll give it a look. I seem to recall when I looked at the car at Keith's before buying that the indicator worked and he backs that up when I asked him about it. I think it stopped working after the first time I pulled the bulb holder off to inspect what was going on with the fuel gauge lamp (only to find it was a burned out bulb). But electrically I don't know what I could have done to it; the bulb socket is tight, the wire that provides power to the light is tight, two different good bulbs, same result.
I did note, as the article says, that the lens for the high beam indicator is noticeably dimmer when I put a flashlight up to the back compared to the others but I don't understand why it should suddenly get dimmer if the blue tape is the culprit. I will definitely add that though to my troubleshooting process.
_________________
1965 Volkswagen 1500 Variant S
2000 Kawasaki W650 |
|
| Back to top |
|
|
ataraxia
Samba Member

Joined: March 19, 2010
Posts: 4504
Location: Illinois
|
| Posted: Sat May 23, 2015 7:01 am Post subject: |
|
|
When my 64 was still 6 volt, I bought LEDs for the dash lights because I didn't think any of the bulbs were all that bright. The blue film isn't an issue for the LED bulbs and I like the idea of not having to replace bulbs all that often - especially when they're in an undesirable location.
http://auto-hub.com/type-3/
Not that you'll want to pull that gauge cluster out again...  |
|
| Back to top |
|
|
Erik G
Samba Member
Joined: October 16, 2002
Posts: 13281
Location: Tejas!
|
| Posted: Sat May 23, 2015 8:56 am Post subject: |
|
|
| ataraxia wrote: |
When my 64 was still 6 volt, I bought LEDs for the dash lights because I didn't think any of the bulbs were all that bright. The blue film isn't an issue for the LED bulbs and I like the idea of not having to replace bulbs all that often - especially when they're in an undesirable location.
http://auto-hub.com/type-3/
Not that you'll want to pull that gauge cluster out again... |
do the illumination lights dim?
_________________
Stop dead photo links! Post your photos to The Samba Gallery! |
|
| Back to top |
|
|
sjbartnik
Samba Member
Joined: September 01, 2011
Posts: 5998
Location: Brooklyn
|
| Posted: Sat May 23, 2015 4:55 pm Post subject: |
|
|
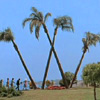
The Square goes to brunch in Vinegar Hill:
_________________
1965 Volkswagen 1500 Variant S
2000 Kawasaki W650 |
|
| Back to top |
|
|
sjbartnik
Samba Member
Joined: September 01, 2011
Posts: 5998
Location: Brooklyn
|
| Posted: Sun May 24, 2015 9:08 pm Post subject: |
|
|
Today's project was to see if I could fix the pulling right under braking condition that was happening with the front brakes.
I found a couple sets of re-lined front shoes in the Samba classifieds so I picked those up and they arrived the other day.
Pulled the drums off today, no obvious issues. The only weirdness was on the right side (the side it was pulling toward). The rearmost wheel cylinder had a lot of brake dust stuck to it and it was even a bit wet, almost like a paste. I thought maybe the wheel cylinder was leaking but I pulled the seal up to have a look and it was dry with no evidence of leakage.
Here's what I found:
The shoes on both sides looked good, no signs of contamination or anything. On both sides though they did have this groove in the middle:
The new shoes didn't have a groove in the center. Hit everything with some brake cleaner; re-assembled the adjusters with anti-seize, and put it all back together:
The initial adjustment was a comedy of errors as I would adjust the shoes out until the drums were binding, then go pump the brakes and they'd all be loose again. Did this a few times until I finally got the adjustment dialed in.
The verdict? It stops straight as an arrow now! Must have been an issue with the old shoes.
_________________
1965 Volkswagen 1500 Variant S
2000 Kawasaki W650 |
|
| Back to top |
|
|
ataraxia
Samba Member
Joined: March 19, 2010
Posts: 4504
Location: Illinois
|
| Posted: Mon May 25, 2015 6:23 am Post subject: |
|
|
I always figured that the cylinder with the most crud was the shoe doing the most work...which would explain your issue in some regard.
Good to hear the fix was simple. |
|
| Back to top |
|
|
sjbartnik
Samba Member
Joined: September 01, 2011
Posts: 5998
Location: Brooklyn
|
| Posted: Mon May 25, 2015 7:44 am Post subject: |
|
|
| ataraxia wrote: |
I always figured that the cylinder with the most crud was the shoe doing the most work...which would explain your issue in some regard.
Good to hear the fix was simple. |
True, there was a lot more brake dust in general inside that drum. I just don't know what the deal was with those shoes as they were the same side-to-side and no obvious issues. But whatever, it works now.
_________________
1965 Volkswagen 1500 Variant S
2000 Kawasaki W650 |
|
| Back to top |
|
|
sjbartnik
Samba Member
Joined: September 01, 2011
Posts: 5998
Location: Brooklyn
|
| Posted: Mon May 25, 2015 8:07 am Post subject: Installing Reverse Lights - Help Needed |
|
|
I picked up one of those NOS Bosch reverse light kits, with the switch that mounts on the transaxle's nose cone and the operating lever that mounts on the shift rod. I tried to install this yesterday but I got hung up on step 1.
To power the switch, you run a wire from the fuse box down under the edge of the mat and then through the rear kick panel with the brake line into the under-rear-seat area. Then the instructions say to pass the wire through the grommet with the brake line and this is somehow supposed to get the wire into the tunnel so you can get power to the switch at the shift rod coupler.
Well, as far as I can tell, the brake line doesn't go into the tunnel at all, it seems to run from the under-seat area through its own passage and comes out under the car pretty far to the left of the tunnel where there's a T connection for the hard lines to the left and right wheels. I tried feeding the wire through there but no luck.
So what am I missing? Can you in fact get the wire into the tunnel from the hole for the brake hard line? Is there another way to get the wire into the tunnel short of drilling a hole? Is there another route I can take to get the wire into the tunnel?
I looked at the voltage regulator wiring but it looks like it goes through a harness between the inner and outer fenders so that's not gonna work. I also looked at the main battery cable but Keith had replaced that with a gigantic welding cable (no starting issues here!) so I don't think I could physically fit this little wire through the grommet with it.
The instruction sheet was in German but I ran it through Google Translate which seemed to do a pretty good job. The relevant portions:
2) Connect the black wire from the harness to fuse No. 1 (terminal 15) with plug distributor. Cable installation (see Figure 4) downwards, under the mats edge to the rear and front of the partition wall to the center of the frame tunnel. Remove the rear seat and pull cable along the brake pipe through the partition.
3) From the vehicle underside of the lid frame tunnel Unscrew, pull out the black wire end and connect to the reversing light switch.
Any assistance would be greatly appreciated. I abandoned this project yesterday when it was late and it became clear that I was missing something.
_________________
1965 Volkswagen 1500 Variant S
2000 Kawasaki W650 |
|
| Back to top |
|
|
Bobnotch
Samba Member

Joined: July 06, 2003
Posts: 22431
Location: Kimball, Mi
|
| Posted: Mon May 25, 2015 8:59 am Post subject: Re: Installing Reverse Lights - Help Needed |
|
|
| sjbartnik wrote: |
I picked up one of those NOS Bosch reverse light kits, with the switch that mounts on the transaxle's nose cone and the operating lever that mounts on the shift rod. I tried to install this yesterday but I got hung up on step 1.
To power the switch, you run a wire from the fuse box down under the edge of the mat and then through the rear kick panel with the brake line into the under-rear-seat area. Then the instructions say to pass the wire through the grommet with the brake line and this is somehow supposed to get the wire into the tunnel so you can get power to the switch at the shift rod coupler.
Well, as far as I can tell, the brake line doesn't go into the tunnel at all, it seems to run from the under-seat area through its own passage and comes out under the car pretty far to the left of the tunnel where there's a T connection for the hard lines to the left and right wheels. I tried feeding the wire through there but no luck.
So what am I missing? Can you in fact get the wire into the tunnel from the hole for the brake hard line? Is there another way to get the wire into the tunnel short of drilling a hole? Is there another route I can take to get the wire into the tunnel?
I looked at the voltage regulator wiring but it looks like it goes through a harness between the inner and outer fenders so that's not gonna work. I also looked at the main battery cable but Keith had replaced that with a gigantic welding cable (no starting issues here!) so I don't think I could physically fit this little wire through the grommet with it.
The instruction sheet was in German but I ran it through Google Translate which seemed to do a pretty good job. The relevant portions:
2) Connect the black wire from the harness to fuse No. 1 (terminal 15) with plug distributor. Cable installation (see Figure 4) downwards, under the mats edge to the rear and front of the partition wall to the center of the frame tunnel. Remove the rear seat and pull cable along the brake pipe through the partition.
3) From the vehicle underside of the lid frame tunnel Unscrew, pull out the black wire end and connect to the reversing light switch.
Any assistance would be greatly appreciated. I abandoned this project yesterday when it was late and it became clear that I was missing something. |
Without drilling a hole, you won't get inside the tunnel.
On another thought, why couldn't you pull power from the coil + wire (#15) like the late models do? Then you really wouldn't have to do any drilling of the tunnel (an possibly hit a fuel line).
_________________
Bob 65 Notch S with Sunroof
71 Notch ...aka Krunchy; build pics here;
http://www.thesamba.com/vw/forum/viewtopic.php?t=249390 -been busy working
64 T-34 Ghia...aka Wolfie, under construction... http://www.thesamba.com/vw/forum/viewtopic.php?t=412120
| Tram wrote: |
| "Friends are God's way of apologizing for relatives." |
| Tram wrote: |
| People keep confusing "restored" and "restroyed". |
|
|
| Back to top |
|
|
|


